Tutorial on Creating Photo Galleries in Lightroom 2
In my review on Adobe Photoshop Lightroom 2, I stated I would write a short tutorial on the basics of using the Web module to put up a photo gallery. In the review, I give a few examples. Below are examples of three types of galleries I put up on my website using Lightroom 2.
http://www.perpetualvisions.com/new-articles\review-lightroom2\webs\index.html
http://www.perpetualvisions.com/lightroomuploads/index.html
http://www.perpetualvisions.com/new-articles\review-lightroom2\webs2\index.html
For each type of website, the information requested is a little different. The example I am using is from the Airtight AutoViewer. Basically, the information that is important is the same.
Once you choose the pictures you want to be in the gallery, choose the type of Engine which is on the right group of panels. Then, choose a template from a Preset which is a panel on the left. The rest is automatically taken care of by the choices that you will make using the right panels. Below are the right panels, which are one long group in Lightroom 2.
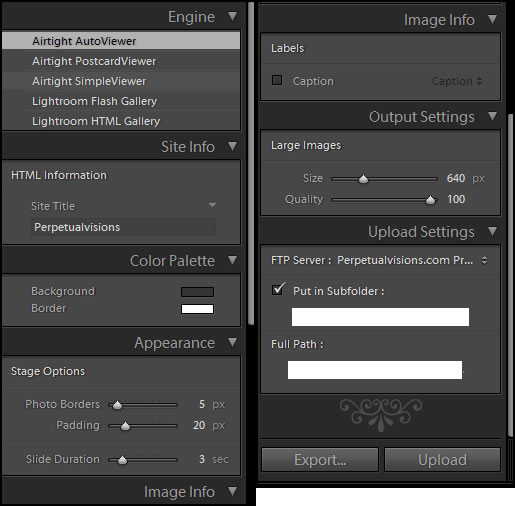
Some of the additional screens that will appear with other Engine choices will contain choices of watermarking, adding an e-mail and contact address, etc.
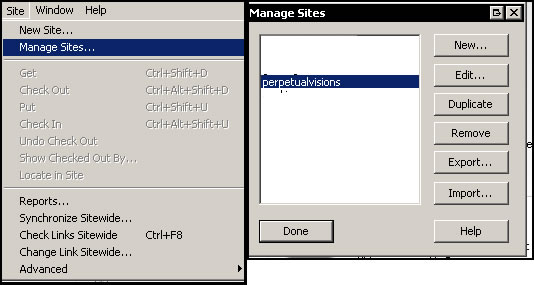
The only part that is not intuitive is in the Upload Settings panel. Notice the name FTP Server and two little arrows to the right. Click on those and choose Edit. You will put in your own information. Since I don't know how it is done using other web authoring programs, I will use Dreamweaver CS3. You will need to know your remote information. To access it, open Dreamweaver and choose Site>Manage Sites>site name>Edit.
Then, click on Remote Info:
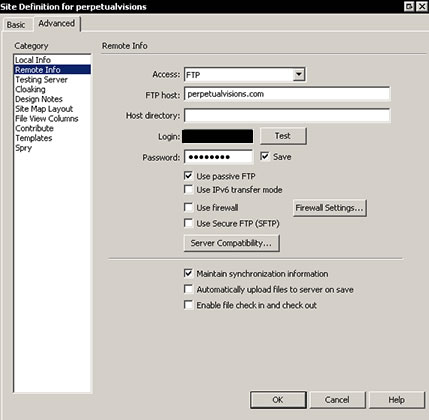
Here is how to interpret the information requested by Lightroom 2. The name of the website means only the name such as perpetualvisions.com. You do NOT put in anything else but the domain name.
In the case of Dreamweaver, The User Name is the ID which you have already established if you have an active website. In Dreamweaver, the User Name is the Logon. The password is also something that you established previously, so I hope you wrote it down because in Dreamweaver all you will see are place markers. Now when you see Server Path, you will also see a Browse button; navigate to the top most part of it. This will be a ".". Either click on it, or put a period where it asks for Server Path.
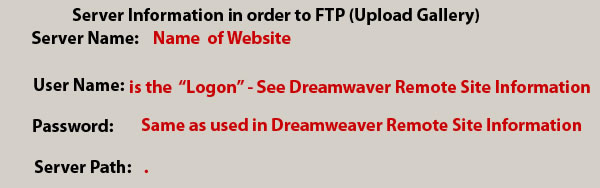
Now, going back to the Upload Settings' panel, notice the words Put in Subfolders. You put in the URL after the name of the domain. For example, my domain is perpetualvsisions.com. I will put in the string of all the folders after the name. You will not put in the domain name, but only the subfolders. If the slash marks / or \ are in the wrong direction for FTPing, the program will tell you and the the slashes will be corrected automatically. The Full Path will reflect the information you put in subfolders.
What you have done is uploaded your information to the Remote Server. In the case of Dreamweaver, it will not appear in the list of Local Files. I wanted it there also. The easiest way without synchronizing in Dreamweaver, etc. was to Export it. This is next to Upload on the Upload Settings' panel in Lightroom 2. Export it to a folder in your Local Folders for your website which is on your computer. Mine is on drive F in a folder called Websites. I have all my past and present websites there in their own folder. That information is what you see in Dreamweaver under Files>Local Files.
It is so easy and fun to create diverse galleries. I really had fun changing them and customizing them. Once you know how to upload the information for the type of gallery you want to create, the rest is pure creativity.