Review of Adobe Photoshop Lightroom 2
What is Adobe Photoshop Lightroom 2 and how does it differ from Photoshop? While I did not review Adobe's first Lightroom, I was a little familiar with it, so I can understand how the new features effect Lightroom 2. I use windows machines, both XP Pro and Vista Ultimate.
Lightroom is not Photoshop. It complements Photoshop and increases productivity, especially when dealing with a lot of photographs. With the advent of the digital camera, people take many more pictures than they did with film and often need to work with them from a "batch" perspective. Lightroom is aimed at speeding up the digital photography workflow. It is a cataloguer (Library module) for all your images as well as an image editor (Develop module) from the stand point of the "whole" image. However, in Lightroom 2 there are new tools which can work on sections of an image to modify only parts. All of its editing is non-destructive. As the review proceeds, I will describe the workflow of Lightroom 2 and how it interacts with Photoshop. Its format and workspace are very different than Photoshop's. I use Photoshop CS3 Extended and have used and reviewed Photoshop since about version 3. I will also, of course, describe the other three modules that make up Lightroom 2. The program is made up of 5 modules: Library, Develop, Slideshow, Print, and Web.
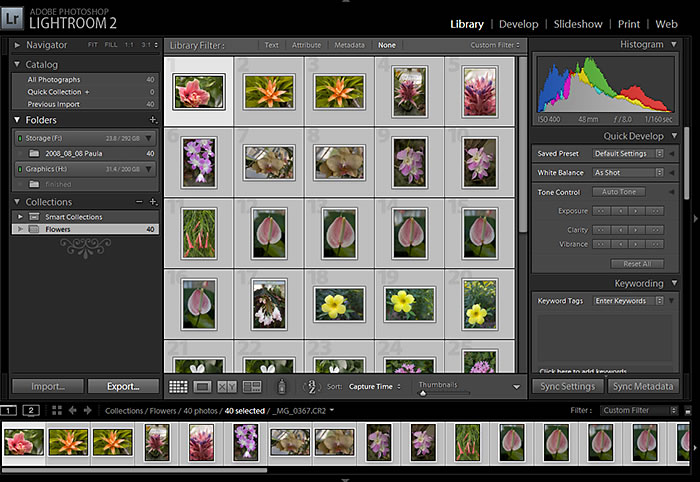
The workspace is made up of an image display area and two groups of panels. They will change according to the module selected. The left group of panels gives information and tells how to manage items, such as showing catalogs, while the right panels are more involved with specifics or controls; editing or keywording are examples. Below is a picture of the workspace using the Library module. At the bottom of the workspace is a film strip showing all the images. This film strip will appear no matter what module you are using. It can be hidden if desired as can the individual panels that make up the panel groups.
When I took these photos, I took raw + jpeg. In the collection only one image is shown. If I click on it, it brings up the raw file format as a default. In Edit>Preferences, I could select to bring up both the raw and the jpeg images. In Adobe Bridge, both jpeg and raw images are shown side by side as the default. I suggest that when you start Lightroom 2, you look at the Preferences and configure them to reflect your workflow. As a note, while black is the default color for the workspace, in Preferences>Interface the color can be changed within a grayscale.
In the Library module You start out by importing a folder of images. This can be imported directly from a camera, hard drive, memory card reader, or other storage device. I chose to do it from a folder on my disk. All the results of these "import" actions appear on the left hand panel.
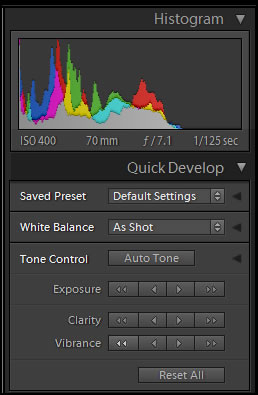
If you choose a certain picture, the right panel will give Metadata (information) about the image, the ability to add keywords for sorting, and a Quick Develop with a Histogram panel. Remember, all these changes are non-destructive.
You can manage your photos whether they are stored on internal or external hardrives or on removable hard drives. It is very easy to bring in images, create collections, assign keywords, sort them, etc. There are many ways to sort through and find images.
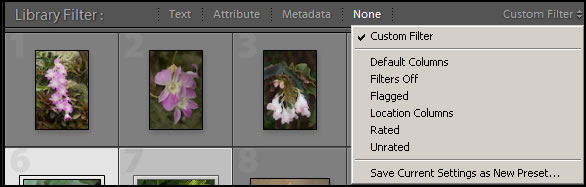
You can sort them by means of the Library Filter. Notice it below and the choices including Custom Filter. You can customize it according to how you work. Depending whether you choose Text, Attribute, Metadata, or None will determine how you select the group of photos or the single photo. Since I didn't have any captions or key words attached to my images, when I selected Metadata, it sorted them by type of camera used since two different ones were used.
The next module is the Develop Module. Using the left panel, one can access presets to change how the images look. For example, you can choose a sepia look, antique white and many others. You can add presets to the library as well, and I have seen a number of free ones on the web. You can also create User presets. Also, on the left is a history of all the changes made to an image. On the right panel (shown below) are the tools to modify the image. I will go into the tools more later, especially the new ones that can be used on parts or sections of an image.
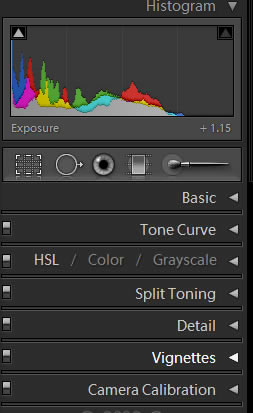
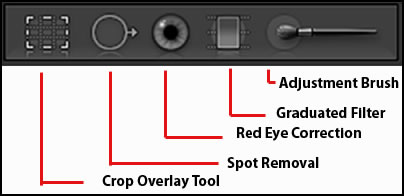
Under the histogram are some tools. They are shown below. When you click on them, the choices expand.
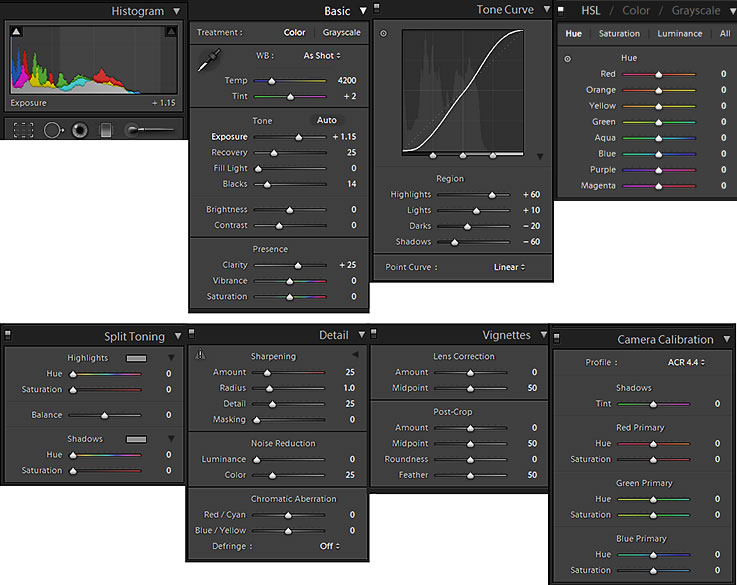
The individual controls from the right panel of the Develop module are shown below:
At this point I am going to make adjustments to an image in Lightroom 2 so that 1 can bring it into Photoshop CS3 and describe the workflow. I am using image _MG_0440.CR2. I shot this flower under a table where there was practically no light. I didn't use a flash.

To bring it into Photoshop CS3, which I have designated in Preferences as my editing program, I go to Photo on the top toolbar. Actually, if you have Photoshop CS3, it will show up on the menu as the main editing choice. You can, however, use another program.
Once I work on it in Photoshop, all I have to do is save it and the new file will be added to the Flowers Collection in Lightroom 2. The file will be called _MG_0380-Edit.tif since I have kept the default file format in Preferences.
Basically, that is how easy it is to go from Lightroom 2 to Photoshop CS3 to Lightroom 2. When I brought the file into Lightroom 2, it looked like the one pictured above. In Lightroom 2 I made global changes to exposure, brightness and clarity. The file now looks like this. I didn't make any changes to it in Photoshop.

I was concerned that since Lightroom 2 uses the ProPhoto color space which has a wider gamut than the Adobe RGB (1998) color space, which is what I use in Photoshop CS3, that the colors would look different. To the naked eye they looked about the same even though Photoshop CS3 was on one monitor and Lightroom 2 was on another. The monitors are calibrated to be very similar.
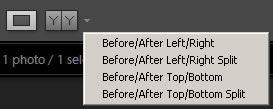
Both the Library and Develop modules have a feature at the bottom of the main workspace for comparing images before and after adjustments have been made to them. The one in the Develop module is pictured below.
One other quick tip involves zooming. If you go to the navigate panel on the left in either of the two modules mentioned above, you will see two arrow points. If you click on them, you open a menu to designate the zoom level.
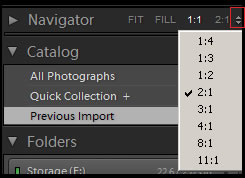
I have mentioned these because I found them useful as I worked in Lightroom 2.
Let's backtrack a little and show some of the new or enhanced features. Then, since a number deal with these first two modules, I'll discuss them next. Below are the new features for Lightroom 2
- Enhance specific areas of a photo using the Adjustment Brush or Graduated Filter. "The Adjustment Brush tool lets you selectively apply Exposure, Clarity, Brightness, and other adjustments to photos by 'painting' them onto the photo." [from the Help pdf.]
- The Graduated Filter tool lets you apply Exposure, Clarity, Brightness, and other tonal adjustments gradually across a region of a photo. You can make the region as wide or as narrow as you like.
- Native 64-bit architecture
- Expand your workspace—Maximize your screen real estate with support for multiple monitors.
- Print more efficiently—Quickly arrange photos for printing multiple sizes on one or many pages with flexible and customizable templates to make the most of paper and ink every time you print.
The enhanced features are:
- Edit non-destructively— Lightroom 2 enables you to edit jpeg, tiff, and more than 190 camera raw file formats, all non-destructively.
- Work smoothly with Photoshop—Integration with Adobe Photoshop CS3 software (sold separately) allows for streamlined use of Photoshop software's Smart Objects, panorama stitching, HDR functionality, multiple layer workflow, and more.
- Quickly find any photos
- Accelerate your workflow from start to finish using task oriented modules.
- Share more easily—Take advantage of the wide range of plug-ins created by third-party developers to help you quickly and easily transfer images to your favorite sharing sites and photo labs.
- Showcase your photos online—Create dynamic web galleries, based on Adobe Flash® or HTML, without programming.
- Sharpen smartly—Improve the appearance of your photos with enhanced algorithms that sharpen photos when you output.
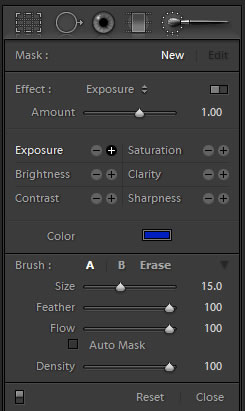
First let's look at the Adjustment Brush. It has an Auto Mask feature that "confines brush strokes to areas of similar color". Notice how you can change the size of the brush. Also, you can change this panel to show sliders by clicking on the little rectangular two tone button near the top. There is also, another similar button on the bottom to turn on and off brush adjustments.
As an understanding of the Preferences is important, so are checking for "hidden" attributes. They are not really hidden, but might not be obvious on a first glance.
I increased the saturation of the yellow flower using the brush and decreased both the exposure and saturation of the background using the brush.
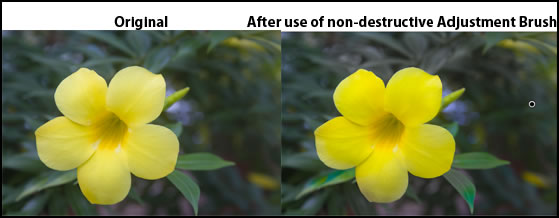
If you hover the cursor over the double circle in the image below, it will show a mask that you have created when you brushed over the area to adjust. The Auto Mask feature has to be checked in order to create the mask.

While the other tools worked very smoothly, the Adjustment Brush worked chunkily. When I initially chose a setting for saturation, for example, and then brush size, it worked smoothly. When I went to make changes, the sliders would not usually move smoothly but jumped around or did not respond immediately. I was able to accomplish what I wanted, but the sliders did not always respond to a change as the change was "made." You can undo the strokes as well as reset the image. This was the only problem area that I experienced using Lightroom 2.
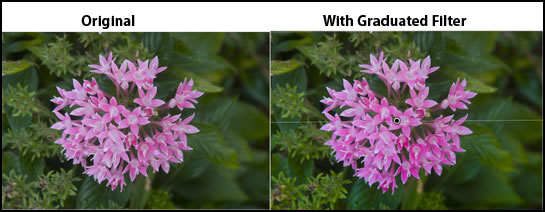
The Graduated Filter worked smoothly. I increased saturation and sharpness from the middle.
You can always press "Reset" to remove these effects. There is also multiple Undo.
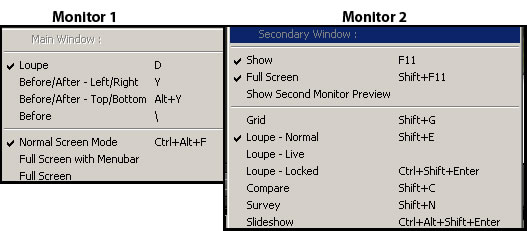
Before we move on to the Slideshow module, I want to illustrate how the multi-monitor function works in Lightroom 2. If you look at the screen capture of the workspace, you will notice near the bottom two images of monitors labeled 1 and 2. On the top right of the screen, you will notice standard symbols for maximize, minimize, etc. If you have more than one monitor, you will see the sign for change monitors.

The main workspace can be on either monitor. The secondary space will show an enlarged view of the image. You can also do other things such as compare an image, etc.
The Slideshow Module allows you to put together a slide show, obviously. You can choose from presets or create your own. There are three choices for what slides to include: All filmstrip photos, selected photos, and flagged photos.You, also, have a lot of choices once you decide on the basic format such as Options, Layout, Overlays, etc. You can add solid colored introduction and ending slides in Lightroom 2. When you are finished, you can export it as a PDF or a series of JPEGs. Once you choose, another screen will come up with additional options. I easily put together a slide show from selected flowers on the filmstrip. It took no time to put together one that looked very good. I could use the default or change how long the slides were visible, duration of fade, add captions etc. I had many choices to customize the slide show.
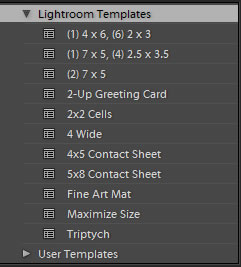
The Print Module has been enhanced. The templates give you many choices.
When I print, I can choose the profile, rendering intent, print resolution, and whether I want to sharpen the final product and by how much right from Lightroom 2. Also, I have a choice whether I want to print on glossy or matte paper. While what I have noted are standard options when I print from Photoshop CS3, I can also add page numbers, specify margins, print multiple images per page and control the aspects of the printing such as cell spacing and cell size. I printed a set of 4 images on a page of plain paper using my color laser printer which I normally don't use for any type of art work. The results were fantastic and so easy. Now maybe I'll use that printer for more color work. The printed images matched those on the screen perfectly.
The Web Module is a fantastic time saver as well as very creative. You choose a template for your gallery
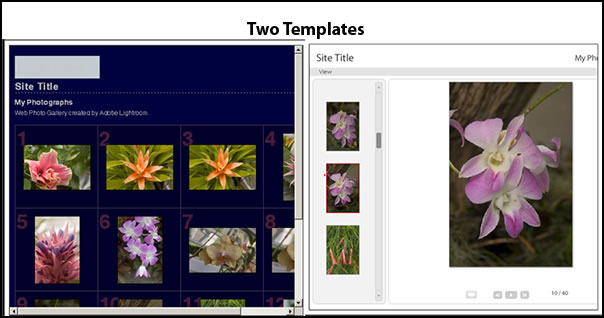
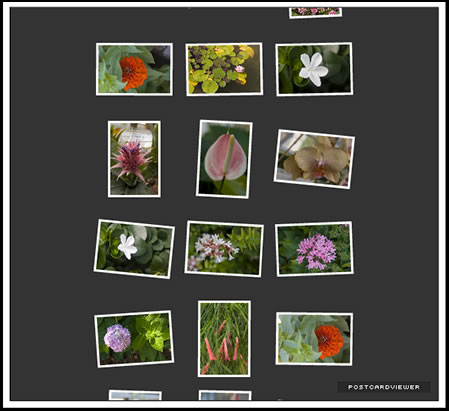
and, then, you choose the type of Engine you will use. This determines whether you are producing a flash gallery or html gallery or one of the Airtight galleries: Airtight AutoViewer, PostcardViewer, and SimpleViewer. Once you have decided on the type of Engine, then you look at the other options which range from Site Info to Color Palette to Appearance, Output Settings, etc. Below is an example of the PostcardViewer.
You can upload directly from the page to a number of specific websites such as Flickr as well as to your own. You download the free export plugins for sites such as Flickr from the Lightroom Exchange. Since Adobe has provided a development kit to create third party materials for Lightroom 2, look at the exchange often. These plugins can be either free or have a purchase price. The export plugins are all free. If you didn't know about the Exchange, it is available for most of the Adobe products.
I have written a short tutorial on how to upload photo galleries to your own site. I have used it in conjunction with information from Dreamweaver CS3. The information would also be consistent with other programs for creating websites. In the tutorial are also live examples of other types of web photo galleries created in Lightroom 2. The link to a Flash Gallery is here: Flowers.
When you click on Lightroom Help, you get taken to the Adobe Design Center - Community Help which is in the beta stage. Other types of help are listed on the right panel. If you want to download the Lightroom Manual, you need to go Photoshop Lightroom in the Adobe Forum. I am giving you two links to the document. This is an important document and I suggest that everyone downloads it after installing Lightroom 2 on their computer. The Adobe Forums are also very useful in learning more about your product and looking for answers. The manual is excellent.
Some programs are an effort to review. This one was a lot of fun not only because of what it can do, but because of its ease of use. I got so intrigued with it that I couldn't stop delving into it. I never thought that I would want to use the Print and the Web modules. When I started this review, I was more interested in the capabilities of the Develop module. However, I can see where I will use a lot of these modules. I have never used an organizer such as that of the Library module. I have burnt most of my images to CDs for storage because I started many years ago. Now, I am finally considering how I can bring my vast collections into the Library for sorting since it is so useful and easy to use. For this test, I used some images of flowers that I shot last week. The filmstrip at the bottom of the screen is so easy to use.
I will still keep using the Adobe Bridge for looking at collections of images, especially straight from Photoshop, but I now plan to incorporate all my digital image collections into Lightroom 2.
As I stated earlier in this review, Photoshop Lightroom does not take the place of Photoshop. It complements it and adds features to enhance the whole digital process from cataloguing and sorting images to printing and putting them on the web. There will be images that don't need editing in Photoshop. Since I do a lot of combining photos and editing of small areas, I can't imagine not using Photoshop. How do the tools differ from Photoshop CS3's Camera Raw? While they are very similar, Lightroom is a process. It encompasses a module (Develop) similar to Camera Raw in Photoshop CS3, but it still is different, especially with the addition of the Graduated Filter and the Adjustment Brush as well as Red Eye Removal and other functions such as ready made presets.
The full price is US $299.00 with an upgrade US $99.00.
The system requirements are:
Windows
- Intel® Pentium® 4 processor
- Microsoft® Windows® XP with Service Pack 2 or Windows Vista® Home Premium, Business, Ultimate, or Enterprise (certified for 32-bit and 64-bit editions)
- 1GB of RAM
- 1GB of available hard-disk space
- 1,024x768 display
- CD-ROM drive
Mac OS
- PowerPC® G4 or G5 or Intel based processor
- Mac OS X v10.4 or 10.5
- 1GB of RAM
- 1GB of available hard-disk space
- 1,024x768 display
- CD-ROM drive
This is a fabulous multifaceted program and very inexpensive for what it will do. I have only touched on its capabilities. I recommend downloading a free trial. Also, for more information go to the Photoshop Lightroom 2 product page as well as the Design Center which lists so many resources for understanding Photoshop Lightroom 2. Adobe's home page is, also, very useful.