Review of Auto FX Software's Mystical Lighting
This package is really fun to use and will produce some very interesting effects. What I didn't know when I started to use it is that it also has a photo correction component. So if there is a problem with a photo or an image, you can correct it within the program itself.
Mystical Lighting will produce either realistic or surrealistic effects. The Spotlight filter I would classify as a realistic one, while the Fairy Dust one is, obviously, not.
"All plug-in versions of our software (to quote Auto FX) support Adobe Photoshop 4.0 - CS3, Adobe Photoshop Elements 1.0 or higher, Corel Paint Shop Pro 7.0 or higher, Corel Photo Paint 9.0 and higher as well as Corel Draw 9.0 and higher."
It, also, "works as both a plug-in and as a stand alone application for Windows 98/NT/2000/ME/XP/Vista or Power Macintosh systems running OS 9.0 or higher. Mystical Lighting runs native under all versions of OS X." [From the Mystical Lighting product page of Auto FX.]
I used this on a PC with Windows XP and Photoshop CS3. I also installed it on my laptop with Vista Ultimate.
Below is a screen capture of the interface. I will now explain it element by element. Notice in the right hand corner, the box with opacity and layers. This is movable.
If you notice the double ellipses on the image, these define the areas for the filter to take effect. They are controllable by the ellipse controls in the interface. (The controls are marked by a red rectangle in the screen capture.) You can change the shapes and sizes of them. There is also unlimited undo, a magnifier, panning hand, and the ability to see at a click the original image. This is to just name a few of the immediate features obvious in the interface.
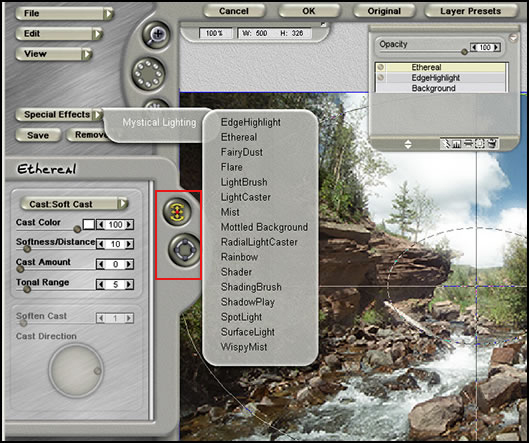
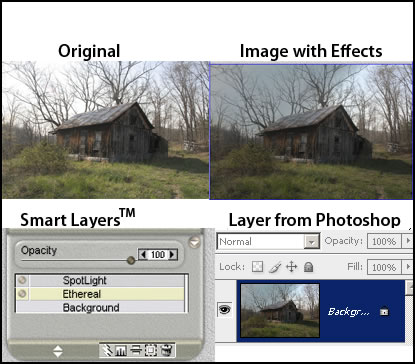
The screen capture shows the functions available for use in Mystical Lighting. As I stated it does more than the name implies.The layers below are called Smart Layers™. You can combine them and change the look of the object. Using the same filter and changing its settings, especially color and opacity, on the Smart Layers™ gives some great effects.
No matter how many SmartLayers™ I add, when the image is saved even as a PSD, the layers are applied to the layer image in Photoshop.
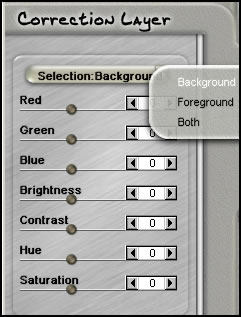
The new layers menu has two parts: you have both a Correction Layer for correcting the basic image and a Photo Layer for adding new photos and compositing them together.
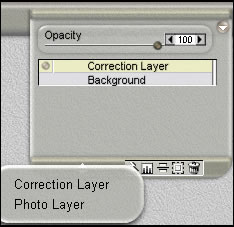
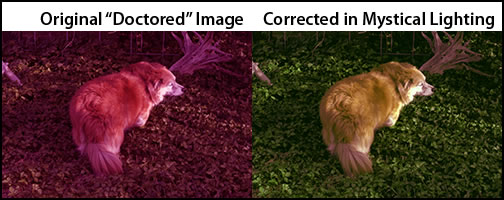
Below is an example of the Correction Layer with all the sliders at default or neutral. While the choices are fairly basic, it does a respectable job, so while in the program, you do not have to go outside it to make changes. I adjusted the Original Image to be particularly poor.
 |
|---|
 |
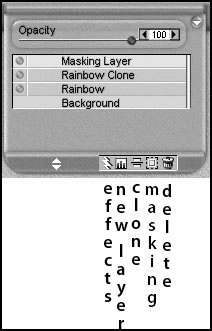
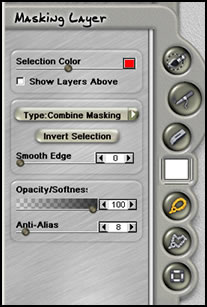
Below is an example of the Masking Layer. You can mask out the areas to which you do not want to apply the lighting effects.
The program was easy to use. You can add as many layers as you want. I found that I liked to add layers not only for multiple filters, but also for the same filter and change some of the settings. This gives you a lot of freedom to create the image as you envision it.
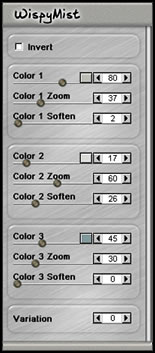
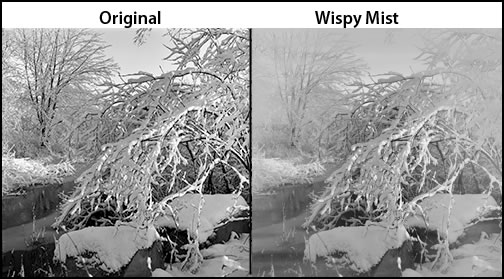
And lastly, is an example of the options available for the Wispy Mist filter. The filters can also be accessed from the left panel under Special Effects.
I will not be giving examples of all of the filters because there are excellent examples on the Auto FX Software website. However, I worked with them all and found that they gave very interesting effects that were very controllable and customizable especially since one could use layers and masks.

I created the below effects in two stages; however, I could have accomplished it using layers.
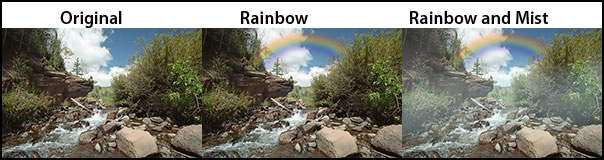
You can, also, do effects using black and white images.
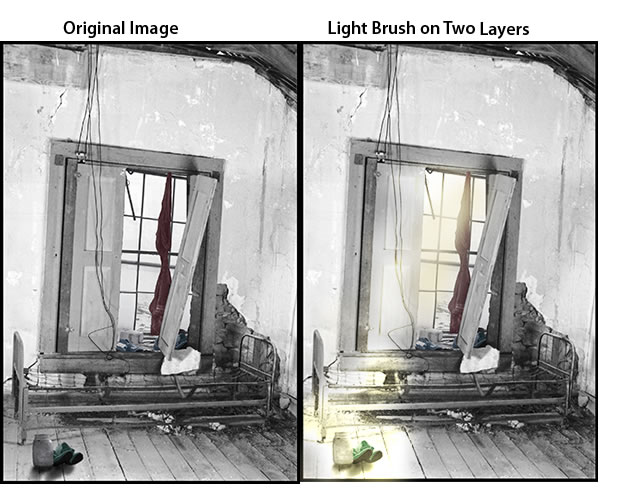
In the below image on the right, I used different layers to mix the different colors of light.
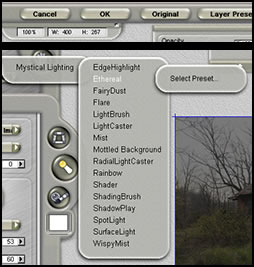
You can also apply presets from all the filters to your image. Below is an example from the Mist Effect. These are resolution independent. You can save your own visual or layer presets. These were obtained by clicking on Layer Presets.
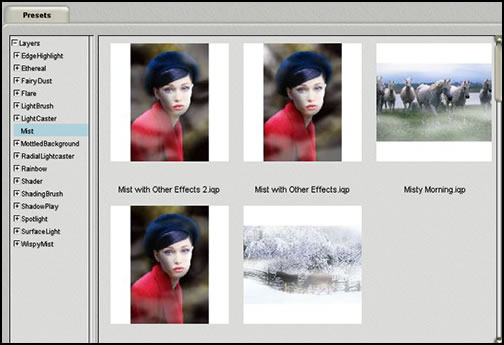
There are two types of presets: Regular Presets capture and replay a single effect. (The screen capture below illustrates those.) Select the filter from the list and then click on "Select Presets." Layer Presets capture entire sets of layers and render them dynamically. For those, you go to the Layer Presets on the tool bar; then, you select the filter and one of the presets. You can also create and save your own presets.
There are so many different controls for each filter as well as combinations you can use and presets that the ability to create myriad effects is endless.
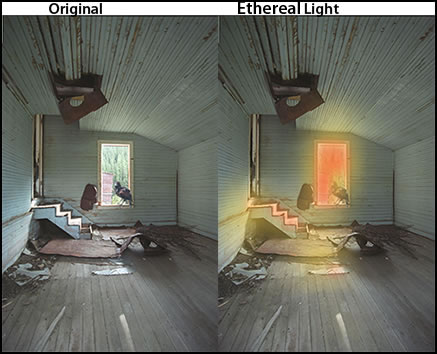
There, also, is a lot more to Mystical Lighting than I have even presented in this review. The Auto FX Mystical Lighting product page will discuss more of the functions. What I have done in this review is tried to present an over-view and show how well it works and some of the kind of different effects that can be achieved from natural light to surreal type lighting.
Since I wrote the review, I have found that I am using the features of this program more and more.
In addition, you can become a member of Auto FX and download textures and fonts.
The system requirements are:
| OS | Memory | Free Space |
| Windows 98/NT/2000/ME/XP/Vista | 128 MB | 30 MB |
| Macintosh Power Mac - OS 9.0 or higher | 256 Min | 30 MB |
| Mystical runs native in OS X (including Leopard) | 512 Rec |
Mystical Lighting costs $179 and is available as a download. You can, also, download a Demo.
For more products from Auto FX Software, go to: http://www.autofx.com.
For reviews of other Auto FX Software products go to the following URL's.
Auto FX AutoEye2
Auto FX DreamSuite Bundle
Auto FX Tint Mystical Tone and Color
Auto FX Photo/Graphic Edges