Review of Spiral Graphics' Genetica 2.5 Pro
In early 2006 Spiral Graphics will release its new version of Genetica Standard and Pro. There will be free upgrades for licensed users of Genetica 2 Standard to Genetica 2.5 Standard and Genetica 2 Pro to Genetica 2.5 Pro. The version I am reviewing is Genetica 2.5 Pro While I usually do not review beta versions, I am reviewing a pre-release version of Genetica 2.5 Pro. (When I refer to Genetica, unless specified, I am always referring to the Genetica 2.5 Pro version.)
In July of 2005, I reviewed Genetica 2 Pro. I started out by stating that Genetica 2 Pro was a seamless texture and tile creation editor that was node based. It was geared toward professional 3D artists. It had more than 500 finished texture presets with tremendous variations possible.
Genetica 2.5 Pro picks up where Genetica 2 Pro left off. It is a texture creation program and, with upgraded batch processing and other improvements making it more streamlined, it is designed to be a better production program than Genetica 2 Pro. This new version has a lot of new features. Many have to do with utilizing it in a 3D environment to an even greater extent than previous versions. Just starting to use Genetica 2.5 made me realize the number of changes actually made. The interface, alone, has so many more options than it did in version 2. Some of the new features are outlined below.
- Effect Maps that can be used in channels supported by a 3D environment such as bump, specular, etc.
- Effect Map Lab System has been updated so that it will automatically produce Effect maps based on a texture.
- Effect Map customization has increased by the addition of 5 new nodes.
- Fully-integrated Normal Map generation is now possible and these are automatically seamless.
- The Batch Processor has been upgraded to allow one to automate more repetitive tasks.
- A Color Only Render mode allows a flat version of a texture to be created.
- Five new Noise types have been added.
- The Cells Generator node has been increased by four new modes.
- Floating Views provides large automatically-updating views of parts of a texture.
- Lab Transparency Support allows for transparency
- Embedded Author Info allows authors to embed information in the textures they produce.
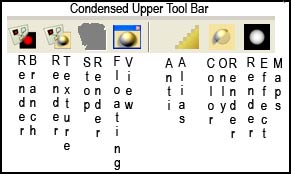
Producing Effect Maps and the corollaries associated with this are the biggest new additions to this well running and very useful texture generating program. Below is a condensed version of the upper toolbar that shows the render tools. If you have used previous versions of Genetica, you will see that many of these are new such as the Render Effects maps and the Color Only Render located on the far right of the tool bar. Also notice the Floating View which will allow you to see parts of a texture as you work on it.
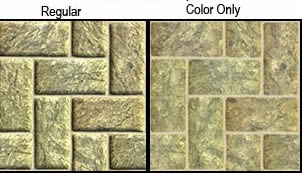
Below is an example of two rendered textures, one rendered regularly and one rendered with Color Only.
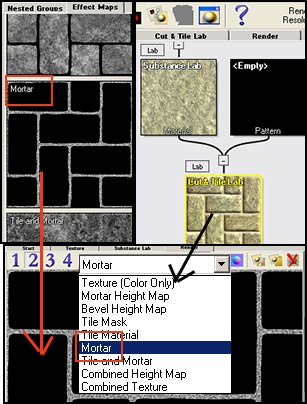
The option to Render Effect maps will shorten the time necessary for production of many types of maps used in 3D projects such as bump maps, for example. There are a lot of Effect maps that can be rendered; these maps are shown on a new left panel under the Effect Maps tab. When the Render Effect Maps button is selected and a texture is partnered with a specific Lab node, such as Cut and Tile, grayscale Effect maps can be produced. Once the texture is rendered, there is a drop down menu that will correspond to the Effect maps pictured in the left hand Effect Maps tab, and any of these Effect maps can be chosen to be exported and/or saved.
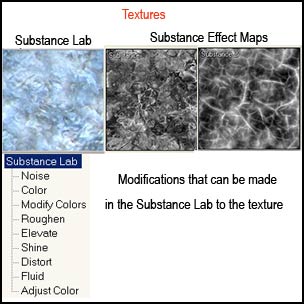
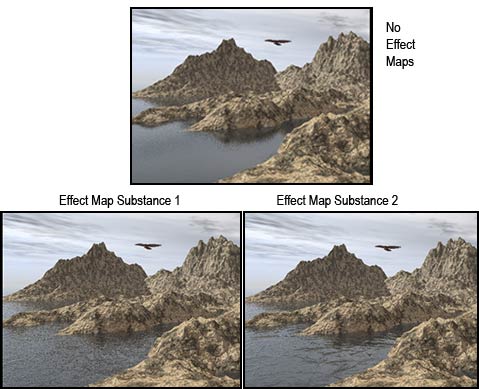
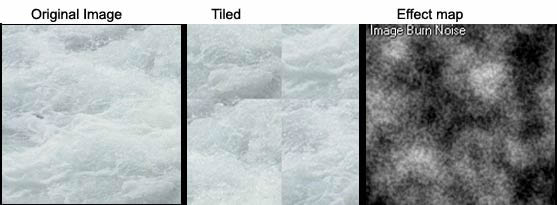
Below is a Spiral Graphics preset texture entitled "Blue Water" that was used in its default state. It contained a Substance Node which upon rendering produced two Substance Effect maps. The categories under Substance lab show the categories for controlling how the texture, and, thus, the Effect maps will look when finished. As you can imagine the changes can be infinite.
These two Effect maps were put individually into the bump function in Vue 5 Infinite without any manipulation. Notice how the texture of the water has changed.
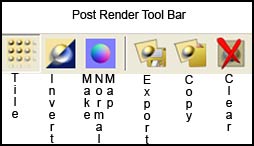
If these maps were put into another channel, other changes would take place. Normal maps can be easily created. They are seamless like all the maps and can be re-rendered at any resolution. Below is a picture of the Post-Render tool bar. Notice the icon for creating Normal maps.
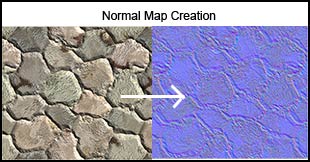
Below is a Normal map created from a Rendered Texture.
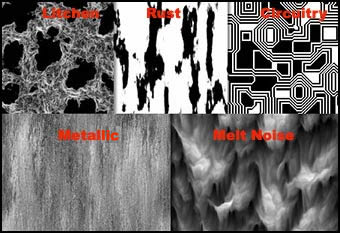
There are new additions to different elements. For example, there are five new Noise types: Litchen, Rust, Circuitry, Metallic, and Melt Noise.
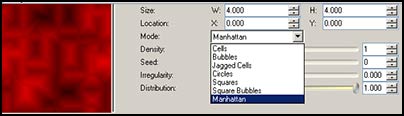
And four additions to the multi-purpose Cells Generator node. Below is a look at the settings of the Cells. The new modes are: Circles, Squares, Square Bubbles, and Manhattan.
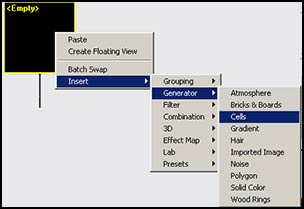
The screens below show one way to access the Cells Generator.
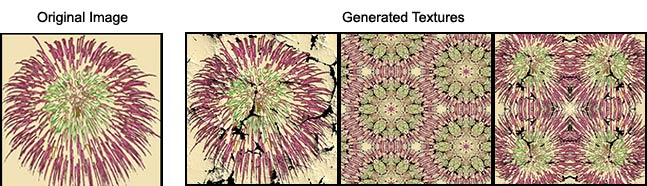
One can create textures many different ways; for example, one can start by importing an image or one can manipulate any of the huge number of presets available. There are so many combinations available and so many ways every facet can be changed that I do not think it is unreasonable to state that one could create an infinite number of textures. An example of an original series of textures was created from a picture I took of some fireworks.
Below are some of the Effect maps that were created in addition to the new textures.
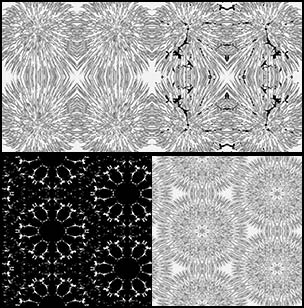
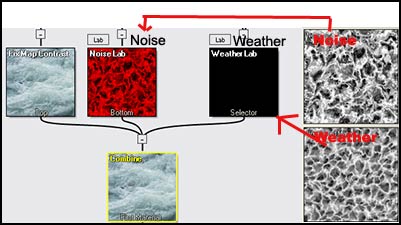
Not every image will create a seamless texture automatically. However, one can create Effect maps, even from those textures that are not tiled seamlessly. While the texture did not tile seamlessly when rendered, the Effect map rendered perfectly.
In the screen captures below, notice the relationship between the Effect maps on the far right and a portion of the "texture creation" setup. The one below used the same image as the one above, but set it up with different parameters. Once again, while the image did not produce a seamless texture, the Effect maps rendered perfectly.
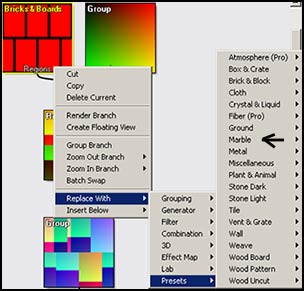
One can also take a preset and change it drastically.
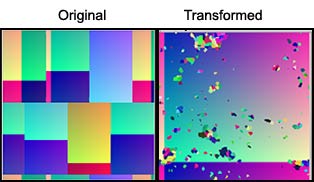
Below is the original set up for the preset.
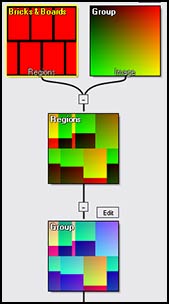
The Bricks and Boards (top left) was replaced with a Glassy Marble preset. The results were seen above in the picture captioned "Original - Transformed."
As mentioned in the beginning of the review, authorship and links to e-mail and web based portfolios can be set up. Once entered, they will appear automatically untill chaged on every texture manipulated. However, they will only appear when these textures are brought into Genetica.

For additional information on the features of Genetica 2.5 Standard and Genetica 2.5 Pro, go to this link on the Spiral Graphics web site.
The requirements for Genetica 2.5 are: Windows 2000/XP, Pentium III 450 MHz, 256 MB, 15MB + free space. A free demo version is available for download. It will expire after one month, say DEMO over rendered textures, and one cannot use the "Convert Lab to Basic Node" function. However, it will become fully functional when activated with a serial number. The cost for a new full version of Genetica 2.5 Pro USD is $399.00 and for Genetica 2.5 Standard USD is $129. With so many new additions, it is wonderful that Spiral Graphics will consider this a free upgrade if one owns a licensed copy Genetica 2. As I stated in the beginning, the versions have to remain consistent.
It's funny how my enthusiasm for a program grows. As I played with this version of Genetica, I began to use the Effect maps in conjunction with some of my 3D programs especially in the area of creating bodies of water. All I can say is WOW! Plus, don't forget the free upgrade if you own Genetica 2. I recommend Genetica 2.5 if you use any kind of textures. Download the Standard and/or Pro demos and see the depth of this program.