Calibration using Using Hardware and Software
MonacoEZcolor Bundle
While my first article on monitor calibration dealt a lot with discussions of color modes, this article will go into many aspects of calibration. The software and hardware used for this article were contained in the MonacoEZcolor Bundle. This bundle consists of the MonacoEZcolor software package and the MonacoOptixXR colorimeter. I chose to test this package because it was advertised with my Epson Stylus Photo R2400 printer. The Bundle can be purchased for $498.00 and can be seen on the X-Rite site.
I am going to start out with my findings. I will go into depth later in the review. Using the MonacoEZcolor software, version 2.63, I profiled my older Epson Stylus Photo 1270 printer and my Epson Expression 1680 scanner. I had been relatively satisfied with the color from my scanner since "perfect" color in the images scanned was not critical for their use. However, I had not been satisfied with the printer and had spent a lot of time trying to work with it. This software solved all of my problems and took about 5 minutes to profile each piece of equipment. Both can be profiled together. This software gets a rating of excellent for profiling my scanner and printer. I love my new Epson Stylus Photo R2400 except for the results from the Watercolor Radiant White paper which were dull and muddy. The R2400 is on another machine. In a few minutes I created a profile for this paper. What can I say except to say it was perfect! Now I will create all my printer profiles using MonacoEZcolor software even ones I was satisfied with. All I can say is,"truly amazing!"
I also profiled my CRT monitor which I purchased eight months ago. Here, I did not like the results. Neither the software profile nor the combination with the colorimeter were satisfactory. I profiled my monitor using both the software, which is done visually, and the colorimeter/software combination which relies more on its own measurements. The profiles were very similar. Once the profiles were created and the computer restarted, a screen appeared asking if the profiles should be accepted. This screen was in Spanish even though the program was installed in English. Since I use Symantec Ghost to make images of my system before I test products, I ghosted back a few times making sure I disabled Norton Anti-Virus, etc. I kept reinstalling the software and re-attaching the colorimeter, and each time the software and hardware worked in the same manner and each time the same screen in Spanish appeared.
Once the profiling was finished, I looked at files that I had create in Photoshop using the North American PrePress 2 settings as suggested by Photoshop CS2 which suggests a workspace of Adobe RGB. I made sure that all my files reflected this work space to keep everything consistent.
The first things I noticed were that the hardware or colorimeter generated profiles were very similar to the MonacoEZcolor software generated profiles. Both had a cast of pink on areas that were white or very light and the screen was much brighter than I was used to with the image washed out or pastel-like. I decided to go back to the profile I had used previously. This profile was the generic one for one of the monitors, a P95f + made by Viewsonic. (I was later to realize, that this profile actually meant nothing which I will explain shortly.) When I tried to go back to it, my screen looked the same. It would not change by just changing profiles. The profiles would have been listed in the white box shown below. (Unfortunately, I deleted them before I did a screen grab.) At the time there were three profiles listed in the box: my P95f + one, and the two generated by the Monaco software and/or hardware. To get to this screen below, one right clicks on the desk top and then left clicks on settings>advanced>color management.
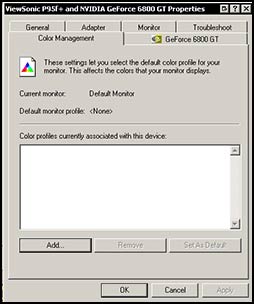
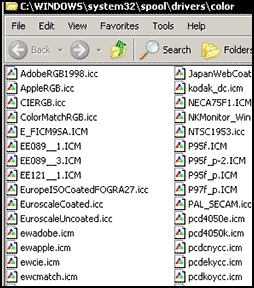
All these profiles reside in a folder found in Windows/system32/spool/drivers/color.
As I stated before, I went to change the profile to the one I had used previously and the screen looked the same. Then, I realized why. Let me present what actually occurred. When I started with this monitor, I let it warm up at least an hour, turned on the monitor and adjusted the hardware in it. (I still check it visually periodically.) It has more adjustments than the illustration below, and they are not knobs but have sliders for choosing colors, brightness, etc. The picture is a simplification. So, I adjusted the brightness and contrast so that I had a good tonal range of black to white. I usually leave the contrast at 100% and manipulated just brightness.
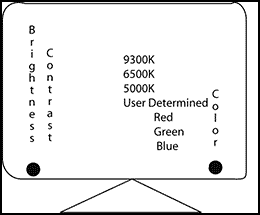
Since I found that none of the color temperature settings looked good, I went to User Determined Settings and moved the colored bars back and forth until there was not a caste to the white and the gray was neutral. All monitors have these settings set up differently, but the principle is the same.
Remember I stated I had installed a Viewsonic profile for my monitor. In reality, even though I chose this profile, the default color and brightness hardware settings in my monitor were still active. That is very important to remember. Then, I had to change the hardware settings - the percent of red, green, and blue. Using the profile did not gain anything because I had to manually make changes anyway and visually decide how to do it. It was not as if I had been able to start from a certain theoretical fixed point and then add monitor profiles. If that were the case, "canned" or ready made profiles still would be fallacious. Only those created from "scratch" would work because monitors age over time, room light changes, etc. Thus, theoretically the monitor profiles made with the MonacoEZcolor Bundle should have worked.
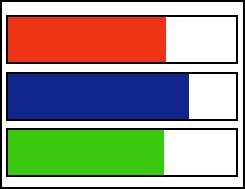
Now we get to the profiles generated by the MonacoEZcolor software and the MonacoOptixXR colorimeter. Remember, all the whites looked pink. To produce these profiles, either I or the colorimeter manipulated the Red, Blue and Green of the monitor. When the profile was finished, these bars, when physically looking at them in on the monitor screen, had changed. If I went to reinstall a different profile, they did NOT move back to where they were before I created the now former profile. In other words, they only moved while creating the profile. Thus, I was left with the problem of having to create a profile that did not have a pink caste to it the way I always did in the past without the help of software.
Basically what we are seeing here is a monitor with hardware driven controls that are changed only in two ways, by hand or through software when creating a profile. If I discard the profile that was created by moving these bars and opt to substitute a profile I had previously created, it would sit on top of the hardware part of the profile I had discarded. To put it briefly, one can work with a monitor profile which is part hardware controlled and software controlled or one can work with a monitor profile that is just hardware controlled. We haven't even touched the manipulating of the video card where monitor color can also be controlled. That, for me, is a last resort.
Going back to the MonacoEZcolor monitor profile, I decided to go back and work the dials on my monitor so that I had a neutral gray screen, proper gradations of black to white bars where each 10% change was differentiated, and where my test hardcopy was similar to what was on the screen. The only variation I made was to up the brightness level in a manner similar to the MonacoEZcolor monitor profile. Guess what? When I did that, the screen images in Photoshop CS or CS2 were too light and the prints made on the Epson R2400 were too dark. (The Epson 2400 allows printing using Photoshop's color management.) This made sense because I had not lightened the pictures within Photoshop but just my monitor as a whole. So I went back to where I had been before all of this. I did learn from the colorimeter monitor profile that I was using too much blue and my screen was a little bit too dark. I did reduce the blue and lighten the screen a tiny bit. I have seen many overly bright monitors and printing problems as a result! A lot of this is common sense couched in extremely fancy terms and lost in the shuffle of words.
The next step in this printing journey was to create a printer profile. I decided to try one for my older Epson 1270 in conjunction with my flatbed reflective scanner. Firstly, I printed a pattern from the MonacoEZcolor software and then attached the IT8 target card which is a standard for calibrating scanners. Below is an IT8 target by Monaco. The really nice people at X-Rite said I must use their target because it will reference a specific version which I will need later. However, I found that I had an IT8 target from Agfa which looked basically the same. However, the exact shade of each color is what is critical.

First, one prints out a set of bars from the MonacoEZcolor software with the printer and then combines it with the IT8 target and scans it.
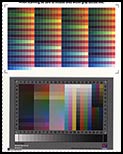
Finally to create the profile, one must match up a reference file for the specific target. To do that, one chooses a file in the MonacoEZcolor software to match the number on the IT8 target that is shown, above, by my white arrow. Well, the file on this target was for 2004 and the latest file in the software was for 2003. There were no instructions stating what to do. Later I found instruction in the onscreen manual. However, the instructions stated to go to www.monacosys.com and click download......There was nothing at that site that had anything to do with downloading these reference files. I finally found them linked to a screen that was updated in 2002 while the screen they were on was updated 2005. I almost didn't look because the first screen, 2002, referred to MonacoEZcolor version 2.5 and the one I was using was 2.63. While I do not like to just find fault, I do feel that the amount of time I wasted looking for these reference files was totally unnecessary and very preventable.
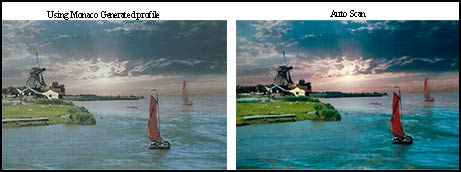
As you can see from the beginning of the review, I was very satisfied with the profiling of my Epson Expression 1680 and really thrilled with the printer profile for my Epson 1270. Immediately below is a picture of two scans. The one on the left was made using the MonacoEZcolor software and the one on the right was created using the scanner's automatic scanning mode. The one on the left is is much closer to the print that I used as a target. (These images have been manipulated a number of times so they could appear in the article and there has been a degradation of color.) The image on the left is more vivid than it appears here.
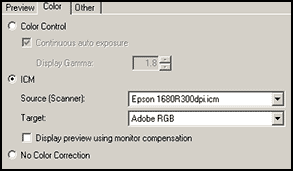
What I found that was very critical was to make sure that when I set up my scanner with the new ICM profile, I set my target the same as the color space in Photoshop.
The profiling of my printer was worth all the hassles. Previously I had not been able to print images that were relatively one color. Now they came out perfectly. Below is an example of the Print Preview screen from Photoshop CS2 using the printer profile I generated.
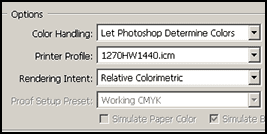
In the above example, the software suggests that the user choose Perceptual rather than Relative Colorimetric. I printed using both and visually just looking at the prints as a whole could not see a difference.
Below are the examples of how the images printed. The top image was printed letting Photoshop determine the colors and using the printer profile created by the MonacoEZcolor software. The bottom image was created using the the Epson 1270 printer's internal printer color management. The basic settings in the printer of media type and print quality stayed the same.

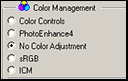
I did not know in the "printer" Color Management set up for the 1270 whether to select no color management or ICM. The controls are not the same as they are on the R2400 and other newer Epson printers. I tried and did two tests leaving the setup in Photoshop CS2 the same. The print from the setup where I chose No color Management was a little darker than the one where I chose ICM. But the color values in both were the same.
. There is a lot of good information on the X-Rite web site about calibration, but it is sometimes hard to find. In conclusion, I found the software for creating profiles of my printers and scanner to give me excellent results, but I did not like the profiles that were created for my monitor. The MonacoEZcolor software with an IT8 target by itself sells for $299 on the X-Rite web site.