The purpose of this tutorial is to try to create as complete a set of instructions as possible for exporting a terrain created from GeoControl2 to Vue. I am using Vue 7 Infinite so I can't comment on how it will work in other versions of Vue. In practicality, it should work in a similar fashion. This is a long tutorial and I have divided it up into sections.
Part 1 - Building the Terrain in Geocontrol2 for Export to Vue
Part 2 - Bringing the Terrain into Vue
Part 3 - Placing the Distribution Maps
There are some good tutorials out there on the subject. What motivated me to do this is that I found holes in some of them where I wanted more examples. Often when one writes a tutorial this happens because you just assume others know what you are describing. So, if in this one I state things that are already known or obvious, they might not be to everyone. Also, I wanted to get Johannes Rosenberg's input since he is the developer of GeoControl2. He graciously agreed to answer questions and look over the tutorial before it was posted.
If you are new to GeoControl2 (GC2) or just want to brush up on using its features, the tutorials by Johannes Rosenberg (cajomi) on the GeoControl2 website are great. Also, first looking at this short movie on the basic workflow of GeoControl2 is very useful.
Part 1 - Building the Terrain in Geocontrol2 for Export to Vue
I will first build a simple terrain in GeoControl2 for demonstration purposes. I will create selections for distribution maps and utilize shaders. In order to show how to work with GC2 terrains in Vue, I need to discuss some aspects of GC2 namely:
1 - Terrain size
2 - Selection and Distribution maps
3- Shaders
When I started to build my terrain in GeoControl2, I used the default size of 1024 x 1024 pixels. Before I exported the terrain as a 16-bit tiff heightfield, I changed it to 4096 x 4096 pixels. However, I forgot to re-export the distribution maps at that size. It didn't make a difference in that they were positioned accurately. The key factor in Vue is to use the OBJECT-PARAMETRIC setting.
If you are not sure of how to make or use selections and create distribution maps in GC2, see the tutorial on Working with Selections 1.
When you start in GeoControl2, make sure that you check the keep seeded box since you will be generating and rendering as you work and you don't want the terrain to change. This tutorial assumes a working knowledge of GeoControl2. If you need more information, Cajomi's tutorials on the GeoControl2 website are excellent. In GC2 I created the important elements of the terrain in the center so that when I brought it into Vue, the main elements would be within the camera's viewing angle. Of course that can be manipulated by adjusting the position of the camera in Vue.
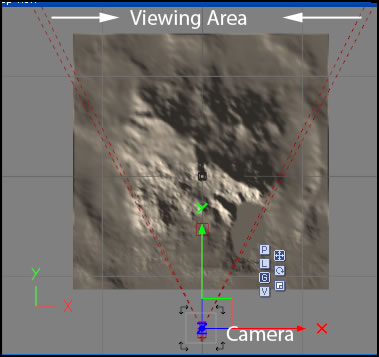
For this terrain, I created 6 new selections and the spring-mask for the lake. Adding shaders in GC2 for placement of selections, the terrain looked like this in GC2. The render setting is from the bottom at full quality. (This can be found on the Render panel in GC2.) You need to export the terrain with the camera POV (point of view) set to Bottom.
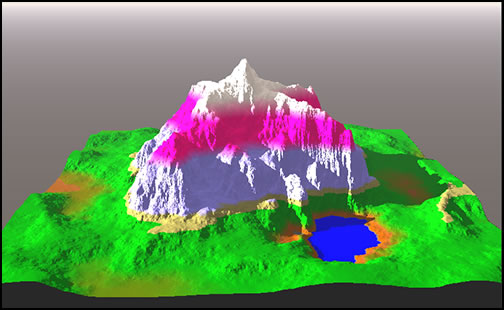
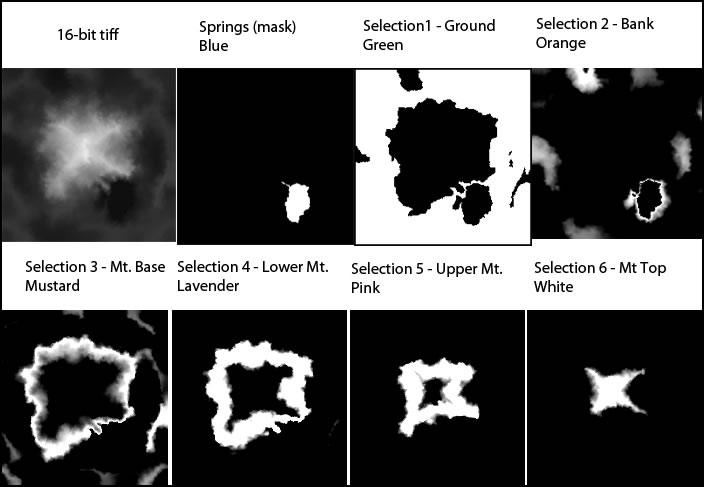
And the exported terrain map and distribution maps can be seen in the following screen.
Before we discuss the mechanics of bringing the terrain map into Vue, the format of the terrain must be discussed. The size of the map is square. The format in GC2 shows a square format. In Vue, the viewports are not square, but by default rectangular. The angle of the camera by default seems relatively narrow when bringing in a whole terrain from GC2, so you cannot expect the terrains to look the same. In addition, the height of the terrain in Vue compared to the one created in GC is compressed.
Can these above factors be corrected? The answer is to some degree. In Vue, as I will demonstrate, camera angle can be changed. Also, the proportions of the terrain can be changed either before the distribution maps are applied or after. Again, and I can't stress it enough, make sure your mapping settings are Object-Parametric.
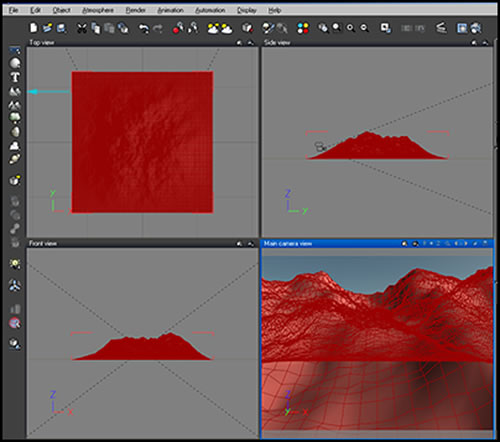
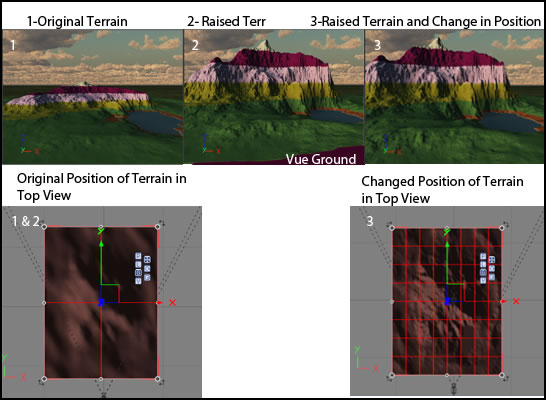
Before getting down to basics, I still want to show a few screen captures. Again, my objective here is to match the terrain as seen in GC2. Here, the only manipulation done on it when brought into Vue was to compress the sides a little in the top view.
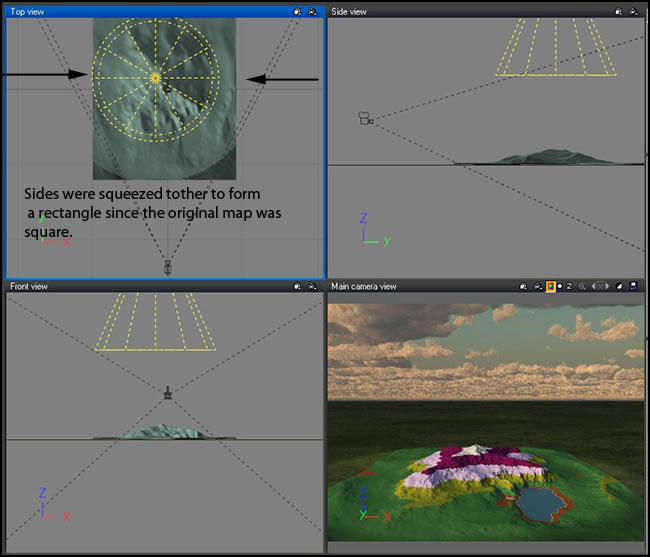
The following examples show basically how the terrain looked originally when brought into Vue 7 Infinite and after some changes were made to it.
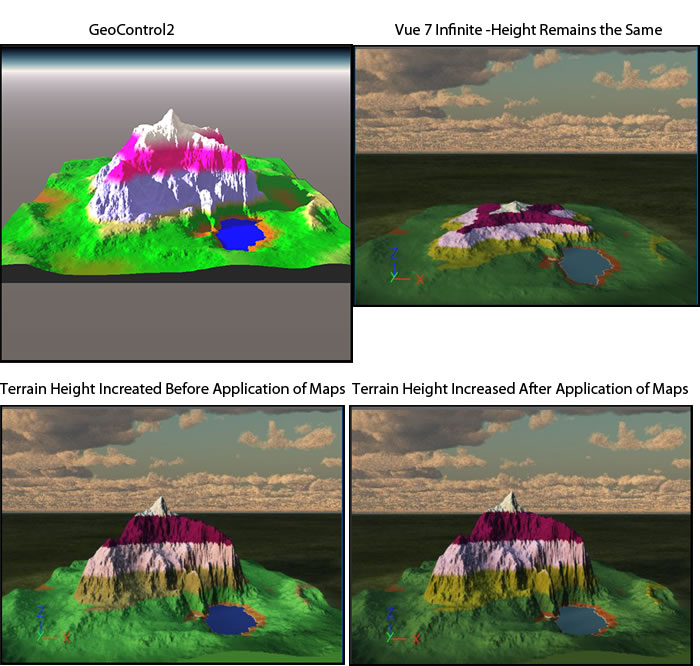
Notice that there are differences in the positioning of the distribution maps reflected by the various colors from the one created in GC2 to the one brought into Vue. Again, I did not manipulate any of the positions of the color maps for demonstration purposes. I, also, brought them into Vue by using mixed materials. Next, I will demonstrate all the basic steps; however, I did feel an introduction was useful.
To use the distribution maps made by the selections in GeoControl2, we must create them in order to export them. To demonstrate the positioning of the selections in GC2, I also created shaders to correspond with each selection. (The shaders were not imported into Vue; instead I reproduced the colors for continuity.)
It is easy to create selection. For this demonstration I only used the Height selector.
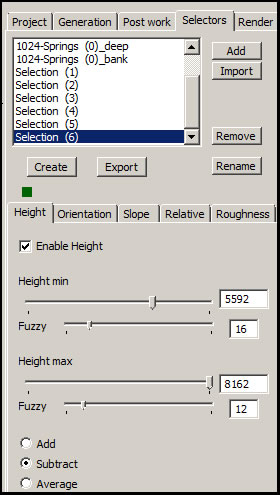
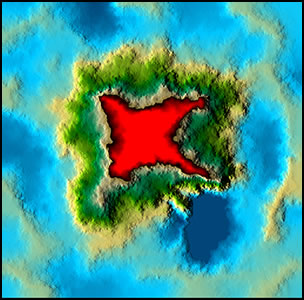
Select the height that you want and press Create (create is necessary for the 2D view only, but I found it useful to use along with the shaders as you will see). You will see a red overlay in the 2D view. However, you must press Create in order to later export the selection. The black area represents the fuzzy controls on the slider. To export it and create a distribution map for Vue, click on Export.
Next I clicked on the Render panel and chose the Texture panel. The only reason I am using them for this demonstration is to show where the colors appear on the terrain. I am not creating shaders for exporting at this time. It is, however, very useful to do this even if the colors are not true to nature. Again, if you do not feel comfortable using selections or shader, see Cajomi's tutorial on Selections mentioned previously.
You can export the terrain after you have created all the selections or before. I like to do it at the end. Remember as you work, increase the terrain size from 1024 to either 2048 or 4096.
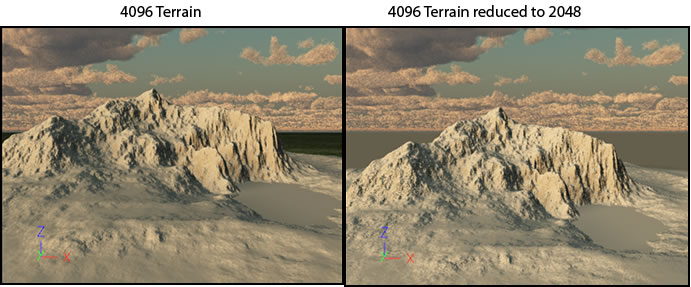
Now we will leave GeoControl2 and discuss bringing the terrain map that we exported from GC2 into Vue. The larger the terrain created in GeoControl, the more details it will have. But the initial map size will be greater and the file will be larger.
Knowing how reduction sometimes can lead to a sharper image and having read as many hints as I could on working with GC and Vue, I tried this experiment. In Photoshop, I cut the size of the terrain in half and chose Bicubic Sharper. After that operation, I brought it into Vue. The results are below. It reduced the file size from 25 MB for this configuration to 5.99 MB. Visually, it appears that the terrain map that was reduced in size produced a sharper image.
I physically increased the terrain height in Vue that is why they are slightly different in each image. As you increase the terrain, the mountain as well as the ground both are raised. This will be discussed more later.
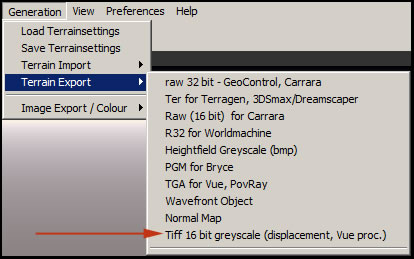
Once we have exported the terrain in a 16-bit tif format, go into Vue and follow the outlined steps.
Part 2 - Bringing the Terrain into Vue
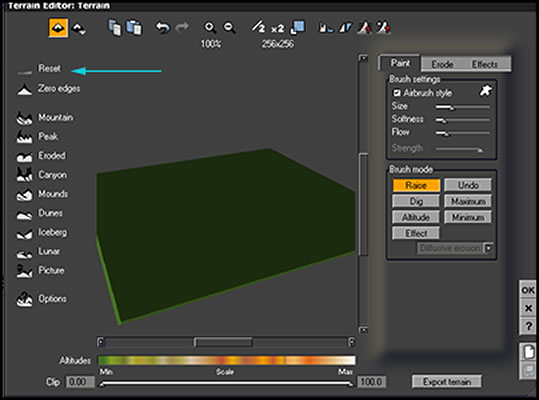
1 - Create a regular Terrain.
2 - Reset it. Leave the size of the reset terrain at 256 x 256. Since we will be working with a procedural terrain, this size does not matter.
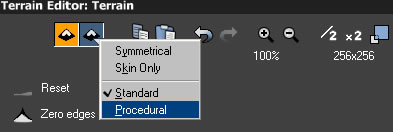
3 - Click on the Terrain drop down and choose Procedural.
4 & 5- Click on Proc. Then right click on the circle to bring up the Function Edit menu. Choose Edit Function to go into the Function Editor.
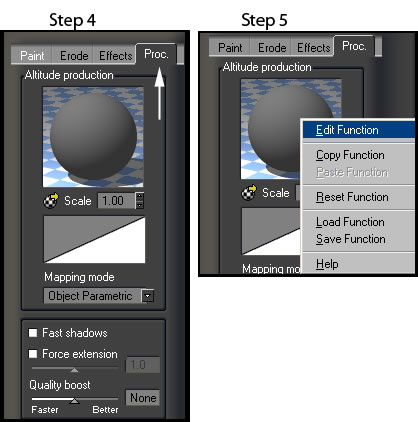
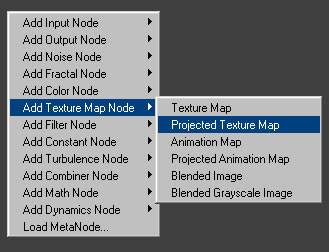
6 - In the Function Editor, right click on the screen to bring up the menu. You want to create a Projected Texture Map.
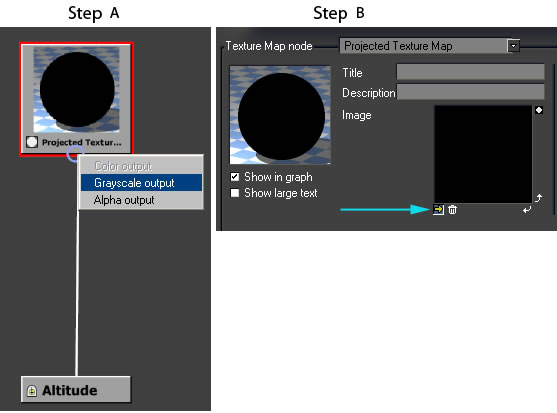
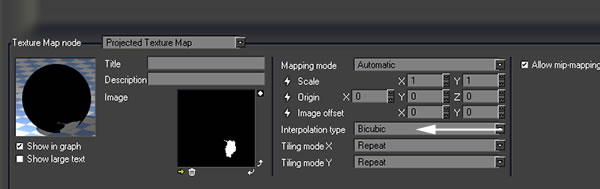
7 & 8 - Make sure you attach the Altitude to the Projected Texture and choose Grayscale Output. Then click on the arrow in step 8 and navigate to the terrain tiff map that you exported from GC2.
9 - Make sure you choose Bicubic. Now click OK to leave the Function Editor.

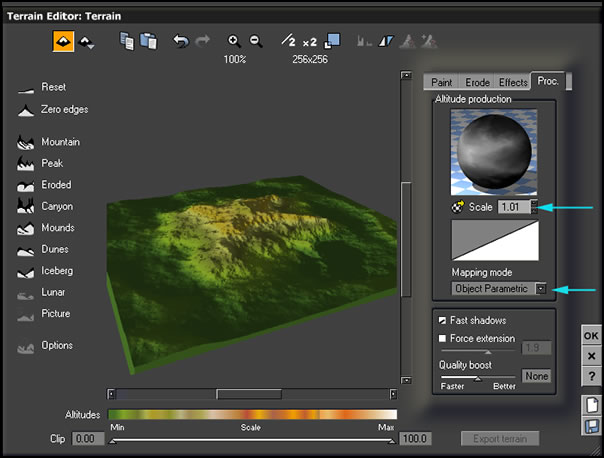
10 - Now you will see the terrain appear in the various viewports. Make sure you change the scale from 1.00 to 1.01. This decreases a tiny amount of deformation. Also, make sure the mapping mode is Object Parametric. Then click OK. This terrain will go into Vue 7 Infinite facing the same direction as it did in GC2. Look at the arrows in the screen capture below and make sure your settings are the same.
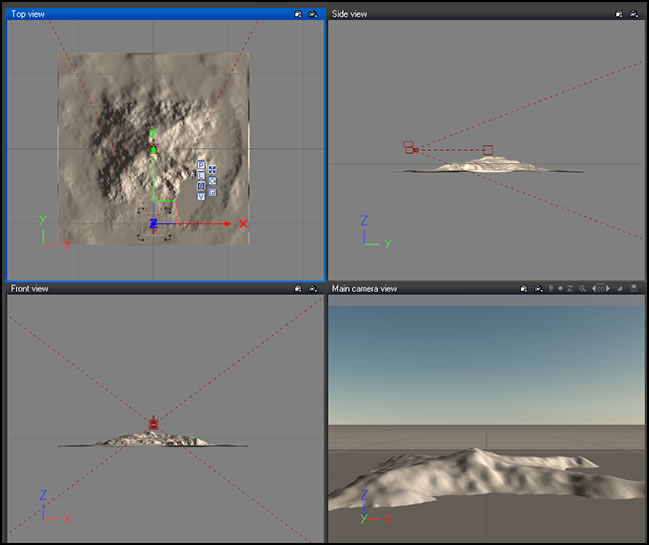
11 - This is how it will appear in Vue 7 Infinite after you click OK.
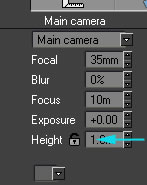
12 - Immediately in Vue 7 Infinite unlock the new camera height lock.
13 - Then, position the terrain as you wish. You will have to make adjustments to the terrains shape as well as to its position and the position of the camera.
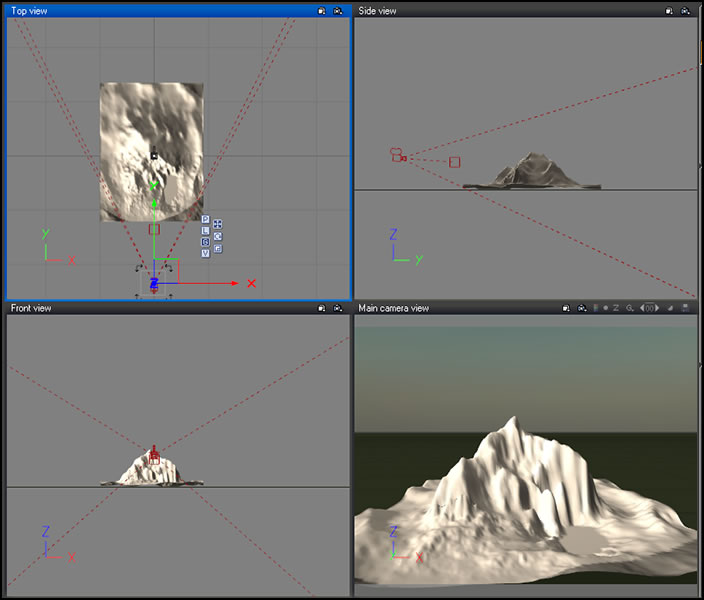
If you increase the height of the terrain, you will, also, change its position so you will have to make adjustments. One of the easiest ways is to go to top view and reposition it there. In addition, you might, need to change the position of the camera a little.
Part 3 - Placing the Distribution Maps
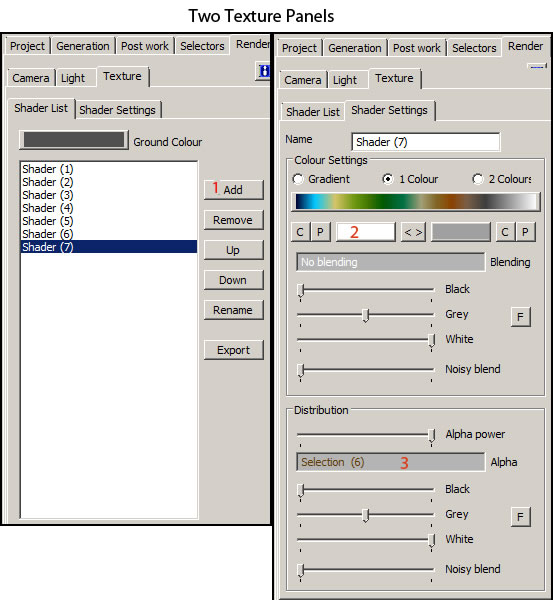
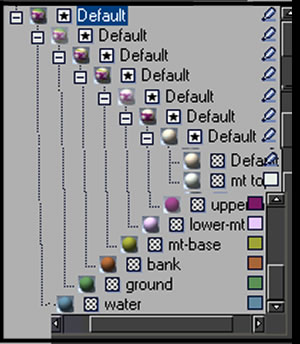
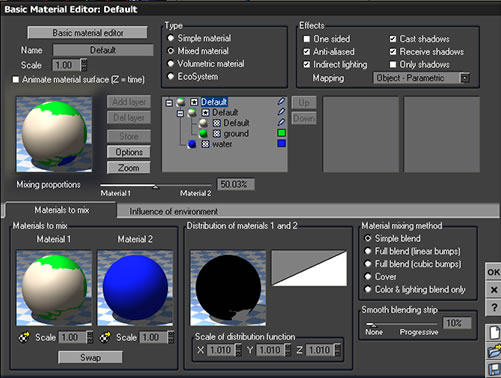
This next section is Part 3 and it involves placing the Distribution maps. Remember, for this tutorial I am trying to duplicate the terrain as it appeared in GeoControl2. The method for Distributing the maps will involve creating mixed materials. Below will show how the mixed materials will look when they are all created. Notice the colored squares on the right. To choose a specific color right click on the square. These are just place holders and the real color you will use in the future can be easily substituted. I will demonstrate how this is created. You can use layers rather than mixed materials. But I have found this easier.
I have not checked the Distribution of materials in the Influence of Environment tab for this demonstration. Once I substitute real materials for the place holders, I would modify the materials in Vue as necessary.

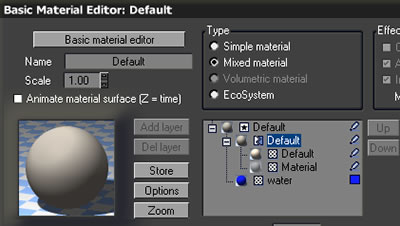
1- Below is just a default material. For this demonstration we are using it. Notice that it is a Simple material.
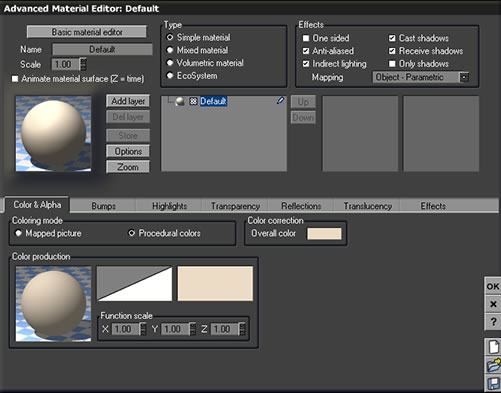
2 - Click on the default material in step (1) and choose Mixed material to produce step (2). We have now setup the ability to distribute the 2 materials. We will use the selections created in GeoControl2 and exported as distribution maps to accomplish this.

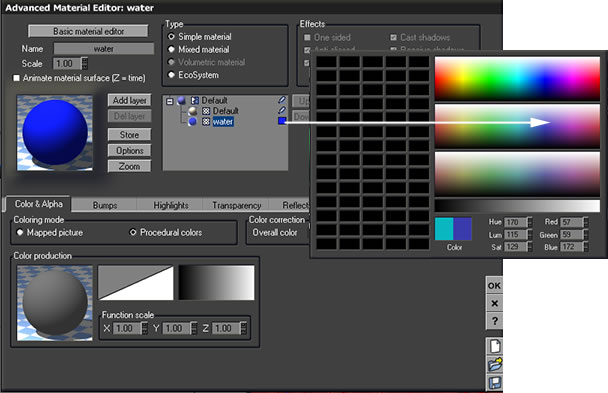
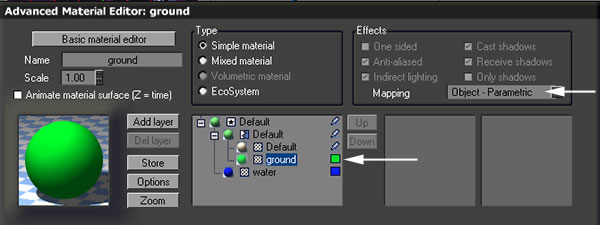
3 - Before we distribute the material, it is easiest to label each component as we go along as well as assign it a temporary color. To assign a temporary color, we right click on the little pencil by the name of the material. To change the name, just highlight the name of the material (default) in the box on the top left where it says "name."
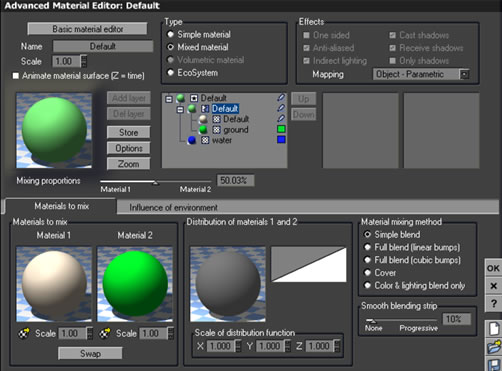
4 - The next step is to modify the Distribution of colors one and two by using the Distribution map exported from GC2. Right click on the Distribution of materials' circle to access the menu. Choose Edit Function.
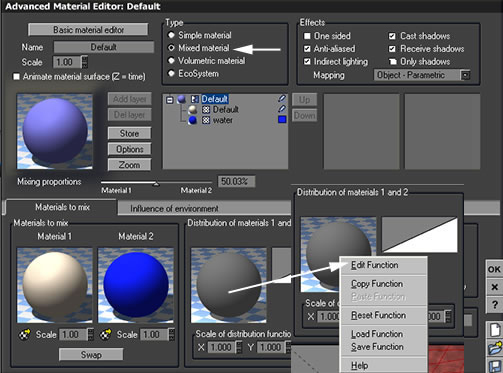
5 - Now proceed with the editing the of the Distribution of materials. Access the Function Editor as shown above in step (4) and when asked for a map, choose one of the distribution maps. For this first example I chose the map of the spring-mask to show the lake. To bring in a Distribution map, you follow the same procedure as you did when you brought in the terrain map.
6 - Make sure you choose Bicubic Interpolation and click OK.
7 - Make sure the Mapping is set to Object-Parametric and the distribution scale is set to 1.01........
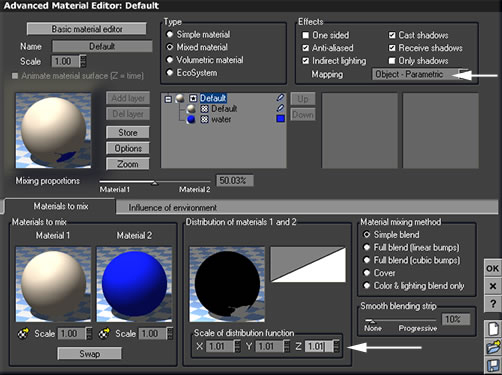
The lake will appear as in the image below.

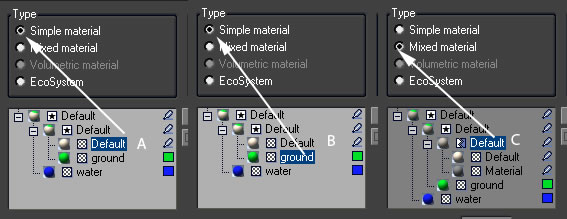
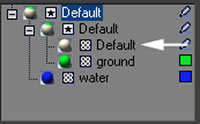
6 - Now you will start to add the other distribution maps. The process is the same. Where it can get confusing is in the Material Editor. Click on the Default material near the white arrow.
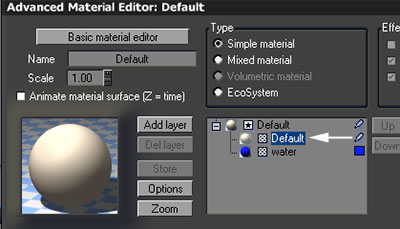
7 - Select Mixed material.
8 - Type in the name Ground and select the color green in the same manner as you did for the water.
The screenshots below show the exact steps. Default (A) is a Simple Material and Ground (B) is a simple material. Select Default A and click on mixed. The new Default is C and is used to create your mix of materials.
9 - Now access the Function Editor as you did for the water and use the same methods to produce a distribution map for the Ground.
The screen will look like the one below.
You will always start on the Default above the last material you added to create the new mixed material. Continue until you have created all the distribution maps.
GeoControl2 and Vue 7 Infinite are a powerful unit. Used together some intricate and wonderful terrains can be built. You don't have to build a complete landscape in GeoControl2. You can create a number of individual terrains in GC2 and bring them into Vue so you have a number of separate terrains.
I hope this tutorial has been helpful especially for those not very familiar with the relationship of GC2 and Vue.