When an Image Renders Too Slowly in Vue 6 Infinite
I was tearing my hair out. I had worked all day on an image and when I set it to rendering using the basic settings I usually use, it would not render. Even after an hour it still showed a 1% render completion. My render times can vary from about 4 hours to 24 hours. If I have lowered settings and my render time is short circa 4 hours, I will boost the settings and re render. I hope these tips and tricks will show how I trouble shot the problem. I was able to finally render this still image.
Everybody seems to have their favorite settings for rendering. What I use may not necessarily be best, but through trial and error and other people's settings such as Peggy Walter's, and Eric Holbrook's I have found that I get good results. I usually blow up my images to 13" x 19" by using Genuine Fractals Print Pro 5 . I am working with XP 64 and have 4 gig or memory. These settings are for still images.
Notice that Texture Anti-aliasing is not checked. I will use it if it does not slow down my render. The settings I use for Object anti-aliasing are as follows. If my render is going quickly enough, I will up the Max setting from 10 to 25.
I will change the Anti-aliasing strategy sometimes to either Crisp or Soft depending on my image.
The changes I will make to my render settings can be to:
- Uncheck "Enable Multi-Pass"
- Lower "Advance Effects Quality" to 33
- Change "Quality Threshold in Anti-aliasing Options" to 85%
- Change size of image to 2000 x 1500 pixels
- Check "Ignore Indirect Lighting on Plants".
I don't like to go lower than 2000 x 1500 pixels since I will be blowing them up to 6660 x 4500 pixels at 360 dpi or 240 dpi. (See my Tips and Tricks on Using Genuine Fractals Print Pro 5.)
If I need Multi-Pass enabled because I use it in Photoshop for selecting objects and the render time is long, I will do it in a separate render where I keep the size of my output the same, but lower all the other settings such as Advanced Effects, Ant-aliasing, etc. I always only check the Object mask section.
Another area is Atmosphere. I checked atmosphere to see how the various Quality Boosts were marked. I looked at the Sky, Fog, and Haze page first. Also, I checked to see if Volumetric sunlight was checked

Then, I checked Quality boost for Light. According to Peggy Walter's tutorial on rendering, Quality boost can be set to -1.0 or even -1.5.
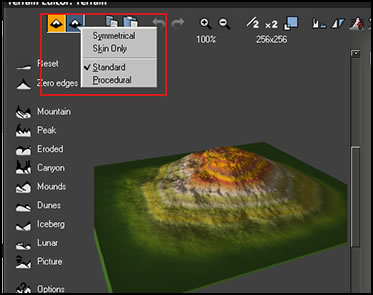
Next, I will check my terrain settings. Since I like to build a number of my terrains in GeoControl 2 at a terrain size of 2048 and then export them as 16-bit tiffs and bring them into Vue as procedural terrains, sometimes I found I have to convert them to standard terrains. I don't like to do this because I will loose the advantage of a procedural terrain, but I can do this if necessary.
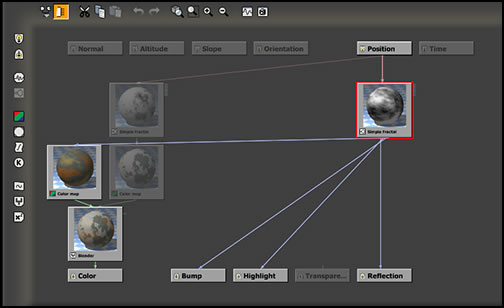
I can also modify the textures of my objects. Sometimes, that is all I have to do. I can keep the "same" material and modify it in the Texture Editor (of course, it will not be the "same"). Or I can change the material completely.
I could also change my atmosphere preset, but I do not like to do that since I build my images by first setting the atmosphere. If I have to change it to another atmosphere, I will usually have to change too many other elements such as additional lights, etc.
Other changes that can be made are in the cloud selection, eliminating lights, etc. But, again, these will change my overall image and that is not what I desire to do.
As I stated in the beginning, everyone will have the render settings that they like the most. These are what I found work for me when making still images.