Adobe Premiere Elements 9 is the hobbyist edition of Adobe Premiere Pro. But don't let that fool you because it has a lot of power, tools, and flexibility. For those who are not familiar with it, it is a video editing and creating program that allows the user to create multiple effects while editing video. It is tied into its counterpart, Photoshop Elements 9 (see my review) and uses the same Organizer as well as comes with Photoshop.com and gives the user the ability to upgrade to Photoshop.com Plus.
As you can see below, it has a number of new and enhanced features which I will discuss in this review.
New Features
- Easily import from Flip cameras and more—Easily bring in video from compact camcorders and DSLR still cameras.
- Easily fix audio problems—Easily reduce background noise and fix problems with audio volume and clarity so your movie has high-quality sound from start to finish.
- Add professional-style cartoon effects—Easily apply cool cartoon effects that instantly give your videos the appearance of an animated film.
- Share in an exciting new way on the web—Debut your movie with a convenient, interactive DVD-viewing experience online. Easily share your movie—complete with a scene index and chapter menus—on Photoshop.com or your own website.
- Quickly share videos and photos to Facebook—Conveniently share videos and photos to Facebook directly from the Organizer.
- If you use a Mac for your videos, you can now enjoy the power and simplicity of Adobe Premiere Elements software.
Enhanced Features
- Enjoy optimized HD editing—Experience fluid responsiveness and high performance when editing video, even HD.
- Get creative inspiration—Bring your ideas to life with relevant how-tos that appear just when you need them.
- Tie it all together with a theme—Easily transform a series of clips into a real movie by dragging and dropping one of many visually stunning movie themes onto your footage. Themes offer coordinated music, transitions, effects, disc menus, and title screens, and new themes include Pets, Fun in the Sun, and Crazy Cartoons.
- Share in Online Albums—Share your memories in one-of-a-kind Online Albums with your choice of animated templates that let you show off photos and videos together, with music. Adobe Flash® technology lets viewers have fun interacting with your movies. And share via public or private galleries—friends and family won't have to register to look.
I don't have a camcorder nor does my DSLR produce video, so I had some friends give me unedited footage they shot. This was an interesting challenge for me. Normally when I review a program, in the back of my mind are other programs that are similar, so an unconscious comparison goes on. I couldn't do that with Premiere Elements 9 because I don't use video so haven't experienced comparative programs. Basically, I will describe what I did and try to explain if it is intuitive or not since programs for hobbyists need to be somewhat intuitive.
I use the Organizer for both Photoshop Elements and Premiere Elements. It is the same Organizer which makes it especially easy if you are using both programs. It was a little confusing going from the Organizer to editing a film clip. I right clicked on a film clip that was part of a project and chose to edit in Premiere Elements 9. Adobe Premiere Elements 9 opened again and showed me a screen to start a new project. If I clicked no to that option, I got a blank screen, but then I could go into File, and choose to edit the project. Organize and Edit are sort of two separate parts of the program although they are integrally tied together.
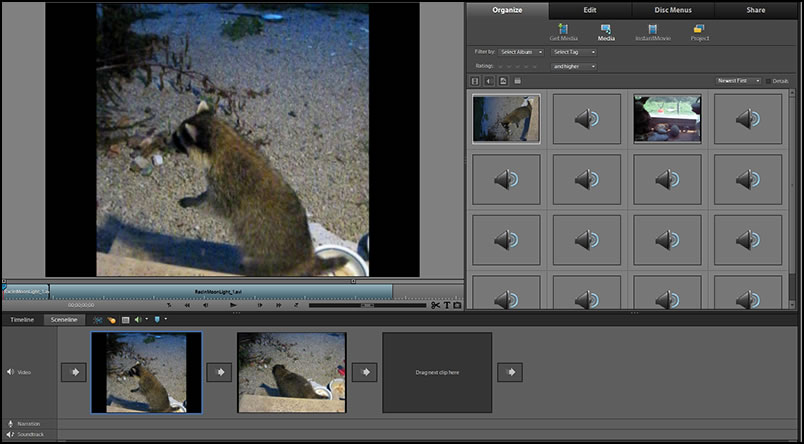
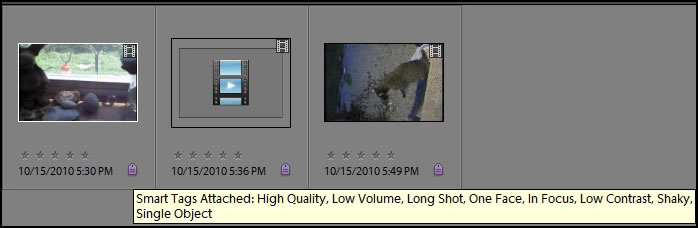
The Organizer not only stores the clips, but inspects them for blur, etc. and produces Smart Tags. If for some reason it doesn't analyze the media upon import, you can do it by right clicking on the thumbnail in the Organizer and choosing run auto-analyzer.
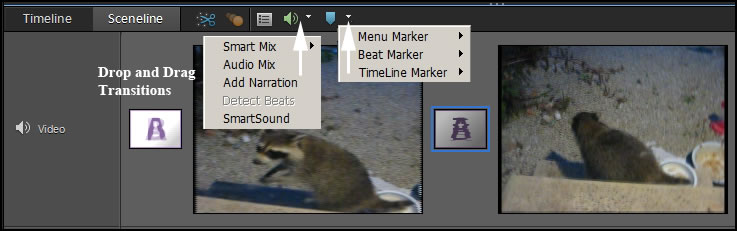
If you look at the above image of the raccoon, you will notice that the camera was held sideways. The first step I had to take was to correct that part of the video. I split the video into three parts using the scissors and created three film clips. The middle clip was the transition where the position of the camera was changed. That one I deleted. I, then, rotated the initial clip so the raccoon was vertical in the clip. I decided to scale it to fill the frame even though that did change the proportions of the raccoon a little since I scaled it in one direction only.
You can access all editing effects from the Edit menu or by left clicking on the timeline.
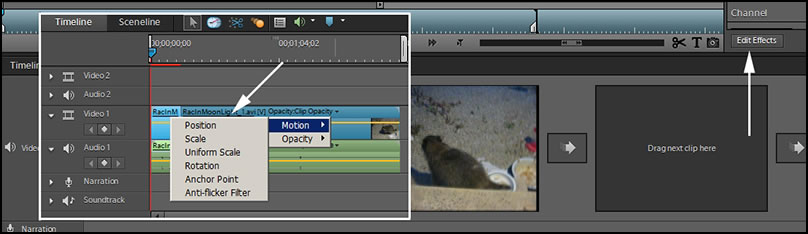
The Effects in Edit mode are impressive. You just drop and drag them onto the clip. You can Edit and prepare a clip by hand or you can use one of the huge number of Preset themes.
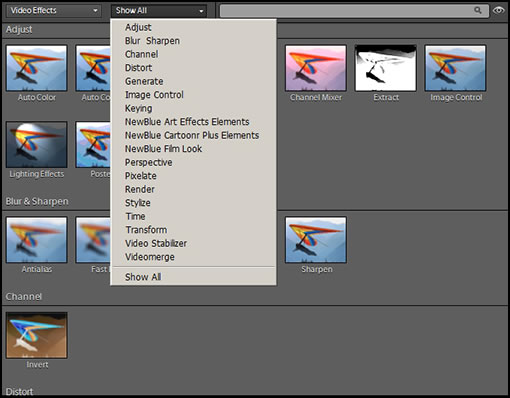
In the Effects menu is a new Effect which gives you the ability to turn your film clip into a cartoon. This Effect was a lot of fun to add.

A lot of Presets are available with the program and more can be gotten when you purchase the subscription to Photoshop.com Plus. I will discuss this more at the end of the review.
In addition to working with the Effects menu and other editing choices, you can access various tools from the Sceneline.
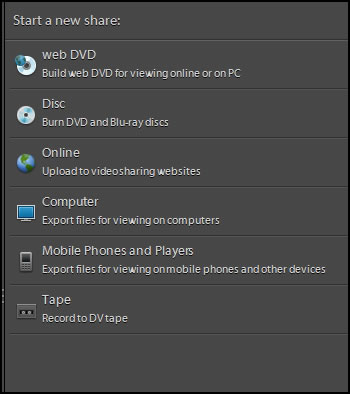
Uploading to various social networking sites as well as in different formats has been added to Adobe Premiere Elements 9. For example, from the program you can create web DVDs and upload to Facebook from the Organizer.
The Share Menu is impressive. You can burn DVDs and Blu-rays from inside the program. This is a time saver. You can, also, export files for viewing on mobile phones.
Supported import/export formats include:
AVCHD (import only), Blu-ray Disc (export only), DV-AVI (import/export on Windows, import only on Mac OS.), DVD, Dolby® Digital Stereo, H.264, HDV, MPEG-1 (import only), MPEG-2, MPEG-4, MP3, QuickTime, Windows Media (Windows only), and many more. For a full list, visit www.adobe.com/products/premiereel/systemreqs. Import/export of some formats, may require activation via an Internet connection. Activation is fast, easy, and free. Importing or exporting QuickTime formats requires QuickTime 7 software. Importing or exporting Window Media formats requires Windows Media Player.
System requirements:
Windows
• 2GHz of faster processor with SSE2 support; 3GHz processor required for HDV or Blu‐ray; dual-core processor required for AVCHD
• Microsoft Windows XP with Service Pack 2, Windows Media Center, Windows Vista®, or Windows 7
• 1GB of RAM; 2GB required for HD editing, (including HDV, AVCHD, or Blu‐ray)
• Microsoft DirectX or 10 compatible sound and display driver
• Windows Media Player (required if importing/exporting Windows Media formats)
Mac OS
• Multicore Intel® processor
• Mac OS X v10.5.8 (or newer) or Mac OS X v10.6 (or newer)
• 2GB of RAM
For both Windows and Mac OS
• 4GB of available hard‐disk space to install applications; additional 5GB to install content
• Graphics card with latest updated drivers
• 1024x768 monitor resolution at 96dpi or less
• DVD‐ROM drive (compatible DVD burner required to burn DVDs; compatible Blu‐ray burner required to burn Blu‐ray discs)
• QuickTime 7 software (required if importing/exporting QuickTime formats)
• DV/i.LINK/FireWire/IEEE 1394 interface to connect a Digital 8 DV or HDV camcorder, or a USB2 interface to connect a DV‐via‐USB compatible DV camcorder
• Internet connection required for Internet-based features
• DVD-ROM drive
• Internet connection required for Internet-based services
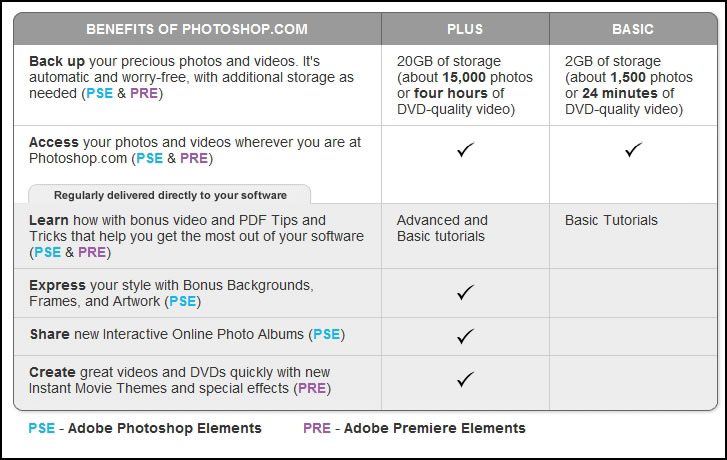
One cannot forget photoshop.com. Whether you use the Basic that comes with Premiere Elements 9 or decide on the Plus package, Photoshop.com is a very useful online service. If you purchase Premiere Elements from Adobe, you can get the Plus services for a $10 reduction. You can get the Plus version and Premiere Elements 9 for $119.99 with a mail in rebate. The program by itself can be purchased for $79.99 instead of $99.99. This includes the $20 mail in rebate. The offer is good from September. 21, 2010 to December 31, 2010. If you purchase Premiere Elements 9, for just a little extra you can purchase Adobe Photoshop Elements 9 as well. I recommend getting the combination. The price for both is $119.99. This is after a $30 mail-in rebate.
If you already own earlier editions of Premiere Elements, you can see a comparison chart. This is always a good way to determine whether it looks right for you. But the best way is to download a trial version. This is a full working version and can be used for 30 days. It is a complete package including templates. For more Adobe products, go to http://www.adobe.com
While I played with a few film clips, I concentrated on experimenting with the raccoon. I was able to take the film clip and accomplish my goal. I had fun ending this project with a confetti explosion. In experimenting, I used a number of the Effects which are numerous. In addition to Effects, Premiere Elements 9 comes with quite a collection of Clip Art. There is everything you need in Premiere Elements 9 to create lasting and fun memories through videos.
I want to thank DeeMarie and Dan Woodward for providing me with film clips.