I have been reviewing Adobe Photoshop Elements for many years now. It is my recommendation of choice if you do not want or cannot afford to purchase Adobe Photoshop. Adobe Photoshop Elements as well as Adobe Premier Elements can still be purchased as boxed versions. The cost is incredibly reasonable. The individual program costs US $99.99 with an upgrade price of $79.99. The cost of both products purchased together is $149.99 with an upgrade price of $119.99. In addition, both Adobe Elements 13 can be purchased at local retailers as well as through the web.
Adobe Photoshop Elements gives the user the opportunity of accessing it in two ways: through the Organizer or through the Photo Editor. Photoshop Elements has many of the features of Adobe Photoshop but it is geared toward the consumer who may or may not be familiar with photo editing or as I prefer to say "working with images. You can work with any 2D bitmapped image; it does not have to be a photograph. It can even be a rendered 3D image saved as a tif, psd, jpg.........file. In addition, Adobe Photoshop Elements 13 (as did previous versions) supports layers and transfers most or all effects from Quick mode and Guided Edit to layers allowing for a thumbnail masks to be created to further alter the image when opened in Expert mode.
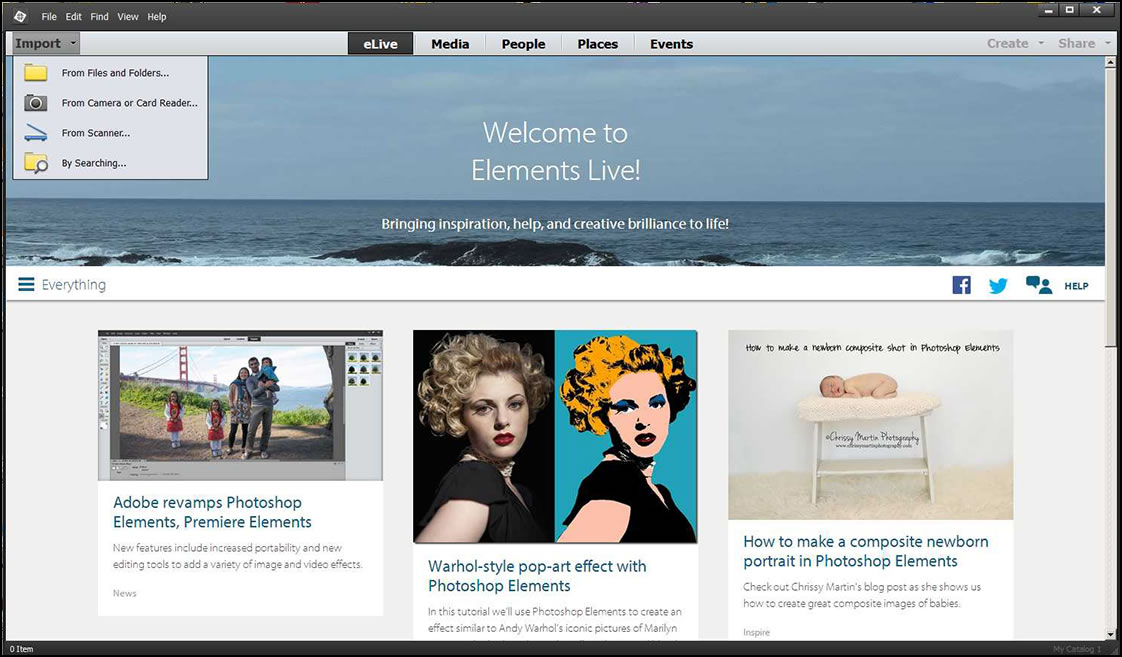
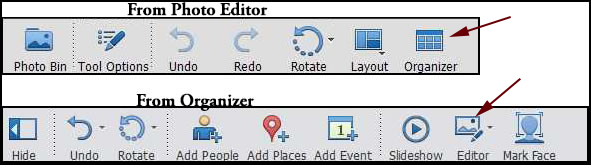
It is easy to access files using either screen. In the Organizer I can access a file through Import.
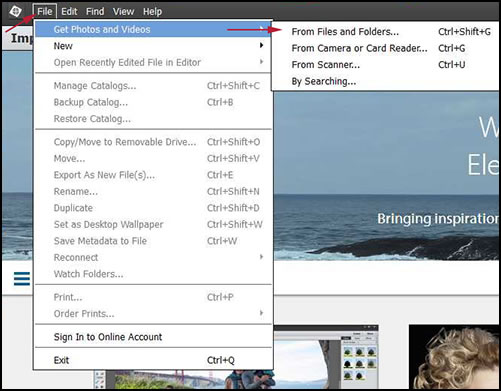
Or through File on the top toolbar.
The Photo Edit screen also allows me to access my media. In the screen captures, I have highlighted eLive which I will be discussing later in the review. Again, you can access a file through Open.
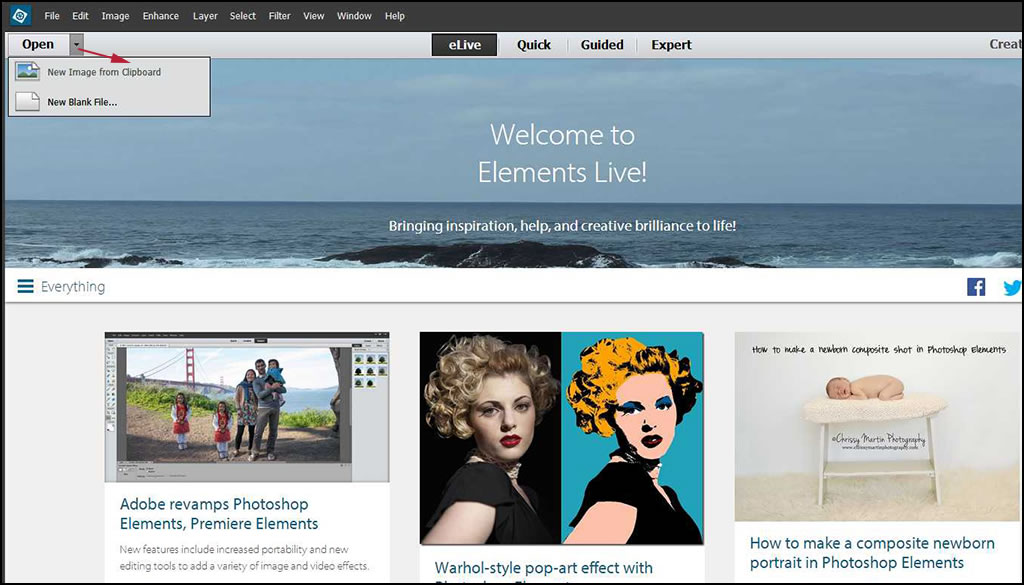
Or through File on the top toolbar.

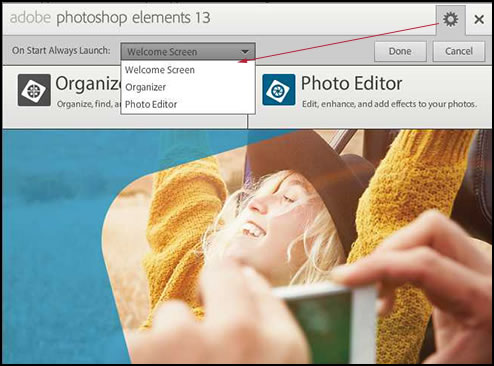
You can organize your images through Media, People, Places, or Events and you can edit your files in one of three ways: through Quick, Guided, or Expert mode. This allows for the beginner to edit their images as well as the experienced user. Also, you can combine the different ways. All this will be discussed in the course of this review.
Since I have been reviewing Photoshop Elements almost from its inception, I will mainly discuss what is new while giving a background on how to use it for people not familiar with it. The toolbars at the bottom of the screen are very important. They are your basic maneuvering tools. The arrows show my most frequent choices.
First lets look at the new and enhanced features according to the Adobe literature. Mobility and more integration with social networks has been enhanced and added to in Adobe Photoshop Elements 13.
NEW FEATURES
- Selections refined through nudging of selection boundaries
- Photomerge Compose to remix photos and easily add an element from one photo to another
- Cropping made easy with different size ratios available
- Effects once chosen can be visualized in four more ways
- Three new Effects under Guided Edits let you reimagine black-and-white photos
- Edit in full 16-bit color for more realistic color
- With Win 7 64-bit support, more photos can be opened at once without slowdown
- Addition of new Elements Live or eLive which gathers together tutorials and articles
- For facebook publication, blending your main photo and your cover photo and easily uploading it directly from Photoshop Elements 13
ENHANCED FEATURES
- Ability to more easily sync mobile photos with Photoshop Elements 13
- More easily transform your photos
- Create and share more easily
- New options in Guided Edits such as the ability to create b&w and color in one image
- Slide show creation enhanced to tell more of a story
I am using the program on a Windows 7, 64-bit machine. Below are the system requirement for both Windows and the Mac OS.
System Requirements
| Windows | Mac OS |
|---|---|
| • 1.6GHz or faster processor with SSE2 support • Microsoft Windows 7 or Windows 8 (32-bit versions will be installed on 32-bit systems, and 64-bit versions will be installed on 64-bit systems) • 2GB of RAM • 4GB of available hard-disk space (additional free space required during installation) • 1024x768 display resolution (at 100% scale factor) • Microsoft DirectX 9 or 10 compatible display driver • DVD-ROM drive (for installation from DVD) • QuickTime 7 software • Internet connection required for product activation and content download* |
• 64 bit multi-core Intel processor • Mac OS X v10.8 (latest dot release) through Mac OS X v10.9 (latest dot release) • 2GB of RAM • 4GB of available hard-disk space (additional free space required during installation) • 1024x768 display resolution (at 100% scale factor) • DVD-ROM drive (for installation from DVD) • QuickTime 7 software • Internet connection required for product activation and content download* |
I'll start the heart of the review by discussing the new features:
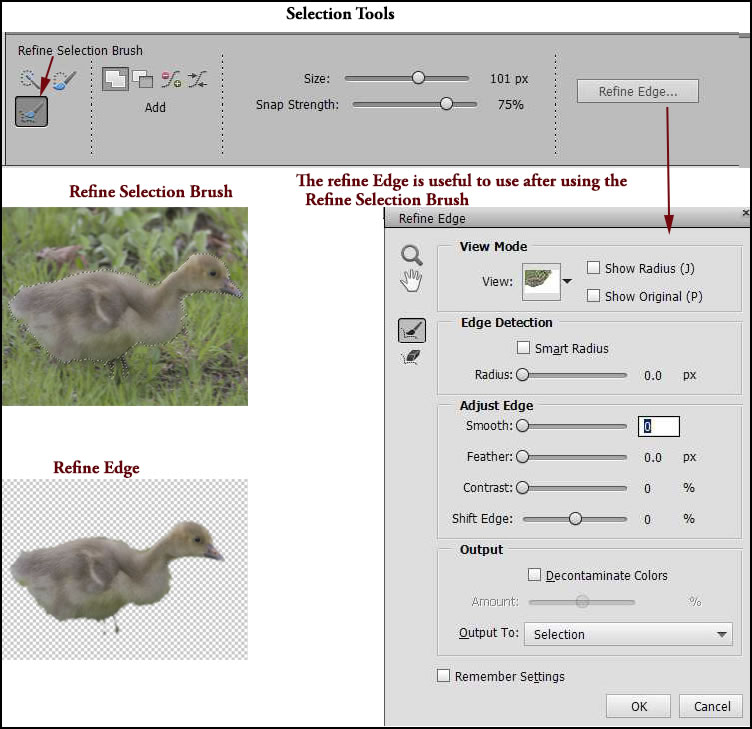
Selections refined through nudging of selection boundaries
Adobe has added a new tool - the Refine Selection brush - to help refine a selection. In Quick mode, make your initial selection, then, refine it using the Refine Selection Tool. The best way to use it is to make large changes (using a large brush size of 200 pixels or more) and, then, make smaller ones until you are satisfied. You can both add onto a selection or subtract from it. You basically push the selection to make it smaller or pull or drag from the selection to make it larger. The Refine Edge menu has been in previous versions of Photoshop Elements, but I am showing it to show the available selections tools in Quick Edit. As you can see, you can do a lot.
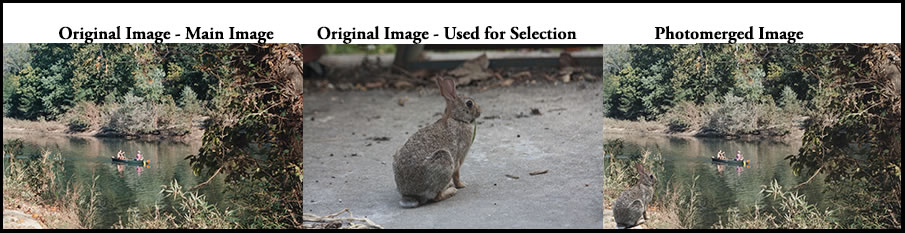
Photomerge Compose to remix photos and easily add an element from one photo to another
New Photomerge Compose from the Enhance/Photomerge menu basically takes 2 photos and uses one as the main photo and one to use to extract your selection. This can be done from any of the Editing levels - Quick, Guided, or Expert. The same step by step directions on how to do it will appear at all levels of editing. In brief, using selection tools, you select the image (in this case the rabbit) from one image. Once selected, it is automatically placed in another. At this point, you can reposition it and rescale it
as well as adjust the the color characteristics of the selection to match the main image.
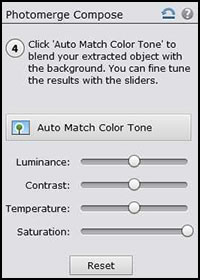
When I did automatch, it increased the saturation of the image which in this case brought out the brown a little more.
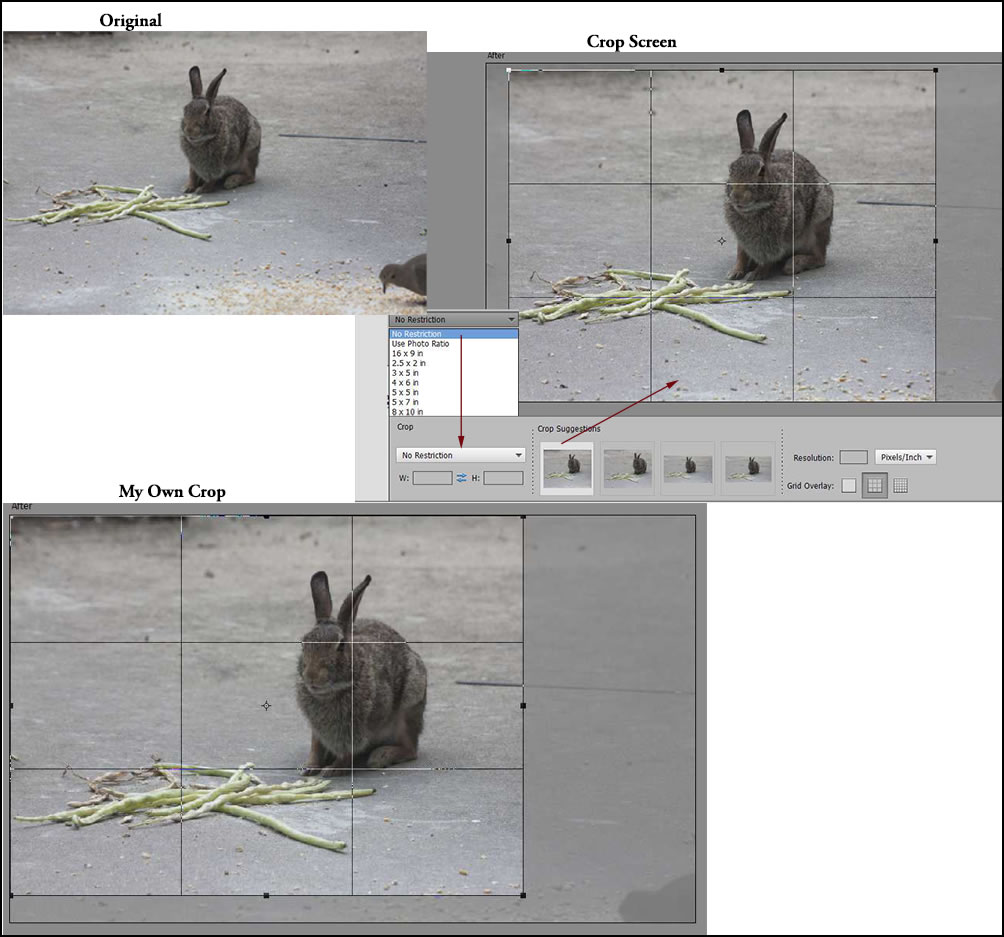
Cropping made easy with different size ratios available
Cropping an image can confuse many people. I, personally am old-fashioned in this regard and take exception to many images where the main subject appears to be leaving the image (where this is not intentional or is bulls eyed only because it was centered when taken). Adobe Photoshop Elements 13 has added some new tools. How the cropping is done is still up to the individual, but it will show automatic choices and size ratios. I did not like the four automatic choices for this image, so I created my own. As an aside, in today's photography, I think composition is the least thought of aspect of an image when it is taken whereas it is really one of the most important. It can make or break how an image looks and the emotional impact of an image.
In the image below, it was taken through a glass door and had to be done quickly as the rabbit moved and other animals came to eat. But I knew I could crop it later. Normally when I take an image, I like to take it full frame and compose it as I take it, not have to do it later.
Effects once chosen can be visualized in four more ways
In this version there are more variations in Effects variables when in Quick Edit mode.

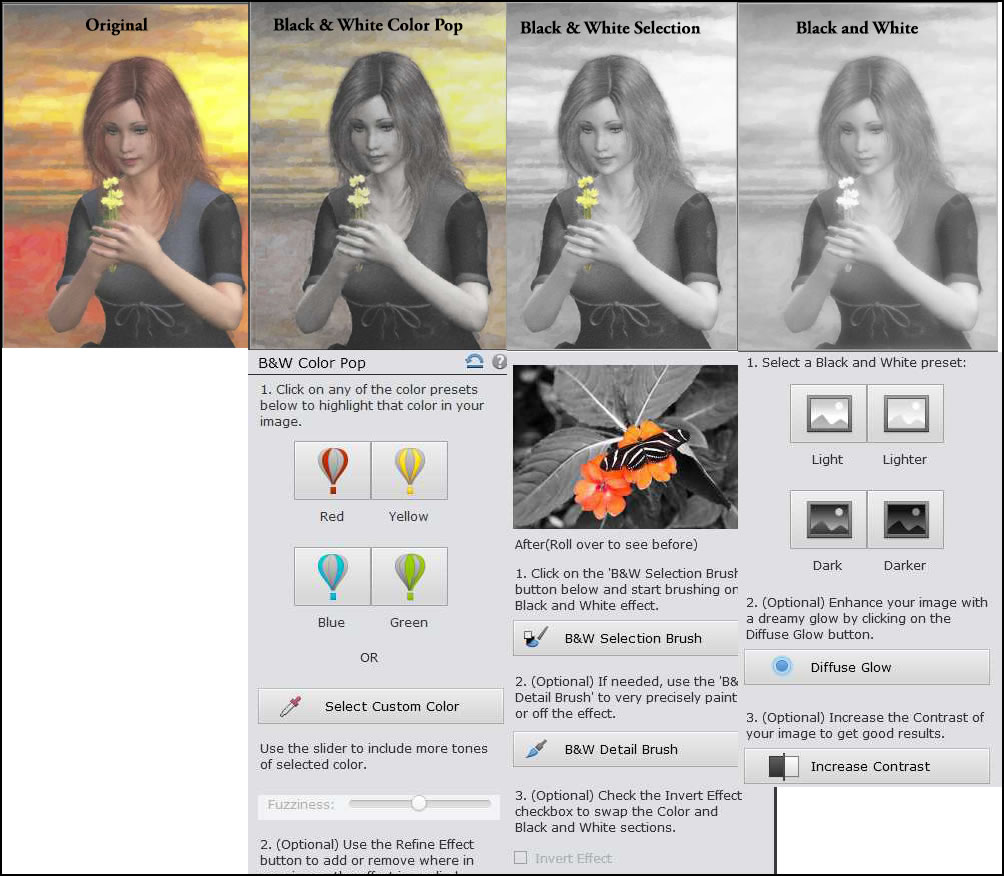
Three new Effects under Guided Edits let you reimagine black-and-white photos
- Make a single color pop against a black-and-white background
- Create a black and white selection
- Create a black and white Image
New features have been added under the hood such as: Edit in full 16-bit color for more realistic color and have Win 7 64-bit support, so more photos can be opened at once without slowdown.
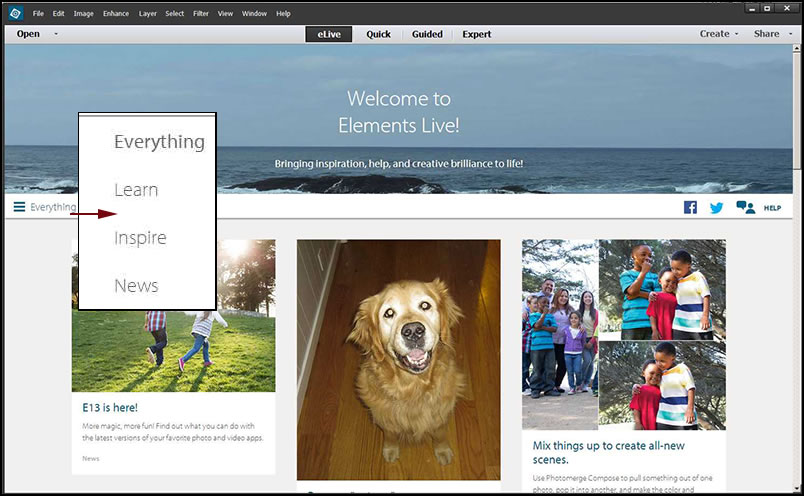
As stated earlier, a big addition to Adobe Photoshop Elements 13 has been the increased ability for mobile work and support. Elements Live or eLive has been added. This is an easily accessed repository for all sorts of information about Adobe Photoshop Elements 13 - all in one place. It includes examples, tutorials, article, etc. Articles will be added on a continuous basis. To use eLive, just click on the name on the top toolbar.
When I address working with Mobile Devices, I am combining both new and enhanced features.
Mobile devices and Facebook
- Easily prepare and upload Facebook photos
- More easily sync mobile photos with Photoshop Elements 13
- Share more easily
Before you begin working directly with Facebook and other mobile services, you need to authorize Photoshop Elements 13 to work with them. These are the instructions found in the guide:
"Authorize Elements to work with Facebook
1. Select a photo in the Organizer, and then click Share in the upper right corner.
2. In the list, click Facebook.
3. In the Facebook dialog box, click Authorize.
Facebook opens in a browser window.
4. Click OK in the two web pages to allow Elements to publish to Facebook.
5. When you see the Thank You page, switch back to Photoshop Elements and click Complete
Authorization.
6. Click Cancel to exit the Facebook dialog box."
The main reason this Facebook section seems useful to me is that when you upload the image, it will be the correct size.
"Authorize Elements to work with mobile services
To set up mobile services with Elements, you need a free Adobe ID and the free Adobe Revel® app for your iPhone, iPad, Android, or Windows 8 mobile device.
1. In the Organizer, click File > Sign In to Online Account
2. Sign in with your Adobe ID (If you do not have an Adobe ID, click Create an Adobe ID to set one
up first.)
3. Get the Revel app from iTunes, the App Store, the Google Play store, or the Win App Store.
4. Open Revel, and then sign in with your Adobe ID."
Adobe Revel is a free mobile app that will allow you to see your mobile albums on your mobile devices. You can, also, share your slide shows as movies using Adobe Revel.
Since I do not work much with mobile apps and horror of horrors don't have a Smart phone, only a poor original iPad, I am copying the "Sharing" section directly from the Adobe Guide.
"Sharing
It’s easy to share mobile albums: just hover the mouse pointer over the edge of the Mobile Album, and then click the share icon. A window appears with a link to the web gallery for the Mobile Album. You can select a check box that controls whether the photos can be downloaded. From there, you click a button to copy the link or send it in an email. After you copy the link, you can paste it to Facebook or other social media. You can also create a Mobile Album and share a private link to it in one shot. Simply select the media you want to share in the Organizer’s grid view, click Share in the upper right corner, and then click Private Web Album."
Everyone who owns a copy of a previous version of Photoshop Elements needs to decide whether they want to upgrade. I always suggest downloading a trial version. In addition, look at some of my or others previous reviews to see what features have been added or enhanced in each upgrade. If you do not own an image editing program, I highly recommend Photoshop Elements 13. In addition, if you are familiar with Adobe Photoshop and comfortable using it, the Expert mode in Adobe Photoshop Elements is as similar as you can get.
For more information, go to the Adobe website and the Photoshop Elements 13 information on the website.