Perfect Photo Suite 6 is now module oriented with Perfect Layers 2 as the core allowing users to better integrate Lightroom and Aperture with Photoshop. Now you don't have to stop your workflow in Lightroom or Aperture to composite photos and edit layers because you can seamlessly bring the file into Photoshop in a layered format. You can, also, use Perfect Photo Suite 6 as a standalone application.
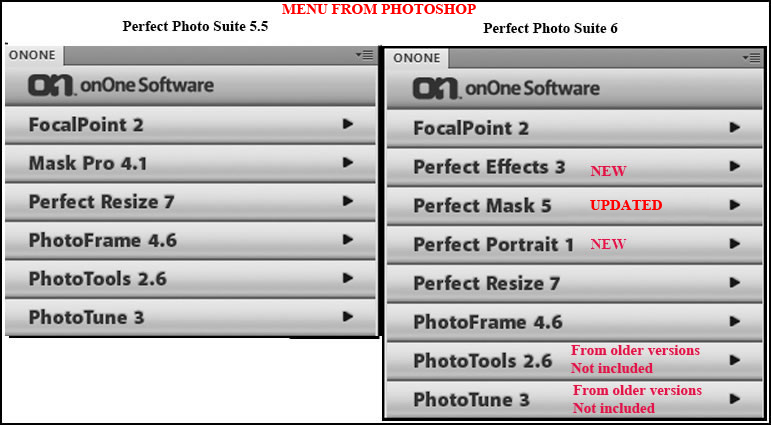
New modules and updates of modules have been added to Perfect Photo Suite 6. They are: Perfect Layers (won't show up in Photoshop), Perfect Portrait 1, Perfect Effects 3, and Perfect Mask 5. Now you can move easily between them as well as access the new browser to look for images. In this review I will discuss all the modules contained in version 6 with emphasis on the new modules. New versions of some of the onOne Software products were introduced earlier in Perfect Photo Suite 5.5. These have already been reviewed. They are all contained in the Perfect Photo Suite 5.5 Review except for FocalPoint 2. If you click on the items in the Perfect Photo Suite 6 menu, you will also find links.
Perfect Layers 2
- Combine multiple images from Lightroom, Aperture, or any application, into a single, layered file
- NEW Crop Tool, Retouch Brush and File Browser
- Adjust size, position & blending mode
- Use layer masks and masking tools to blend multiple layers together
- Add Color Fill Layers for photographic effects
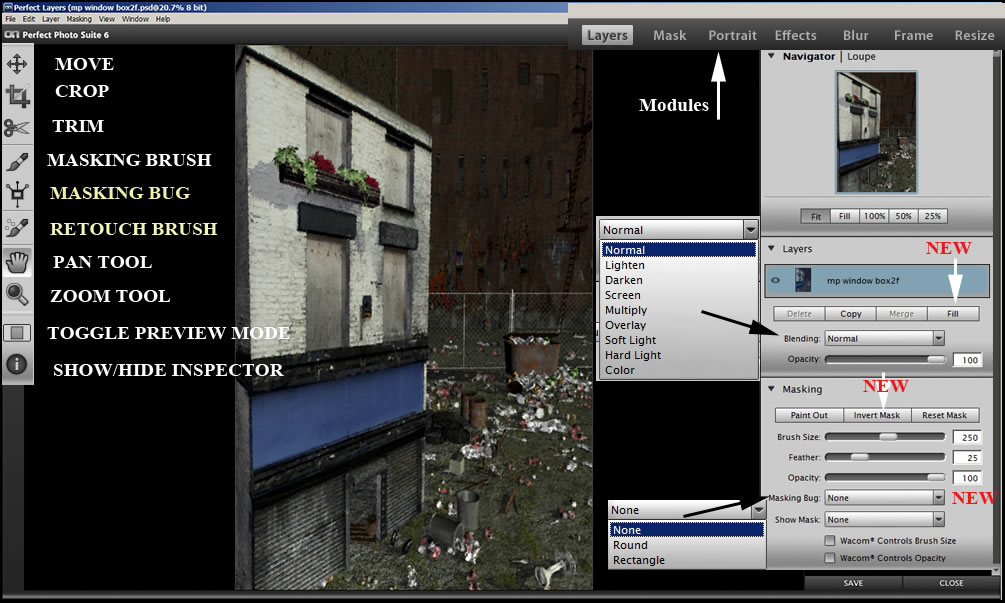
Perfect Layers 2 can work as a plug-in to Lightroom or Aperture or as a standalone. The screen below represents the screen one would see when the program is accessed as a plug-in or used as a standalone. Notice in the upper right corner the other modules that comprise Perfect Photo Suite 6.
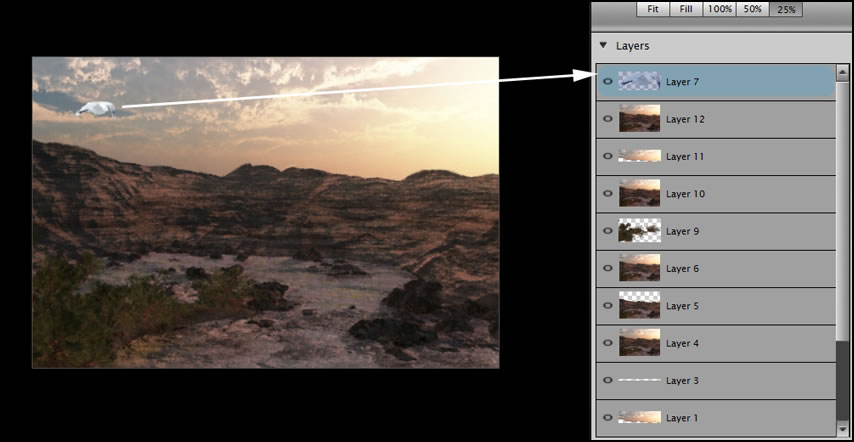
Perfect Layers supports basic Photoshop files. It creates Photoshop compatible files. This means that if you open a layered file created in Photoshop in Lightroom, for example, it will show the layers but will create a composite if the file contains: Text layers, Vector masks, Layer styles, Adjustment layers, Paths, Alpha channels, Smart objects, Layer groups, Clipping masks, Linked Layers, Locked Layers. Perfect Layers is not designed as a Photoshop replacement. It will not turn Lightroom into Photoshop. What it will do is allow you to modify images in Lightroom by creating layers, creating composite images using layers, etc. To demonstrate how an image will look, I brought this one into the standalone program. (It works the same way in Lightroom.) It was made up of layers and multiple alpha channels. To the layers already there, I added a bird. The bird was made up of a selection of the bird and a background. Both layers were added. I deleted the background layer of the bird and resized and moved the bird using the Transform tool. Now I have the original layers of the basic image plus the bird.
I could, also, select two images at the same time from a Lightroom catalogue, go to File> Plug-in Extras> Perfect Photo Suite 6 to open Perfect Layers as well as the Perfect Layer's masking menu which is different than Perfect Mask 5 (both are automatically opened) and the two images became a composite with each individual image on a layer. There are others ways two files can be merged as well. It is similar to the concept with the bird and the water scene.
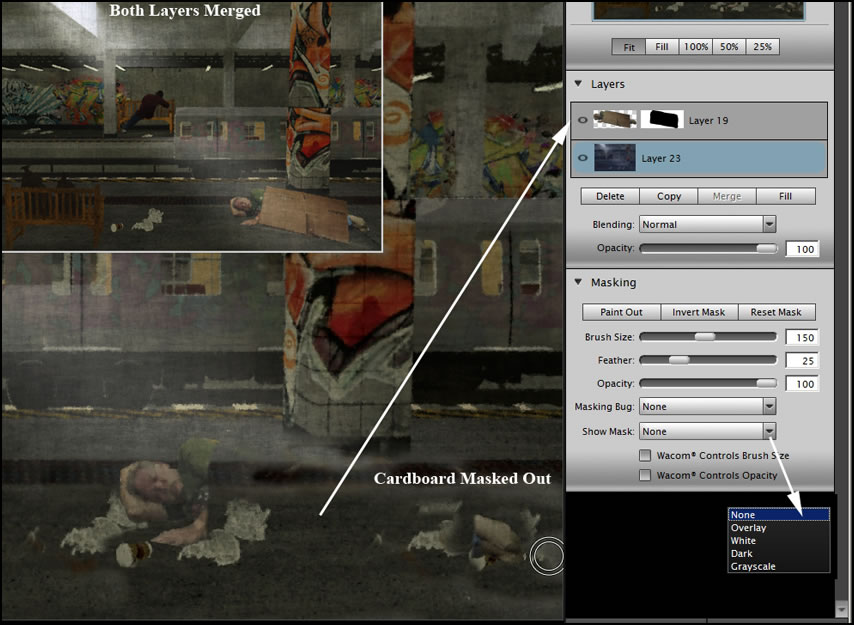
I tried the Masking Options using Perfect Layers. Paint in, Paint Out and Invert give me the flexibility to perfect my mask. I masked the cardboard so the underlying layer would be visible as a demonstration. Masking gives additional dimensions to Perfect Layers 2 and the ability to be more creative.
When I tried to merge many layers, Perfect Layers 2 stopped working. However, I had no problems merging two at a time until they were all merged.
Perfect Layers 2 definitely adds a dimension to Lightroom; with the new tools it adds a level of creativity not formerly possible. If you do not have an image editing program that supports layers, you can add the standalone to your toolbox and work with separate images and, then, bring them together in Perfect Photo Suite 6 to add additional elements and effects.
Perfect Mask 5
- The next generation of the popular Mask Pro 4
- High quality masks in just a few clicks
- Automatic subject detection creates initial mask
- Works great on tough subjects like hair and glass
- Works directly with Lightroom, Aperture or Photoshop
- NEW Keep and Erase tools
- NEW Refine tool
- NEW Background Library
- NEW Automatic Solid Background Removal
- NEW Flexible previews
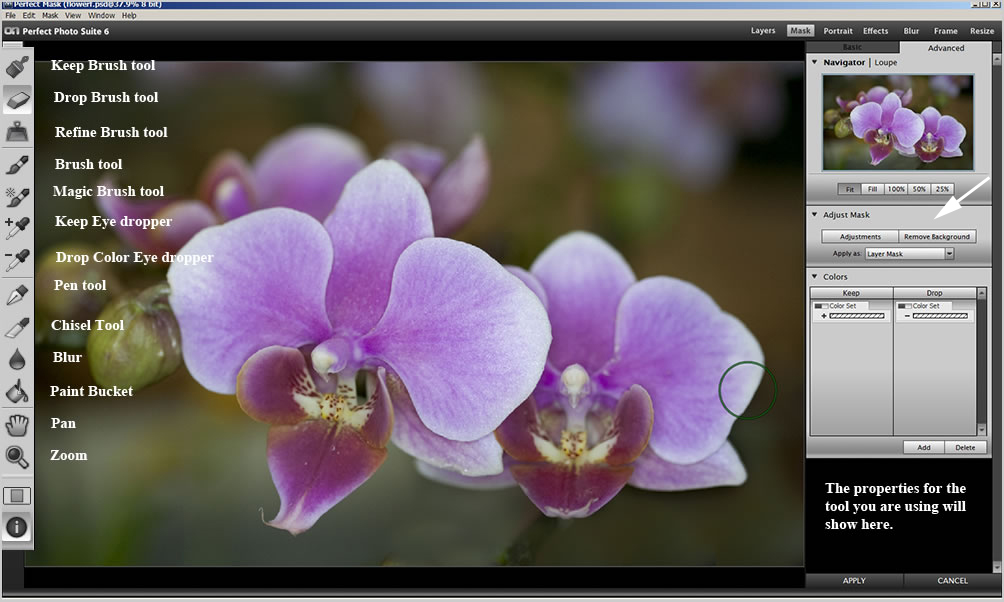
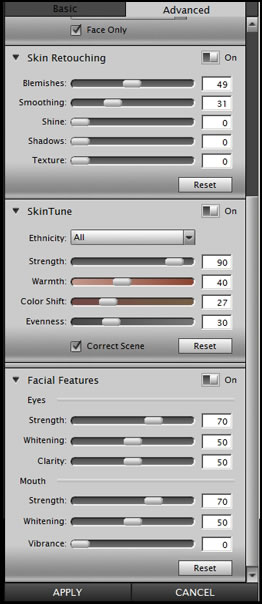
Perfect Mask 5 can be used in Lightroom, Aperture, as a standalone, or as a Photoshop and Photoshop Elements plug-in. It is geared toward removing backgrounds. You can even substitute another background behind the original one that you will remove. Below I have labeled the advanced set of tools. The Basic set has fewer tools. When you first open an image in Perfect Mask 5, it automatically analyzes the image. Perfect Mask 5 provides tools for erasing simple backgrounds as well as complex ones.
With simple backgrounds of basically one color, you can use the Remove Background command. The Adjustment menu (next to the Remove background button) is very useful and should not be overlooked.
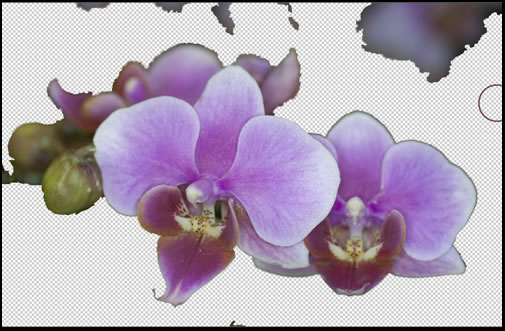
I chose another image to use. I like to work with the Keep and Drop Color Sets. A few swipes of the background with the Drop Brush removed most of the background. Then a cleanup with the Refine Brush did the trick. You can, also, add and delete the Drop and Keep colors as you work. The image below took under two minutes to remove the background.
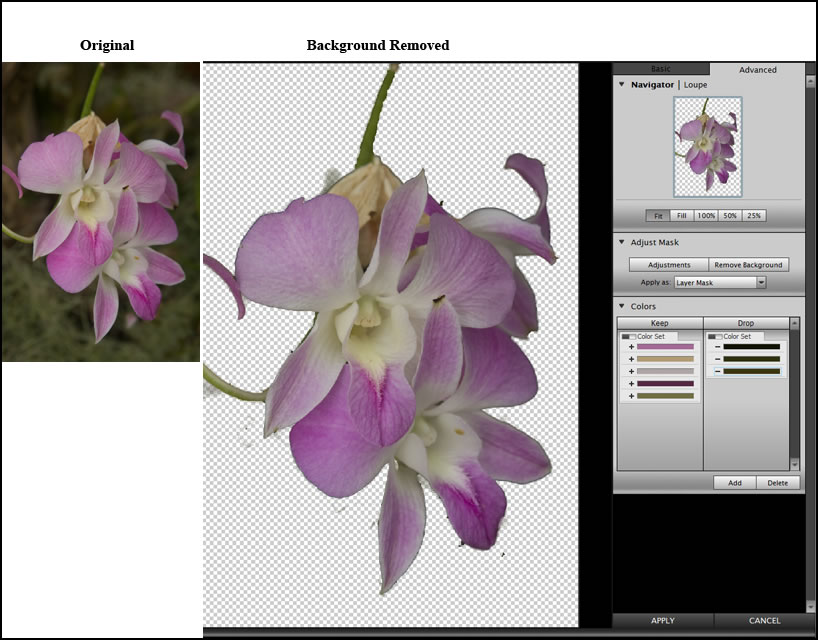
This demonstration of masking shows how easy it is to remove backgrounds and keep clean edges on the foreground image. However, I did have some problems in removing grey hair that was on a brown background in a portrait. Both the Drop Brush and Refine Brush kept deleting some of the hair no matter how I changed the settings. With other images the removal of the background when dealing with wispy hair for example, worked better when the background colors were very dissimilar.
Perfect Portrait 1
- Completely new product takes the mystery out of retouching
- Just the right tools for reducing blemishes & enhancing eyes, lips and teeth
- Automated face and feature detection
- Total control over strength of enhancements
- Works as a standalone application or directly with Lightroom, Aperture or Photoshop
Perfect Portrait is designed specifically to work with portraits. It is a new addition to the suite. It has automatic face detection. When it is first opened, it analyzes the face and sets up basic parameters to improve it. Once that is completed, you have a choice of the type of face you want to work on and how you want to fix it. These presets are not set in stone and can be modified.
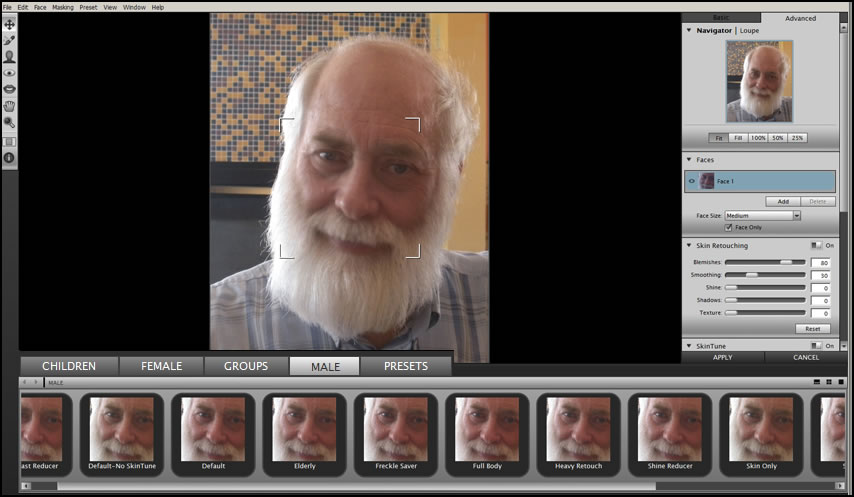
Below is the basic menu. Notice the large number of choices. Each set of menus will reflect the type of basic modifications chosen such as "reduce shine," etc.
Using the "Female Elderly Preset", I easily removed some of the lines especially around the chin and eyes. This is simple and easy to do. You can make changes to the face only, turn selections on and off, and even use the controls for creating weird effects to the skin or face only leaving the background alone.
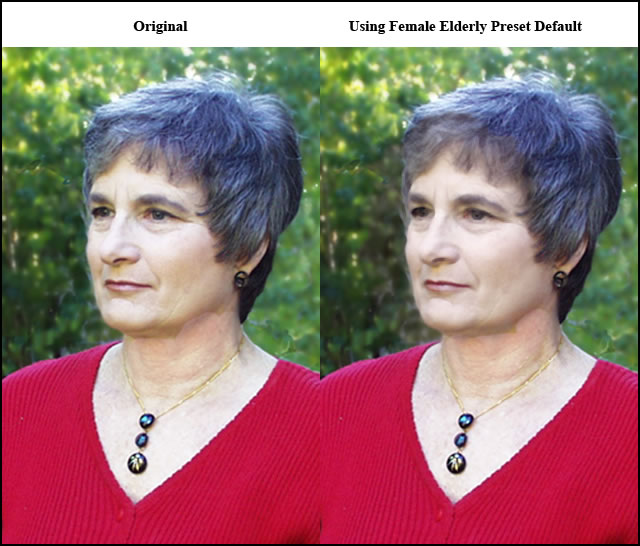
This is a nice addition to the Perfect Photo Suite.
Perfect Effects 3
- The next generation of the extremely popular PhotoTools 2 Professional
- Complete library of professional photographic effects
- NEW Live, full screen effect previews
- Stack, blend and combine effects to create your own unique look
- Works directly with Lightroom, Aperture or Photoshop
- NEW Manual Controls
- NEW Vintage Effects
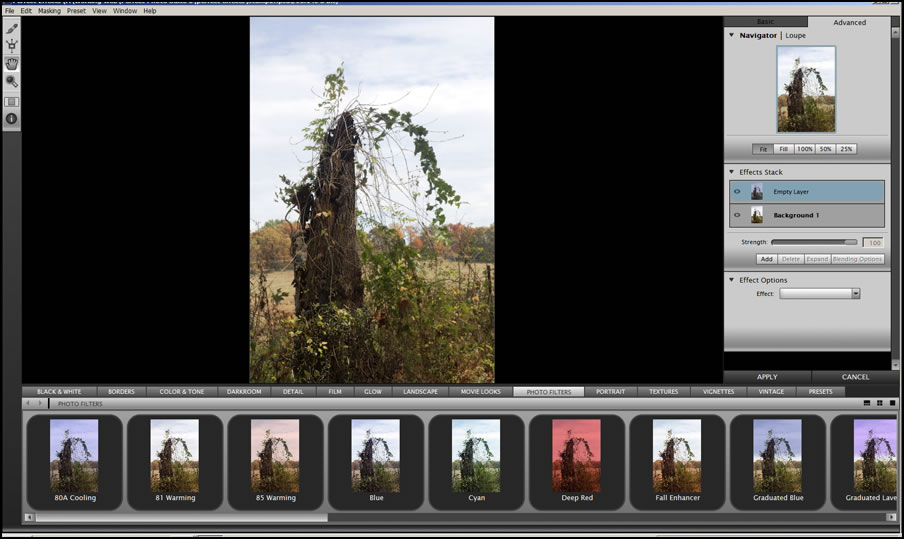
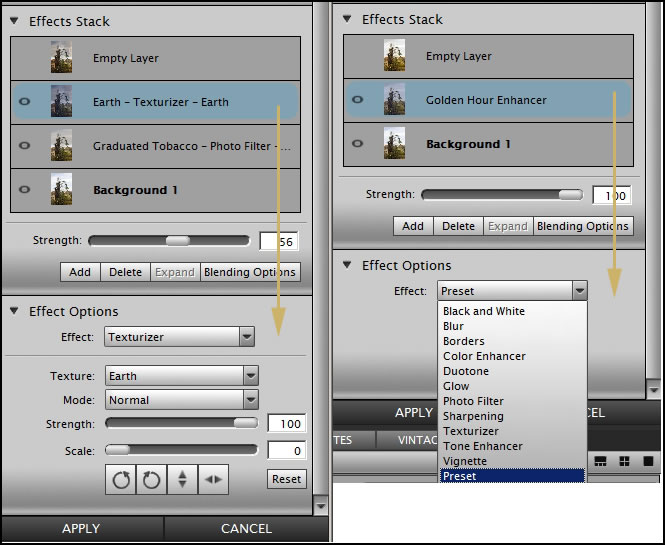
You can work with Perfect Effects 3 in Basic mode or in Advanced where you have more controls. Notice in the above screenshot of the interface the Empty Layer. I always am happy to see that I can stack and modify layers without having to go out of the program. You can do this in both Basic and Advanced modes.
You can work from the selection of Effects at the bottom of the screen or add or change layers as you go using the Effect Option's menu. This does differ from the choices at the bottom of the screen and for some filters seems more filter specific than for others.
The effects you can get with Perfect Effects 6 are only limited by your imagination.
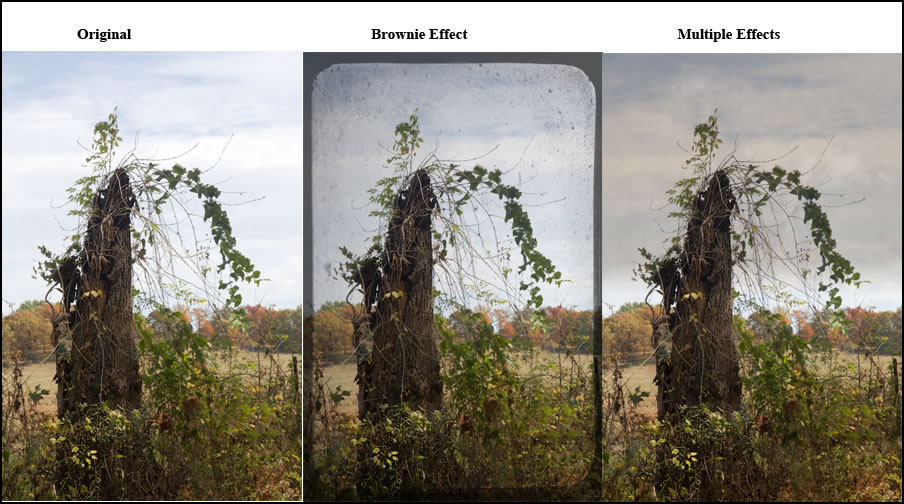
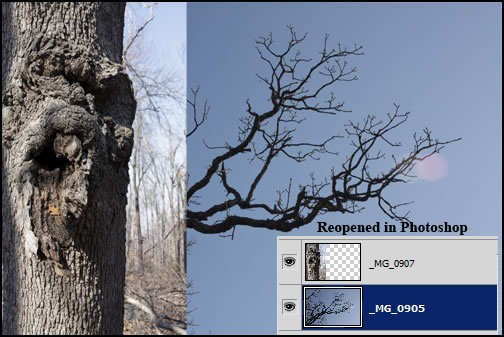
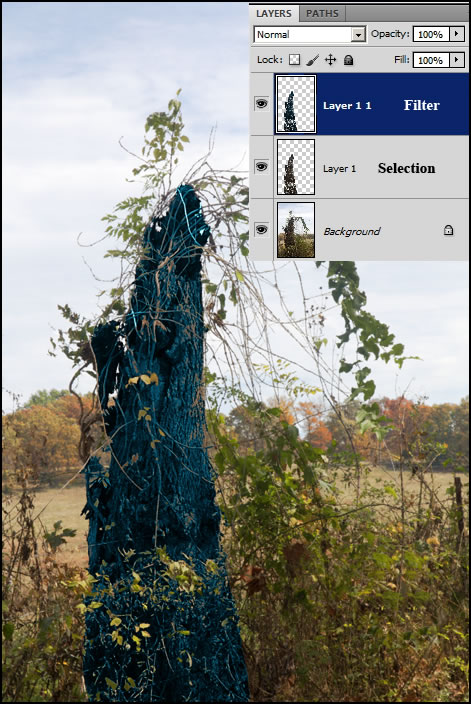
I discovered that you do not have to work with the whole image. You can use selections on their own layer and just affect those. I put the tree stump on its own layer and, then, I brought the image into Perfect Effects 3. Only the layer with the tree on it was affected.
The ability to stack layers and work with selections on their own layer makes Perfect Effects 3 an excellent plug-in for manipulating your image.
Since I have already reviewed the other components in Perfect Suite 6 - Perfect Photo Suite 5.5 Review and FocalPoint 2 - , I will just list their main features according to onOne Software and add a few comments.
- The industry standard for image resizing
- Enlarge images up to 1000% without sacrificing quality
- Crop & resize images in one easy step
- Works as a standalone application or as a plug-in for Photoshop, Lightroom and Aperture
Perfect Resize 7 has been an integral part of my workflow since early versions when it was Genuine Fractals. I have seen the program grow and use it daily. I guess I could say I rely on it when starting out small and enlarging my images.
- Recreates the blur and depth of field from popular lenses including selective focus, fast aperture and tilt-shift lenses
- Ultimate defocus control after the shot is taken. You control the amount, feather and type of blur
- Works as a standalone application or as a plug-in for Photoshop, Lightroom and Aperture
I work with depth of field a lot when creating images. FocalPoint 2 works really well. It is a great alternative to using layer masks in Photoshop.
- Create full-page album layouts for your clients
- Add realistic film edges to your images
- Includes hundreds of overlays, textures & backgrounds
- Works as a standalone application or as a plug-in for Photoshop, Lightroom and Aperture
PhotoFrame 4.6 is especially useful if you are creating collages of many small elements because you can use frames to vignette them or make them stand out.
Perfect Photo Suite 6 as well as the individual components can all be downloaded for a 30-day trial.
The system requirements are:
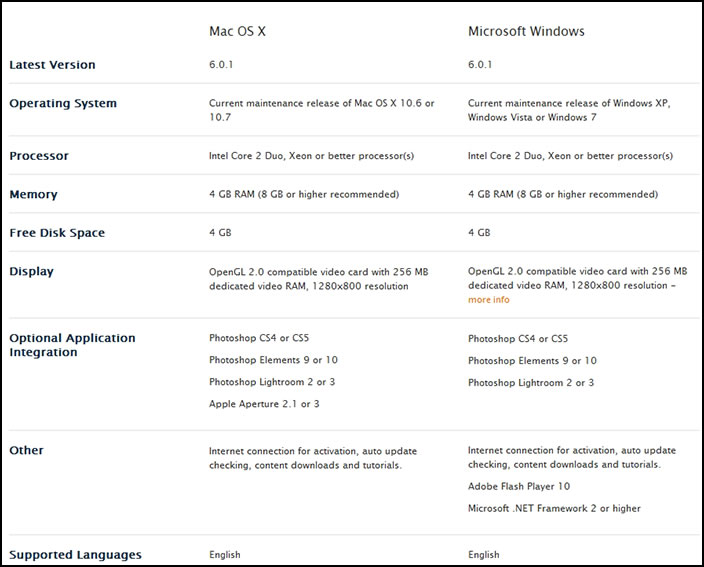
You can also view recommended system configurations.
The full version of Perfect Photo Suite 6 is $299.95 with an upgrade price of $149.95. Buying the suite is very cost effective. Depending on the programs chosen, buying 2 or 3 individual programs will cost the same as purchasing the suite. Purchasing Photo Perfect Suite 6 will add greatly to any digital artist's toolbox of programs. For lots more information including many tutorials and schedules for webinars, go to the onOne Software website.