Previously I reviewed Nik Software's Viveza 1. Many new features have been added to Viveza 2. Viveza is a fast, easy to use and accurate plug-in for globally or selectively changing the light and color in a photograph. It can revolutionize how you work. It utilizes The U Point® Technology: "The U Point technology powered Color Control Points let you identify and isolate objects within a photograph by placing a Color Control Point directly on the object or area to be affected. By analyzing the color, tonality, detail, and location, the Color Control Point automatically determines where and how to apply certain effects, based on your needs."
I will be discussing what is new in Viveza 2 as well as demonstrating how it works and what it can do. Following is a list of new and improved features in Viveza 2.
• New Global Adjustments
• New Enhancement Sliders: Shadow Adjustment and Structure
•New Levels and Curves
• Improved Interface Controls
• Improved Selection Engine
• Improved Control Point Interaction
Immediately you will see the difference between Viveza 1 and Viveza 2. First notice the changes and additions to the right panel.
Next notice how some of the changes can be created global as well as can be controlled by the Control Point feature. Structure Control and Shadow Adjustment Control have been added to both methods of adjusting your image. Structure, which is both global and Control Point activated, is used to accentuate detail and emphasize structure.
The new Group Controls are very interesting. They allow you to group together many different Control Points on a single image for ease and consistency of use.
For those of you who use Levels and Curves a lot, and I know I do, you will be glad to find it has been added to this plug-in as a new tool.
The sliders shown above can be used globally or will reflect the changes made by the manipulation of the Control Points. When you do not have a Control Point selected, you can globally manipulate the controls. If you select a Control Point, you will notice that the sliders reflect just the changes made to that Control Point. This gives Viveza 2 much more flexibility than was found in Viveza 1.
All the images used for demonstration purposes are already finished images except if otherwise noted.
I used Levels and Curves to globally darken the image; then, I added Control Points on the trees to redden them a little and increase the saturation. I, also, added one Control Point on the cloud and added a touch of red. I grouped these Control Points on the trees. Since the change created by Viveza 2 is on a new layer, I can modify it further in Photoshop.
In the following image I globally darkened the image using the Levels and Curves adjustment; then using Control Points I desaturated the trees and changed the hue. To do this I first chose one area of trees and made the changes. Then, I duplicated those changes and created minor adjustments. When I was satisfied, I grouped all the tree changes together. Lastly, I used a new Control Point to darken and desaturate the sky a little. I did this so the falls would jump out of the image. Even though I darkened the whole image globally, by using the Levels and Curves tool, I could darken it so that all areas were not darkened to the same degree. Thus, the white of the falls was not modified a lot.
To give you an idea of how you can use these extremely flexible tools, on the lower image, I first globally added more red (+33) and more blue (+41). Then I added a Control Point to the green grass and compensated for the increases by changing both the red and blue by -13. Lastly, I darkened the image using the Curves and Levels so I had a smooth curve with the point in the center. Again, if I had just globally darkened the image, the change would have been uniform which is not what I wanted. The colors are a little exaggerated to better show what can be done.
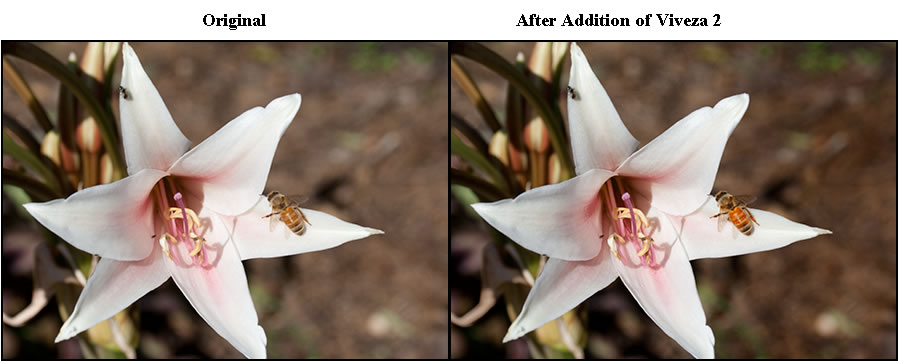
With this image which had not been modified at all, I accentuated the bee by using a Control Point to increase the saturation, contrast, structure, and lower the brightness a little so its orange body was not too bright. I, lowered the brightness in the background and upped the structure in the flower and added a little cooling. This took maybe 5 minutes.
I hope these images have shown the flexibility of this plug-in as well as its ease of use and time saving ability.
System Requirements:
Windows
- Windows XP, Windows Vista, Windows 7
- AMD or Intel processor, 64-bit compatible
- 1 GB RAM (2 GB recommended)
- Adobe Photoshop 7 through CS4; Adobe Photoshop Elements 2.0 through 8.0; Adobe Photoshop Lightroom® 2.3 or later
Macintosh
- Macintosh OS 10.5 or later
- Intel® Core™ Solo, Intel Core Duo, Intel Core 2 Duo, Intel Xeon® processor (Universal Binary compatible)
- 1 GB RAM (2 GB recommended)
- Adobe Photoshop CS2 through CS4; Adobe Photoshop Elements 4.0 and 8.0; other Adobe Photoshop plug-in compatible applications; Adobe Photoshop Lightroom® 2.3 or later; Apple Aperture 2 (version 2.1 or later).
The cost of Viveza 2 for a full version is $199.95 and for an upgrade $99.95. For a Free 15 day trial click on the link and go to "demo." Nik Software offers many video tutorials which can be downloaded as well as seen on the monitor.
It is so easy to make both global and selective changes using Viveza 2. Not only does it work very well, but it is a terrific time saver. While you are considering purchasing Viveza, look at all the wonderful products by Nik Software. I have reviewed many of their excellent software plug-ins.
Even if you own Viveza 1, this is one upgrade that is absolutely worth purchasing. If you do not own it, try it. It is a huge time saver as well. By using the Control Points through the U Point® Technology you have the ability to select areas of your image without having to make complicated masks or time intensive selections. I'm glad I have this plug-in in my toolbox.