Review of Alien Skin Software's Image Doctor 2
Image Doctor 2 is a plug-in filter set for Adobe® Photoshop® and compatible host programs. The following information is taken from the Alien Skin website:
- Adobe Photoshop CS2 9.0.2 or later
- Adobe Photoshop Elements 4.0.1 or later (Macintosh)
- Adobe Photoshop Elements 5 or later (Windows)
- Corel Paint Shop Pro Photo X2 or later
- Adobe Fireworks CS3*
*Note: Using Alien Skin plug-ins as Live Effects in Fireworks CS3 are not supported.
The purpose of this plug-in set is to retouch and restore images. It uses image selection to accomplish these goals. One can use presets or adjust a number of sliders. The filters are:
- Dust and Scratch Remover
- Smart Fill
- Blemish Concealer
- Skin Softener
- JPEG repair
I tested all these filters with my own images, and I will comment on each after I discuss the program as a whole. The preview screen is very large. One can activate a split screen in many variations on the image as well as activate a "before" button to see what the image looked like before the change was made. The filters were very easy to use. It did not take long to get a feel for how to create the selections for each filter. There is, also, a magnifier and a hand to move the image on the screen.
Since I have not used Image Doctor 1, I am listing what is new according to Alien Skin:
- Improved rendering speed and quality
- More seamless integration of replacement pixels
- Better matching of background patterns
- Expansion of skin retouching
- Native support for Macintosh Intel computers
- Multiprocessor support
- 16-bit support
- Simplified interface
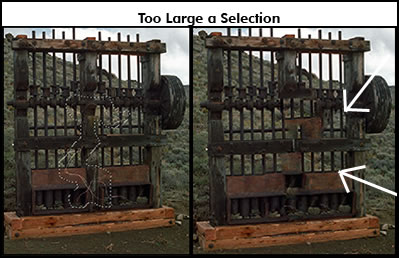
The first filter I tried was the Dust and Scratch Remover. Initially my selections were too large and, as you can see, the finished product was not too good.
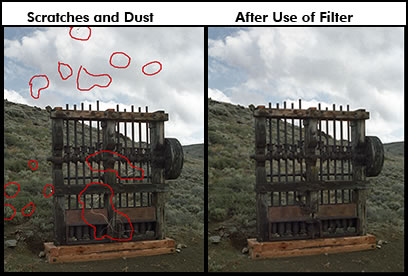
Once I realized how to structure the selections, it was a snap to remove all the dust from this picture. The filter did a great job. The red circles show the selections. The Dust and Scratch Remover works best if you work with individual selections; however, I found that if the background area was uniform, such as the sky, I could fix more than one selection at a time. I did this with the minor blemishes in the grass. For the most accurate results, I found the smaller the selection, the better, especially if the scratch (or hair) is over a complex background such as the gate in the image below. As you can see, the filter works beautifully.
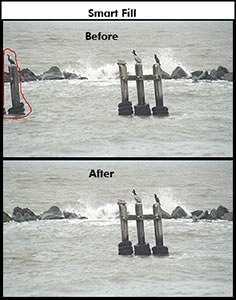
Smart Fill is a great filter. It took one attempt to remove the bird and the pylon. It even added the rest of the rocks in the background. The area circled in red is what I removed.
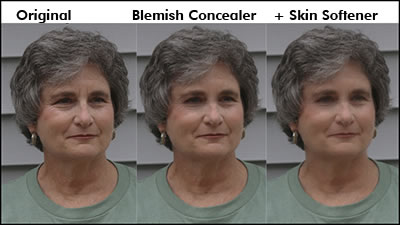
The next two filters I worked with were Blemish Concealer and Skin Softener. I used Blemish Concealer to remove wrinkles around the left eye in the photograph (actually the right eye of the person) as well as deep grooves over the nose. It took a few tries until I was happy with the look. If one has the slider set on a setting that is too strong, it distorts the area a little. So one has to find a balance.
Below is a closer look at the eye and nose areas.
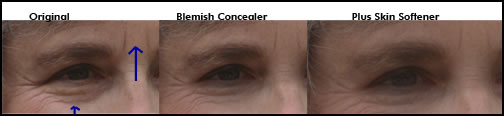
In both images, the right box shows the addition of the Skin Softener. Alien Skin recommends that you use both filters together. My opinion is that the Skin Softener should be used judicially because too much will make the face look very phony.
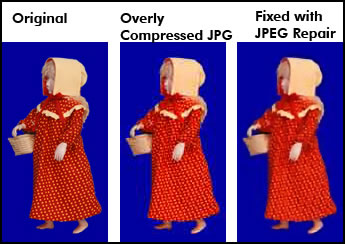
The last filter, JPEG Repair, was the only one I found didn't do a very good job. I took a JPEG and over compressed it. To get rid of the artifacts that that caused, I found that I had to soften the image. However, it did get rid of the artifacts and there are presets and sliders to modify how you set it up.
The system requirements are:
Minimum System Requirements: 1024 MB RAM and
1024x768 or greater monitor resolution.
Windows: Intel Pentium 4 processor (or compatible) and Windows XP or later.
Macintosh: PowerPC G5 processor or Intel processor and Mac OS X 10.4 or later.
The price is US $199 with an upgrade price of US $99.00
While Photoshop CS2 or later has tools for removing areas of an image as well as "Healing" tools, the Dust and Scratch Remover filter cleaned up the area with less blurring. Also, if you do not own a digitizing tablet, the Dust and Scratch Remover filter is easier to control than the Photoshop "Healing" tools.
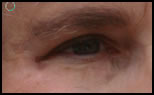
Removing wrinkles with Photoshop can, also, be done by using the "Healing" tools, but there is more control with the Blemish Concealer. In the image below, the wrinkles were removed with Photoshop's Spot Healing tool. It removed all of the wrinkles, and to me, gave an artificial look. Through creating additional layers, I could have been able to soften the effect, but it would be very time consuming.
Smart Fill is my favorite filter. It was so easy to remove the bird and the pylon without the problems of using Photoshop's Clone Stamp. After I finished the review, I was working on an image which had some white artifacts in the water. I tried to go over them with the clone tool and did not like the results. One quick trip to Image Doctor 2 and the Dust and Scratch Remover and the look was perfect. I guess I have two favorite filters now. I am using these two filters consistently in my work. They speed up the process and do a better job than the comparable tools in Photoshop.
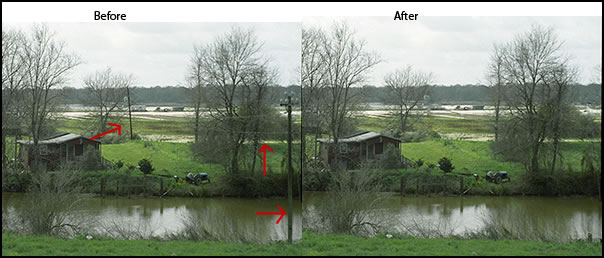
I just had to add this last example. I was going over some old negatives and found this example of a scene interspersed with telephone wires. In the early darkroom days, many scenes were spoiled by these. With Photoshop, they can be eliminated, but it is often tedious. It took me just a few minutes using Smart Fill for the poles and Dust Scratch and Remover for the lines.
You can download a Demo and test these filters out for yourself as well as demos of Alien Skin's other software. The Alien Skin website lists all their products as well as has galleries, etc for their various products.
In addition, click on the Articles' link below to find reviews of other Alien Skin products.