Review of Spiral Graphics Genetica 3.51 Studio
Update to the review of Genetica 3.5 Studio
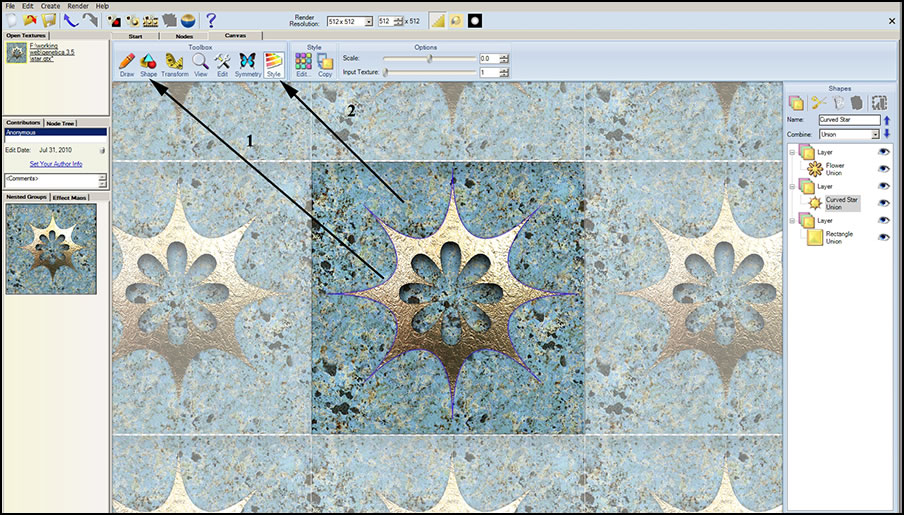
On June 18th, 2010, Spiral Graphics released Genetica 3.51. This update adds the ability to blend photographic texture synthesis with vector drawing. One simply draws in the vector elements. This review contains the basic review of Genetica 3.5 Studio with the addition of examples of the new upgrade. This technique can be best explained by this video. Here is a simple example of a three layered image, rendered and exported as a JPG.

Below is how the interface looks. First I drew different vector shapes; then, I filled them in by selecting Styles>Edit. (When I clicked on Styles, an Edit menu opened to the right of it in a similar manner to when I clicked on Shapes. The order of the layers is important.
Not only has Genetica 3.51 added the ability to blend photographic texture synthesis with vector drawing, but it has added other features as well as fixed some bugs. (The source of this list was taken from a post by a Spiral Graphics' staff member on 6-5-10 in the forum.)
A list of the New Features is below:
- " Synthesized photos can now be embedded directly into styles using the new Texture Synthesis effect type, found in the Edit Style dialog.
- Over 100 new photorealistic style presets have been added that make use of the new ability to embed synthesized textures within styles.
- The patch editors within the Texture Synthesis dialog now support zooming so that control points can be placed more accurately. Zooming can be done with the new View tool appearing above relevant controls, or by using the mouse wheel.
- An "Import..." button as been added next to the "Select Image..." buttons in the Texture Synthesis dialog. This is a shortcut for people wanting to import a custom image with a single click."
Below is a list of Improvements and Fixes:
- "Memory improvements were made. Synthesis-using GTXs are more likely to render successfully at large sizes on computers with less memory.
- Improvements made so that you can import very large custom images into the Texture Synthesis dialog without it goofing.
- Image viewers and controls in Textures Synthesis and Select Image dialogs given asynchronous loading so that app doesn't hang while loading large custom images. "Loading" will appear at the upper-left of such controls in situations where previously the interface would freeze while loading proceeded.
- The patch editors in the Texture Synthesis dialog will no longer interpret clicks as drag operations, even if the mouse happened to drift a couple pixels during the click. This will be a help to stylus users who had trouble selecting control points without moving them since their pen would move slightly during tap-to-click operations .
- Some users had trouble opening special dialogs by double-clicking nodes if they double-clicked by tapping their stylus twice and their pen drifted a bit during the double-click. Double-clicks on nodes are now more forgiving to help with this.
- Fixed a few more situations where nasty unwanted horizontal lines would appear in Canvas.
- Fixed the problem where open curves in Canvas wouldn't be seamless if they approached the edge of the image without actually crossing it.
- Bug fixed that made it so you couldn't change color properties in Lab nodes.
- A few users were setting their resource library location for downloaded resources within the Program Files folder, which was making downloading impossible since Vista and Windows 7 don't allow apps to modify protected system folders without elevated privileges. We've updated Genetica to no longer allow users to place the library within a protected system folder.
- A resource leak that could cause the Texture Synthesis dialog to crash after prolonged use has been fixed.
- Goof fixed that would happen if you deleted all patches, then selected a different photo, then selected the patch that was automatically created when the new photo was selected.
- Dragging the Canvas > View tool > Tile Opacity slider no longer has a possibility of goofing.
- New users (those who had never opened the Select Image dialog) experienced an annoyance where every time a style was selected, first any resources used by it were downloaded once at a small size and then immediately afterward they were downloaded again at a medium size. Now it will just download them once at the medium size to begin with.
- In the Canvas node, if you've selected all of the points of a shape, you can now easily deselect all except one by clicking the point you want to be selected on its own."
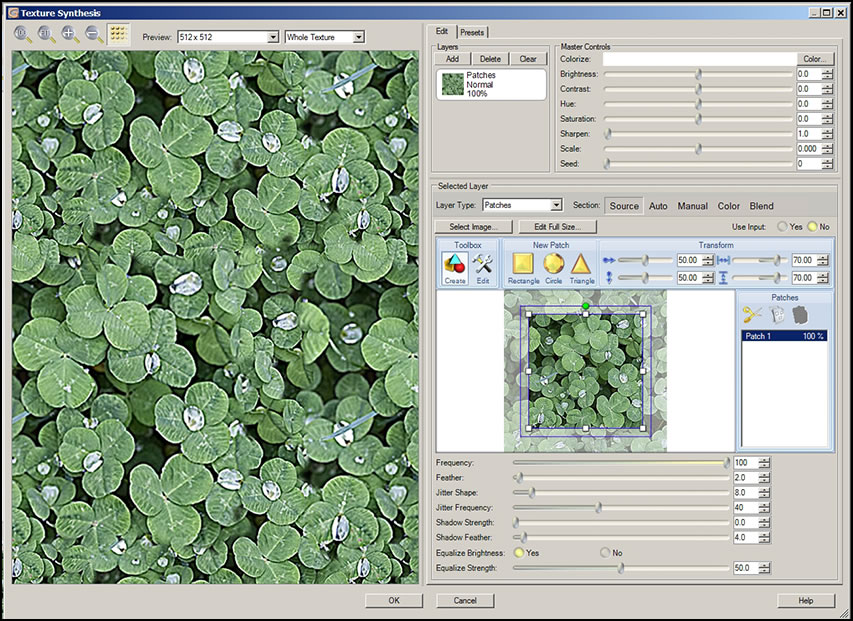
Spiral Graphics has added to Genetica 3.5 the wonderful feature of creating textures from photographs called Texture Synthesis. You can use your own photographs or choose from their myriad of royalty free ones. I am going to present part of my review of Genetica 3 here to introduce new people to its basic features. And guess what? This 3.5 upgrade is free for Genetica 3 users having the same version. Usually when most companies add such a great new feature, the upgrade is not free.
"Users: Genetica 3.5 is a free upgrade for licensed users of 3.0. If you purchased Genetica 3.0, then you can activate the Genetica 3.5 demo with your existing serial that you received in your purchase confirmation email. Please contact us if you need assistance." [from the website] As was Genetica 3.5, version 3.51 is a free update to Genetica 3 users.
To start with, I will present a chart showing the differences between the three versions of Genetica 3.5.
Features |
Basic |
Pro |
Studio |
|---|---|---|---|
Texture Synthesis New in 3.5 |
X | X | X |
| Node Based | X | X | X |
| Professional Drawing Tools | X | X | X |
| Visual Styles | X | X | X |
| Powerful Lab System | X | X | X |
| Advanced Lighting | X | X | X |
| Thousands of Presets | X | X | X |
| Effects Map | X | X | X |
| Edit HDRI Environments | X | X | |
| Render and Export HDRI | X | X | |
| Normal Maps | X | X | |
| Hair and Fiber | X | X | |
| Batch Processor | X | X | |
| Lab Conversion | X | X | |
| HDRI and 32-bit Output | X | X | |
| Create Animations | X | ||
| Animation Presets | X | ||
| Maximum Render Size | 3000x3000 | 6000x6000 | 6000x6000 |
| Prices for Full new versions. Upgrading prices are also available | US $ 149 | US $399 | US $899 |
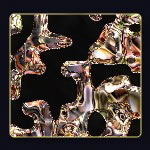
Next I will talk about the new feature - creating textures from photographs. It is absolutely easy to use your own photographs in Genetica 3.5. Notice that you can do this with any version of Genetica 3.5. Here I chose a photograph I had taken after an ice storm. I can manipulate it in many ways. I can change the hue, saturation, scale.......It's as easy as that!
According to my version of Genetica 3 Studio, Genetica 3.5 Studio not only has more categories, but more textures in each category. The basic workplace looks the same so there are no surprises which makes it easier to use. The only difference I noticed was in the position of the Create Floating View.
Spiral Graphics has an excellent demonstration video as well as some fantastic tutorials to demonstrate how to use all three versions of Genetica 3.5.
What can you do with Genetica 3.5? Depending on the version, you can create simple or complex textures, effect maps such as bump and specular, animations, HDRI and 32-bit output, shaders, and more.
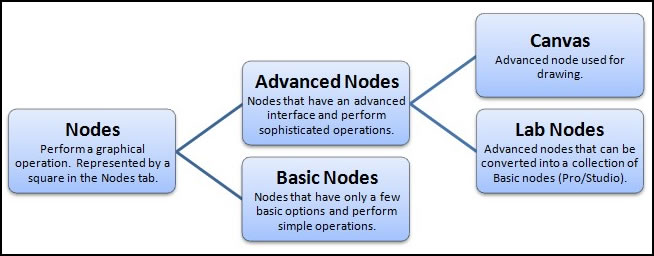
Genetica 3.5 is a node based texture or material generating program. It is made up of Basic Nodes and Advanced Nodes. The Basic Nodes perform straightforward tasks such as blurring; while the Advanced Nodes perform complex and high level operations. The diagram below is taken from the Genetica 3.5 Manual which you can access from the Spiral Graphics' website.
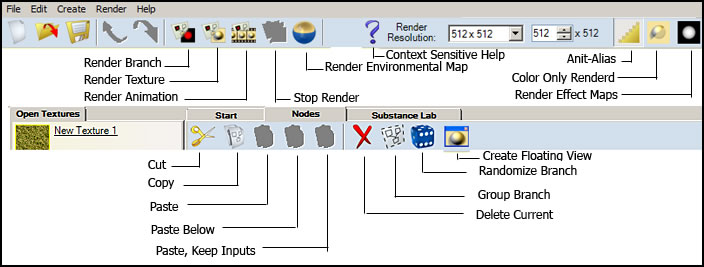
Below is the interface of Genetica 3.5 Studio.
The toolbars are very important. These are the commands. The position of the Create Floating View has changed in version 3.5 from where it appeared in version 3.
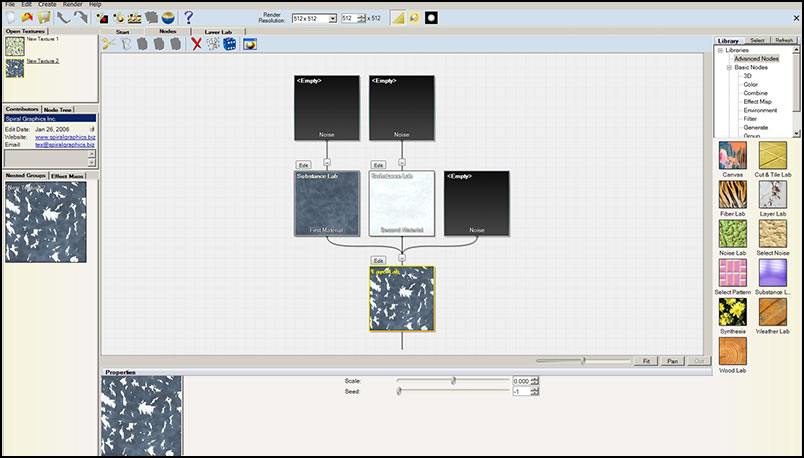
Before I progress with the review, I want to explain nodes a little further using the screen capture below.
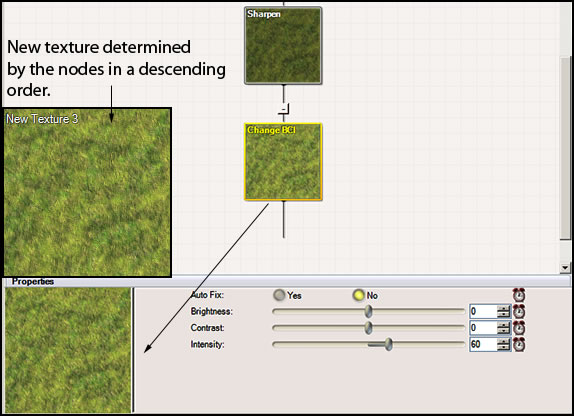
As you change the properties of brightness contrast and intensity, you change how the final texture will look.
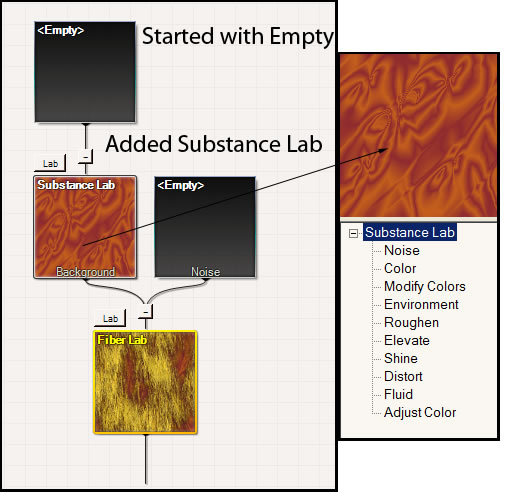
One can either start with one of the very many preset textures provided in Genetica 3.5 and modify them or create your own. Below I created my own just by using a few options in the Substance Lab. This shows how you can start with absolute basics.
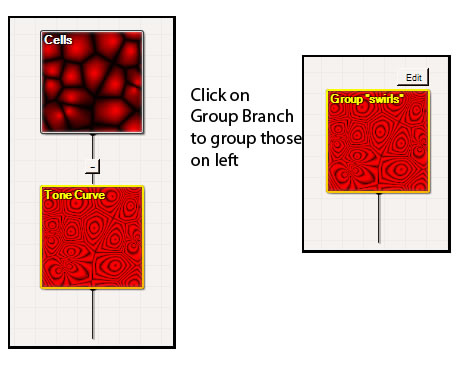
You can group various nodes. Below is a simple example. All of this is very easy to do because there are excellent tutorials describing these processes.
Drawing is another great way to create a material. Here is an example of how you can make curved as well as straight lines.

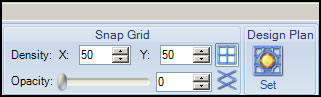
Further, you can use this method to trace shapes for later inclusion in a material by clicking on the Design Plan which will let you access designs that you might have on the computer or have scanned in.
I have only touched on the bare basics of the capabilities of this program and what is basic to the core of the program. There is a lot one can learn. One of the best ways is to dissect the presets and look at what others have made to share. Some of these can be found on the Genetica Forum of the Spiralforums.biz
Once you have rendered the texture, you can export it as a jpg, png, tga, tif, bmp, pfm, or hdr.
This description of creating animations pertains only to the Studio version. Below is a screen capture showing some of the individual frames.
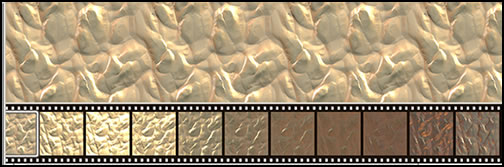
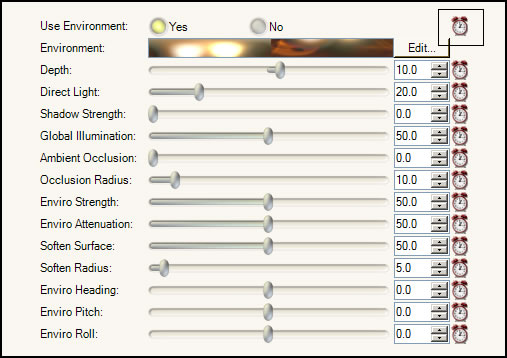
To create an animation you click on the clock symbol. That will open up one of the many screens available. Each category will allow you to edit for certain effects. The number of variables is truly amazing. The excellent tutorials, either written or video, lead you through the processes.
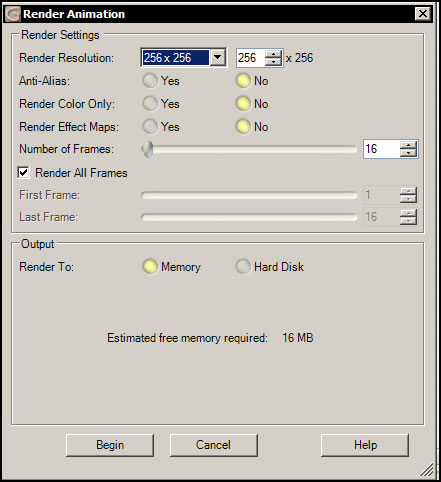
There are many Render Options available for creating various image maps and full animations.
There are also options on size of render, number of frames, etc.
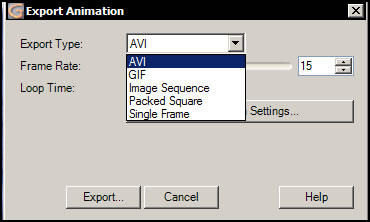
And, lastly, there are options on how to export the animation.
I found this very impressive as well as easy to do once I understood how to manipulate the numerous variables.
As with Genetica 3, in Genetica 3.5 animations can be created specifically for use within the Second Life Community. This Second Life Tutorial shows how to create textures specifically for Second Life and how to export them as well as how to import them into Second Life.
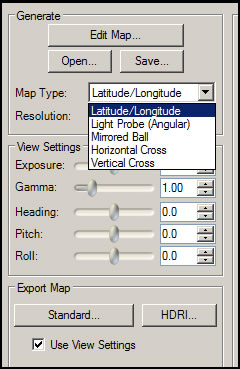
You can create Environment Maps for shaders in the Pro and Studio versions. You start by clicking on the Render Environment Map button on the toolbar.

You can, then, proceed to select a map to use and edit. Sometimes, you will have to download additional material from Genetica. That is easy to do by just following the prompts.
For different types of functions you will want to work with different types of maps. Genetica offers a selection for art images, gaming, etc.
Thumbnail images can be created for the web. This is taken from a tutorial of that name and is possible with the Pro and Studio versions only. To test this feature, I followed the tutorial and created thumbnails from some of Genetic's own presents.
System Requirements
| Operating System | XP/Vista/Windows 7 | |
| Memory | 1 GB (2 GB recommended) | |
| Hard Disk | 400 MB | |
| Internet Connection | Integrated resource library requires |
My review just gives some of the basics of Genetica 3.5 Studio. To include all I experimented with would have made this review much too long. All the functions that I tried in Genetica 3.5 Studio worked perfectly. To get started there are static (word and text) tutorials and video tutorials. These are all very easy to follow. Once you understand how Genetica 3.5 is setup and works, it is very easy to create your own textures or use the presets as a base. In addition, members of the forum share some of the ones that they have created. This is an excellent program for creating both still and animated textures and various maps of many varieties depending on the version of the program you have.
The best way to decide on what version is most applicable to your needs is to look at the chart in the beginning of the review and try out the demos. Demos of all the versions can be downloaded from the Spiral Graphics' website. The addition of Texture Synthesis has made this program even better. I recommend this program for anyone needing to create textures for both 2D and 3D use.