|
Andromeda's Screens
filter is one of my favorite filters for completely changing
the look of an image. While I gave the reader specific directions
the first article in this series, Image
Editing, in this tutorial I will give only general directions
since I do not believe in the "paint by number"
technique when creativity is concerned. I will, hopefully,
give enough information to unleash ideas and creativity. A
knowledge of Photoshop is necessary for I am not going to
teach basic techniques such as how to create selections, layers,
etc. This tutorial should not only show how I use the Andromeda
Screens filter, but, also, general points on using this filter.
This particular technique that I am presenting using the
Andromeda Screens filter looks much better in print than than
it does on the web. There
are two reasons for this. If you look at the example onthe
right of two pieces of sky, the screening in the screened
version is obvious; it was darkened and the contrast heightened
for this illustration. Two factors make these illustrations
superior for print as compared to the web. Firstly, when one
uses screens, the resolution of the image is important. I
usually use 600 dpi (dots per inch) and then lower it to 300
dpi after the screening. Sometimes, I don't and leave it at
600 dpi. If the term resolution or dpi is confusing,
see my article on Resolution. As
can be seen from the illustration on the right, the Andromeda
Screens filter, roughly, take the colors an isolate them in
patterns. The lower the dpi, the further apart are the dots,
and the less visible is the screening effect. Also, these
images take longer to download. Many different patterns can
achieved using the filter. Experimentation is the key and
lots of it. There
are two reasons for this. If you look at the example onthe
right of two pieces of sky, the screening in the screened
version is obvious; it was darkened and the contrast heightened
for this illustration. Two factors make these illustrations
superior for print as compared to the web. Firstly, when one
uses screens, the resolution of the image is important. I
usually use 600 dpi (dots per inch) and then lower it to 300
dpi after the screening. Sometimes, I don't and leave it at
600 dpi. If the term resolution or dpi is confusing,
see my article on Resolution. As
can be seen from the illustration on the right, the Andromeda
Screens filter, roughly, take the colors an isolate them in
patterns. The lower the dpi, the further apart are the dots,
and the less visible is the screening effect. Also, these
images take longer to download. Many different patterns can
achieved using the filter. Experimentation is the key and
lots of it.
There are two modes for this filter, Novice and
Expert. In this tutorial, I used Novice and kept
the Presets settings, except for the lpi (lines per inch),
the same. Believe me, once the filter is in your machine,
it is not hard to use. The technique I will describe is not
complicated. It involves using different screens (Andromeda
Screen filter settings) on different parts of the image making
each part a layer in Photoshop. Then, these layers are combined
with layers from the original piece of work.
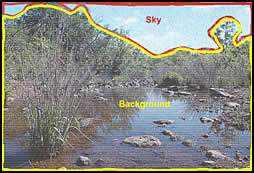
| 2 Selections |
2 Selections Made into
Layers |
 |
 |
Step 1 - In Photoshop, I selected, Image/Image
Size, and typed in 600 dpi. Whether I have Resample
Image checked or not will not effect the final image
using this technique. If I leave unchecked Resample Image,
then the size of the image will shrink to half its original
size but the number of pixels will remain the same. I recommend
doing it this way. Later, if you change the image size to
300 dpi, while technically changing the look of the image,
in actuality, once printed on a home printer, it is not obvious.
If this explanation is confusing, just skip it and Uncheck
Resample Image. Experiment with using different
resolutions. I have found that the filter produces the look
I want at a minimun of 300 dpi while 600 dpi works best.
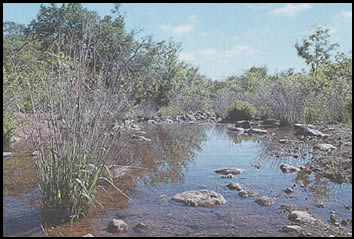
Step 2 - I created two selections from the original
image and cut and pasted each to its own layer. See the above
illustrations.
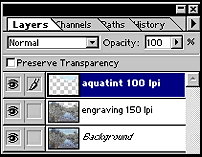
Step 3 - I, then, applied various screens (from the
Andromeda Screens filter) to each layer. The Andromeda Screens
filter's setting that I used for the sky was Aquatint
at 100 lpi (lines Per Inch). The screen I used for the background
selection (not the bottom layer) was Engraving at 150
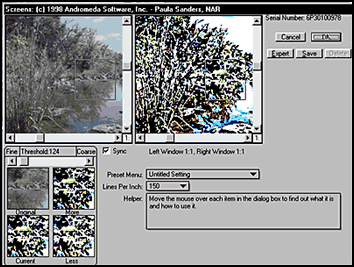
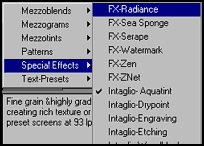
lpi. To find the settings sub menu, click on the arrow near
the Preset Menu and choose a Preset type - Special
Effects, for example, and then choose a Preset from that
menu, for intance, Intaglio-Aquatint. Once selected,
access the Lines Per Inch sub menu and choose a setting
if you don't want the Preset's setting. Again, experiment.
On the lower left of the picture of View of Andromeda Screens,
you will see four boxes. You can increase or decrease the
intensity of the effect of the filter by clicking on the More
or Less box.
| View of Andromeda Screens Filter |
From Screens Preset Menu |
 |
 |
The above illustrations are print screens of the Andromeda
Screens Filter.
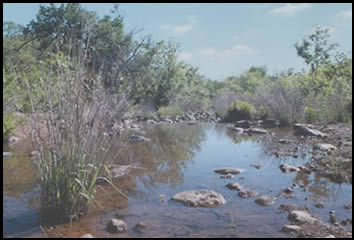
If I just left the image at this point, it would have looked
like the image on the right. As I stated earlier, it is very
hard to see the screening at a dpi of 72 (which is monitor
resolution). However, if you compare it to the original image
on the left, the difference becomes more visible.
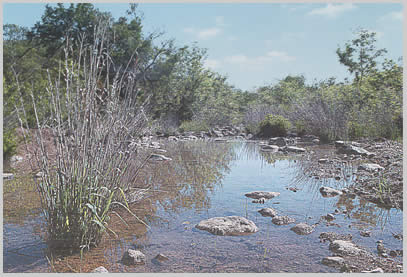
| Original Image |
Screened Image Using Andromeda Screens
Filter |
 |
 |
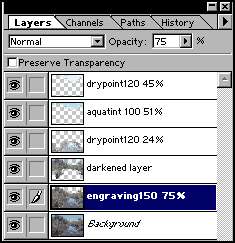
In print the difference would have been very
dramatic. It was too dramatic for my taste, so I made further
changes to it.Also, I wanted the tall weeds in the foreground
to stand out and be more separated from the background. The
following print screens of the layer palettes will show some
of the changes I made.
| After Initial Screening |
Adding More Screened Layers and Starting
to use Other Effects |
Final Rendition |
 |
 |
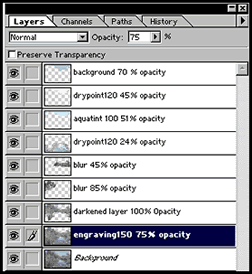 |
If you look at the names of the layers, engraving150 75%,
for example, means that I used the Preset in Andromeda
Screens of Engraving, at 150 lpi (lines per inch)
with the layer having an opacity of 75%. As
you can see, I also blurred some layers using Photoshop's
Gaussian Blur filter. The settings for the Gaussian
Blur filter that I usually use for this type of work vary
from a radius of 2.5 to 3.00. However, these are not magical
numbers.
The image below is the final image. Once again, the nuances
of the changes made are much more visible in print. If you
compare it to the images above, you should see the softening
of the sky and the darkening and slight blurring of the background
trees in order to create more of a contrast with the foreground
weeds.
I hope this tutorial has inspired readers to
explore and see the multiple possibilities inherent in Andromeda's
Screens filter.
|