|
Image editing can be as simple as removing a background or
as complicated as creating a completely new picture from pieces
of many others. I prefer to call the latter painting with
pictures. The first article in this series will be a "how
to" on adding clouds to a blank sky.
Years ago, before I started to work with graphics on the
computer, my husband and I went to a meeting of a camera club
where we lived. We did not know that this meeting was the
highlight of their year and consisted of a judged show with
judges from other cities. Everyone seemed to take this show
very seriously. When it came down to judging the category
of capturing motion or action shots, one of the pictures was
an excellent shot of a boy on a jet ski. However, one of the
judges seriously considered the shot to not be of winning
calibre because she claimed, (and this is the truth) that
the photographer should have moved the sun to a better location.
It was at this point that my husband and I left to never return.
Now one can, through the use of the computer, move that obstinate
sun.
Recently my husband and I were at the Wild Life Refuge in
the Wichita Mountains in Oklahoma. Every day, there, was glorious.
Except for one day, there was not a cloud in the sky. Unfortunately,
the day with the perfect fluffy white clouds was a Saturday
and every boy scout troupe from a 100 mile radius was climbing
the boulders and wading in the water. Thus, I could not get
the shots I desired. The previous day with not a cloud in
the sky, I had taken a lot of shots which upon development
I liked. Fortunately, I always take cloud shots whenever I
see formations I like. Since surrounding these beautiful mountains
was a constant haze of pollution, I decided to take a number
of cloud shots capturing the haze in case I needed to blend
any of them with any remants left of the former sky. In the
following examples, I did not have to.
There is more than one way to add clouds. The simplest way
is to remove the blank sky completedly and substitute a sky
with clouds; this is very easy to do when there aren't any
leafy type folliage protruding into the sky. However, if there
are trees or other leafy or small objects like branches reaching
into the sky, it is very hard to remove the sky cleanly and
add the new sky without the final result looking false. Nevertheless,
it can be done, and I will demonstrate both ways of adding
clouds.
The first example that I will discuss is simply removing
the sky and adding a new sky. The second way I will describe
simply adds another step to the first process. I use Adobe
Photoshop for the majority of my work; however, these techniques
can be used with most image editing software.
Example 1
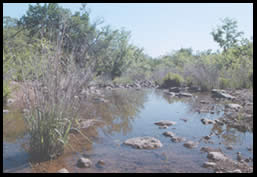
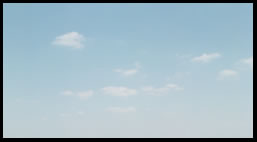
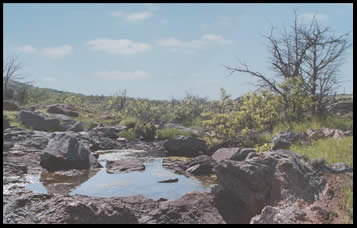
The two images I used were the photograph I call "Weeds
and Water" and a cloud scene that complemented the tones
in the photograph.
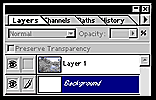 Step
1 - The main image cannot be the background image because
the new sky has to be pasted behind it. So select the original
photograph and copy and paste it into a newfile.The result
will look like the illustration on the right. Step
1 - The main image cannot be the background image because
the new sky has to be pasted behind it. So select the original
photograph and copy and paste it into a newfile.The result
will look like the illustration on the right.
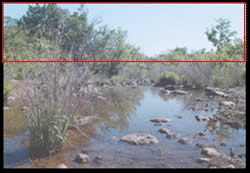
Step 2 - The sky needs to be removed
from the top layer so that the clouds can be slipped in between
the Background and Layer 1 which is the original
image. Since we want to only remove the blue from the sky,
but yet make sure it is removed from behind the trees, we
will use the Eye Dropper tool. But first we must isolate
the sky. One can do this by drawing a loose line with the
lasso around the sky or by using the Rectangle Selection
Tool. See the illustration on the left to show how I isolated
the area. The red line represents the Rectangle Selection
tool.
 Step
3 - Once the area is isolated, select the Eye Dropper
tool and choose a medium shade of blue from the sky. In Adobe
Photoshop, go to select/color range and for this picture
I set the sliding scale at 57. The setting of 57 allowed me
not to include the slightly blue tinted top of the trees.
If this type of option is not available, then one will have
to use the Magic Wand tool and ignore using the rectangle
selectoin tool to first isolate the area (the red line). Once
the sky is selected , delete it. If you use a Magic
Wand type of tool, you will probably have to make a
number of passes or use additional commands such as grow
if your program has such capabilities. Step
3 - Once the area is isolated, select the Eye Dropper
tool and choose a medium shade of blue from the sky. In Adobe
Photoshop, go to select/color range and for this picture
I set the sliding scale at 57. The setting of 57 allowed me
not to include the slightly blue tinted top of the trees.
If this type of option is not available, then one will have
to use the Magic Wand tool and ignore using the rectangle
selectoin tool to first isolate the area (the red line). Once
the sky is selected , delete it. If you use a Magic
Wand type of tool, you will probably have to make a
number of passes or use additional commands such as grow
if your program has such capabilities.
Step 4 - Now the sky will be prepared
to be added tothe picture. First select it,and then 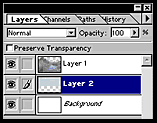 choose
edit/copy and paste it into the new picture that is
shown in the "Layer's" illustration. Select, the
Background, and hit edit/paste. The sky will
now be positioned in the middle ( Layer 2). choose
edit/copy and paste it into the new picture that is
shown in the "Layer's" illustration. Select, the
Background, and hit edit/paste. The sky will
now be positioned in the middle ( Layer 2).
Step 5 - Move the sky layer so that the
clouds are positioned where desired. Sometimes if the layer
has to be moved too much to the left or right, blank space
can appear. Often this can be corrected by just stretching
the layer a little or filling in the space using the Cloning
tool, also called a Rubber Stamp.
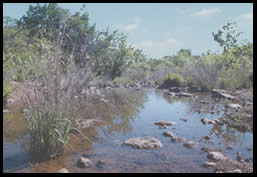
Example 2
 The
second method I described in the beginning of this tutorial
involved working with an image that had folliage or thin branches
protruding into the area of the sky. This can require a slightly
different approach. The illustration on the right is the original
photograph. While there are some clouds in the sky, I decided
to change them and substitute a new sky. The
second method I described in the beginning of this tutorial
involved working with an image that had folliage or thin branches
protruding into the area of the sky. This can require a slightly
different approach. The illustration on the right is the original
photograph. While there are some clouds in the sky, I decided
to change them and substitute a new sky.
Step 1 - I duplicated this picture so
that I had a background and a copy of the background layer.
In photoshop I clicked once on the right and only arrow on
the layers palette and chose duplicate.
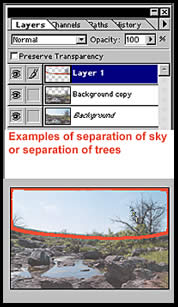
Step 2 - I selected the Background
copy, which is above the Background, and deleted
the sky as I did in the first example. This time, I decided
to be more precise and instead of using the rectangle selection
tool, I drew a line with the Lasso tool( represented
by the red line in the lower part of the illustration on the
left).
 3
- Then I selected the Background and made a new
selection (similar to the one referred to above) using the
Lasso tool around the trees' protruding dead branches
including a little of the background greenery. I used my eye
dropper to select the color of the protruding dead tree limbs.
Next I followed the same pattern as I did with the sky. I
clicked on select/color range. I chose a number on
the sliding scale so that most of the branches were included
as well as the brownish area in the background. I, then, hit
enter. 3
- Then I selected the Background and made a new
selection (similar to the one referred to above) using the
Lasso tool around the trees' protruding dead branches
including a little of the background greenery. I used my eye
dropper to select the color of the protruding dead tree limbs.
Next I followed the same pattern as I did with the sky. I
clicked on select/color range. I chose a number on
the sliding scale so that most of the branches were included
as well as the brownish area in the background. I, then, hit
enter.
Step 4 - Once the branches were selected,
I performed an edit/copy, clicked on the Background
copy layer and did edit/paste. The figure on the
left shows steps 3and 4.
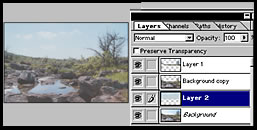 Step
5 - A sky was selected and copied (as in Example 1)
and, then, pasted between the Background and the Background
copy, by selecting the Background and then selecting
edit/paste. The cloud layer (Layer 2) was positioned
according to the instructions in Example 1, Step 5.
See the illustration on the right. Step
5 - A sky was selected and copied (as in Example 1)
and, then, pasted between the Background and the Background
copy, by selecting the Background and then selecting
edit/paste. The cloud layer (Layer 2) was positioned
according to the instructions in Example 1, Step 5.
See the illustration on the right.
The bottom illustration shows the completed
picture. In this picture, I adjusted the color of the sky
so that it would match the water and, also, darkened the image
a little.
|