|
In this tutorial, I worked with the whole image and did not
break it up into parts as I have done in previous tutorials
The first step is to decide whether to work from the Deep
Paint plugin in Photoshop or to use Deep Paint as a stand-alone.
I decided to use it as a stand-alone so those users who do
not have Photoshop can still follow the tutorial.
The second step is to decrease the size of the file to be
opened in Deep Paint. I like to work with a file around 7
MB. The size will depend on the amount of memory in one's
system. I have not found a degradation of the image when resampling
it after finishing it. Possibly on a commercial four color
press this degradation would show. On my Epson 870 printer,
it does not.
|
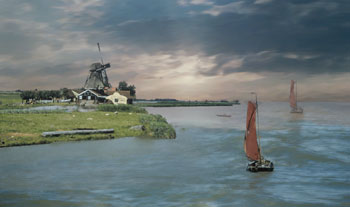
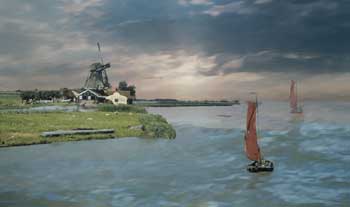
Finished Picture
|
 |
From now on I will list the steps starting from one.
1 - Open a psd, tif, or bmp file in Deep
Paint. Then save it as a .dp2 file. Save the file often. In
the preference section of Deep Paint, the option to save it
at specified intervals can be selected. Edit/Preferences/General.
| Original Image |
 |
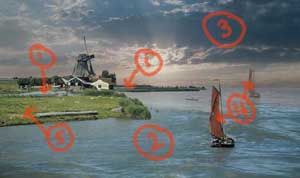
2 - Map out either on paper or in your mind
the hierarchy of layers so that the background can be done
first, for example, and then a layer with a boat can
be placed over the background. This will keep colors purer.
Also it will allow for the uppermost layers to be more transparent
than the lower layers. When I worked on the water, I tried
to leave the area of the boat free.
| Original Image |
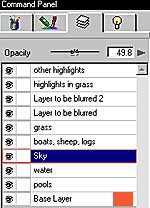
Layers in Deep Paint |
Cloning Setup |
 |
 |
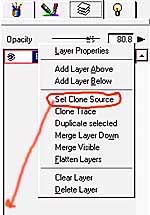 |
3 - The first step in actually starting the picture is to
set the psd, tif or bmp file as the cloning source. I usually
set the transparency slider between 65-80%. I then, set up
the number of layers in their hierarchical order from bottom
to top.
4 - From then on, I choose my brushes for
the effects I want. I am always creating new brushes if I
think that I will use them often. The choices of brushes are
very individualistic. While I create my own, brushes and cloners
can be used from the Deep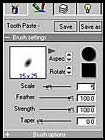 Paint presets. Cloners can be made from any of the Deep Paint
brushes by just choosing the cloning stamp.
Paint presets. Cloners can be made from any of the Deep Paint
brushes by just choosing the cloning stamp. The
brushes that are similar to ones I have made are 1) the Brush
Cloner from the Cloner category. I modified it to a scale
of 24 and 2) the Chalk Cloner from that same category.
The Brush Cloner creates a rough pattern. I used this
for grassy and wooden areas. The Chalk Cloner is a
smooth cloner and I used it for the sail on the boats, for
example. Two other brushes that I really like are brushes
that I have converted to cloners. The brush called Tooth
Paste is from the Variations category and the one called
Slime is from the Weird category. Both can give nice
raised areas and are good for details and texture especially
when their scale is set to 5 and their shape squashed and
angled. The arrows next to aspect and rotate
control these two functions The
brushes that are similar to ones I have made are 1) the Brush
Cloner from the Cloner category. I modified it to a scale
of 24 and 2) the Chalk Cloner from that same category.
The Brush Cloner creates a rough pattern. I used this
for grassy and wooden areas. The Chalk Cloner is a
smooth cloner and I used it for the sail on the boats, for
example. Two other brushes that I really like are brushes
that I have converted to cloners. The brush called Tooth
Paste is from the Variations category and the one called
Slime is from the Weird category. Both can give nice
raised areas and are good for details and texture especially
when their scale is set to 5 and their shape squashed and
angled. The arrows next to aspect and rotate
control these two functions
5 - Once I am satisfied with how the layers
look, I boost the source layer to 100% and modify the opacity
of the other layers as I desire. One must remember that the
computer screen will be brighter than the final image.
| Image from Deep Paint |
 |
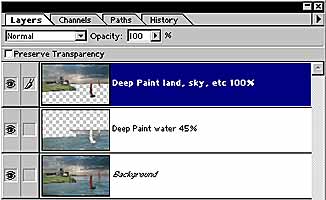
6 - I merge the layers and save the file
as a psd or tiff file. I then open it in Photoshop for final
editing. This is my preference. One could print it from Deep
Paint and retain more of the lighting effects. I, however,
have not experimented with this approach. For this particular
piece of work, I merged it with the original Photoshop file
and resampled it so both were 300 dpi. I then split the Deep
Paint layer so that I could adjust the individual layer opacity
sliders for the final effect.
| Layers in Photoshop |
 |
7 - Even though the three main images (the original Photoshop
image, the one from Deep Paint, and the finished combination)
appear similar in the tutorial, in print they are noticeably
different.Click
to here to see large final image
|