Creating
an Animation in Illustrator CS using 3D Effects and the Blending
Tool
This tutorial is actually two tutorials in one. In the first
part, I will show how to take graphics and create a Symbol
Library and, then, how to use this new Library. While
the Illustrator CS manual describes how to do it a little
differently, I am only approaching it from a different angle.
The angle being that I wanted to create a whole library of
swatches and then use them. First it is necessary to understand
the difference between a Symbol Library Palette and
a Symbol Palette. I guess the best way to describe
the distinction is to say the Symbol Library Palette
isn't active until the specific symbol is dragged onto the
Symbol Palette.
First I will show how to make two cubes using 3D Effects
and the Extrude and Bevel command.
1 - In Illustrator CS, take the rectangle tool and draw a
square by holding down the shift key as you draw it. Make
sure that the fill has a color and the stroke has no color.
You want your cube to have six sides for mapping. If you look
at the table below, you will see the different number of sides
your cube will have once extruded for mapping art depending
on how you draw your square.
24 Sides
18 Sides
6 Sides
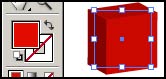
2 -Select the drawn square and click on 3D Effects>
Extrude and Bevel. Since this cube was small, I found
that a good depth was 34 so that it remained almost a cube.
Square
Extruded
Depth of Extrusions
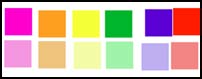
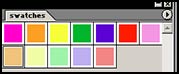
3 - Now I wanted to map colors to each side of the cube so
I had to prepare swatches. I wanted two different cubes for
my animation, so I wanted twelve different colors. I created
twelve squares and filled them with color. The size is not
important because that can be adjusted while mapping to the
3D object. After I created the twelve swatches, I dragged
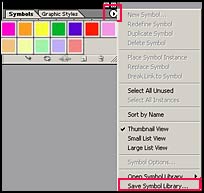
them to the Default Symbol Palette. Lastly, to create
a Swatches Palette, I deleted all the default symbols and
by clicking on the arrow on the upper right of the palette,
I opened all the Symbol options and saved my palette as a
new Symbol Library.
12 Squares of Color
Default Symbol Palette
Save Symbol Library
New Symbol Library
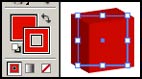
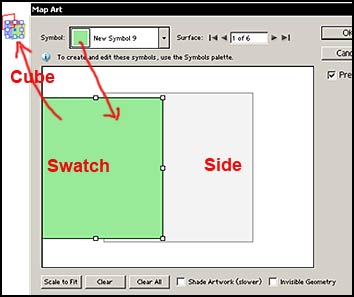
4 - After creating the cube and the swatches, click on Map
Art on the 3D Effects> Extrude and Bevel menu.
In the Symbol Library, I access Open Symbol Library
which is the command directly above Save Symbol Library.
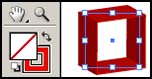
5 - Transfer the swatches to the Default Symbol
Palette by pulling them over with your mouse. In the Map
Art menu, notice how the Swatch Symbols appear
in the Symbol drop down menu. Drag it onto a side of
the cube so that it fits. You can see it appear on the 3=dimensional
cube to the left of the Map Art window.
Dragging Over from the Swatches
Library
Mapping the Symbol
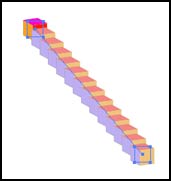
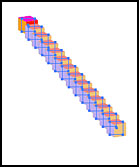
6 - Once both cubes are mapped, the animation can be constructed.
For this animation, place the cubes in Illustrator CS on a
diagonal
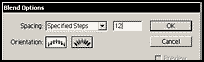
7 - From the top bar, choose Object>Blend> enter
12 for the number of intermediate steps in the blend.
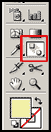
8 - Take the Blend Tool and connect the two end cubes.
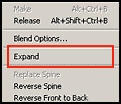
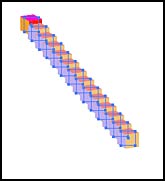
9 - Go to Object>Blend>Expand.
10 - And then, Object>Ungroup.
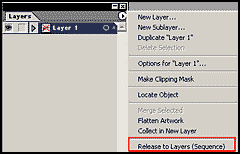
11 - Go to the Layer's Palette and click on the right
arrow and select Release to Layers (Sequence)
Cubes on a Diagonal
Object>Blend
Blend Tool
Two Cubes Connected
Object>Blend>Expand
Expanded Blend
Object>Ungroup
Release to Layers (Sequence)
Export
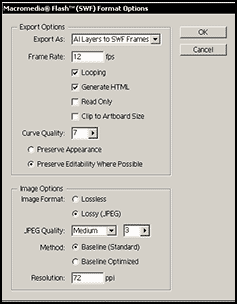
12 - Go to File>Export and choose SWF as your format
of choice (Flash).Choose:
Export As:
Frame Rate:
Looping
AI Layers to SwF Frames
12 fps
looping
13 - The other Export choices are more individualistic dependent
on quality vs time of download. However, the resolution needs
to be 72dpi.