Review of e-on Software's LightTune
LightTune is one of e-on software's new modules for Vue 5 Esprit and part of the new package called Vue 5 Pro. Recently I wrote a review/tutorial combination of Botanica, e-on software's Plant Editing module. LightTune addresses itself to creating innovative lighting in Vue 5.
In brief, LightTune addresses the following:
- It allows the user to select which object shall be lit or unlit.
- It has a view through or ring for spotlights and Quadratic Spots to target the object.
- It gives the user access to AccuShadows™ -a system of creating shadows without undue log render times.
- It can create light to vary with the distance of an object.
- It gives the user the ability to aim the spotlight using camera controls.
- It has various other shadow mapping features.
For a complete feature list go to e-on's website.
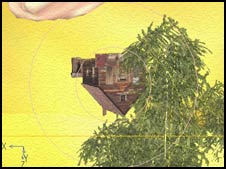
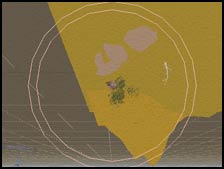
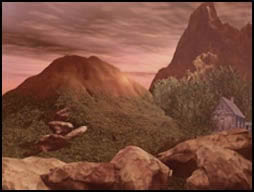
This is a dynamite bundle for $39.00. It is downloadable and does not require shipping. It also has a good pdf short manual with it to give pointers on how to use LightTune. The best way to demonstrate some of these features is by showing pictures and explaining them. To begin with I will demonstrate how the Spotlight View through works and how it can be combined with the the initial spread of light from the Spot Light and the falloff of that light. Think in terms of a cone. The reason I am describing the these two conditions is because they can make a difference even if it is subtle. While they are both present in the lighting setup in Vue 5, I found I was much more aware of them when working with the View Through because it represented them visually. However, that also caused a problem which I will outline in the next paragraph. The definition in the regular manual on falloff was somewhat confusing, so I let the effects which were consistent be the guide. Notice the two concentric circles in each picture. Each picture shows what can be potentially lit. The inner circle shows the spread of light. The spread is 5 degrees for the picture on the left and 20 degrees for the picture on the right. Notice the picture on the right encompasses more objects than on the left. Just because the 20° encompasses both pine trees, rocks, and the house, does not mean that all have to be lit. I can select just the house, for example to light. This will be demonstrated later in the review.
| Spread of 5° | Spread of 20° |
|---|---|
 |
 |
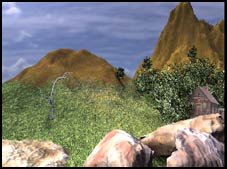
The next item to look at is light falloff from the beginning of the beam to the end. In these two cases, everything in the scene was lit. What does not make sense is the visual change in the spread. The spread was not changed. What was changed was the falloff only. One must go by the results of the image to remember how it works.
| 80% Falloff | 20% Falloff |
|---|---|
 |
 |
 |
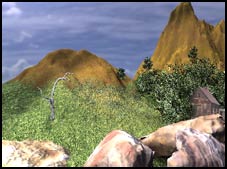 |
Notice how the ground extending from left of the dead tree and going to the house is lighter where the falloff is 20% than where the falloff is 80%. Notice especially the white patches on the left rock in the 20% falloff picture.
When an individual object is selected, the percentage of falloff does not seem to make as much of a difference as when the beam covers a larger area and lights everything in its path.
This selective lighting allows the user to do many creative things with light. One can choose what to select or choose what not to select.
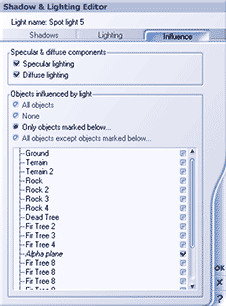
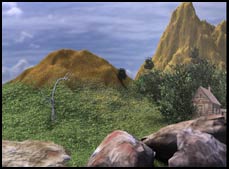
On the scene I have used as an example, I wanted two areas lit; the house and fir trees around it and the dead tree. However, I wanted some of the fir trees lit less than others. By having a light for each of the trees I was able to do that. Even though I could light the picture in a simpler fashion which I also did, the control factor is phenomenal.
| Sunlight | 5 Spot Lights |
|---|---|
 |
 |
Another feature of the View Through for the Spotlight function is the ability to move it with the main Camera 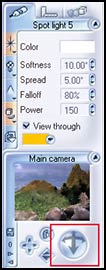 control that is
 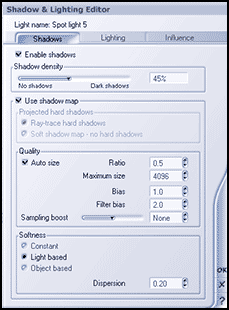 highlighted in red on the spotlight 5 panel. Once the View Through is selected, the control becomes attached to the selected light. I, however, did not find it any easier or harder than using the normal controls to move the lights.
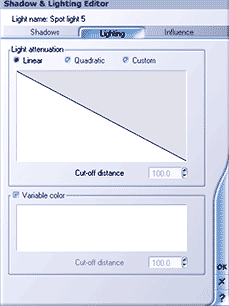
Another nice set of controls is the AccuShadows™ system of creating shadows. This system will render soft shadow maps that take less time to render than do the more accurate ray-traced harsher shadows. Sampling Boost (under the Quality section of the left panel) will help control the quality of the shadows.
LightTune's controls mesh with the Spot Light Property Controls that are already a part of Vue 5. For example, when the softness setting on the panel on the right is set at 0%, then the "Use Shadow Mapping" feature on the Shadow and Lighting Editor is activated. Conversely, when the softness is above 0%, then the "Softness" setting on the Shadow and Lighting Editor becomes activated.
The last part of the Shadow and Lighting Editor is the Lighting tab. This tab lets the user regulate Light Attenuation or the way the light falls off with distance. It also allows the user to vary the color of the light.
The following are two examples of a scene with two types of shadows, a ray-traced shadow and one made using a soft shadow map.The ray-traced picture took 9 seconds to render and the shadow mapped took 8 seconds to render. These were tiny files. The difference in the shadows is not noticeable except barely at 1200% enlarged.
| Ray-Traced | Shadow Mapped |
|---|---|
 |
 |
 |
 |
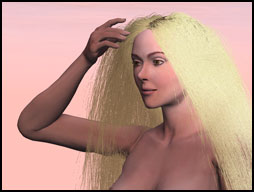
Lastly, are two pictures. The first is a portrait of a Poser 5 figure with 2 spotlights aimed at the near side of her face and the near side of her hair. The second is a sunset . So as not to have areas of the scene that were very dark, I had to use the spot lights as fill lights and link them to a few objects at very low light level. I could not have created that type of lighting without LightTune.
 |
 |
LightTune is easy to use, gives the user great control over lights-even more than I mentioned in this review-and is more than worth the $39.00.
© Paula Sanders 2005