|
I had been waiting a long time for the new release of Deep
Paint from Right Hemisphere. I had played with the Beta version
for a while and, then, waited for the final release. I followed
the same protocol any user would follow by downloading the
demo version from the Right Hemisphere website and then activating
it with the Serial Number/Order ID. This differentiates it
from the demo version which is good for 30 days.
The prior version of Deep Paint did not require a special
license. For those people using most other Right Hemisphere
products, for example, Deep 3D or Deep UV, this will not be
new. What must be borne in mind, however, if one is new to
this type of licensing is that if one ever reformats the hard
drive, the products must be unlicensed first. Also, it can
only be used on one computer at a time.
The only file that was downloadable was the Deep Paint 2
.exe file. The manual is built into the help menu in
the program itself. I do not particularly like the documentation
the comes with this program. Right Hemisphere has produced
much better manuals for some of its other programs I have
reviewed. Reviews of some of their other current programs
can be found on my websites. Once the program is installed
it produces a readme.txt file which states that if one is
upgrading from the prior versions of Deep Paint, one should
uninstall it first. However, by the time you read the readme.txt
file , the program will already have been installed.
Deep Paint is a stand-alone or plugin program for Photoshop
(including Photoshop 7). Its strength lies in its ability
to paint a new image or clone from another image for a realistic
3D look. One can print from Deep Paint 2 or the image can
be saved in many formats including jpeg, bitmap, tiff, and
psd. The system requirements are:
Microsoft® Windows™ 98, NT 4.0, 2000, XP, with IE
5.0 or later
Minimum resolution of 800X600 pixels
Graphics card capable of displaying 16-bit color
64MB of RAM
Pentium 200-MMX processor or better
CD-ROM drive for installation
Recommend:
Wacom® Intuos™ or similar pressure sensitive tablet
Graphics card capable of displaying 24-bit color
Pentium III 266 processor or better
The upgrade price is US $49. The new purchase price is US
$199 until April 30th when it will revert to $249. If it is
boxed, a shipping price is added. For more information, go
to Right
Hemisphere's website.
 The
best way I decided to start the review was to compare both
versions of the program. See my review of Deep
Paint 1. This is because I was initially confused as to
the actual improvements in Deep paint 2. It can be said that
version 2 definitely does more and has more options than version
1, but I do not believe the changes are intuitive nor documented
in a descriptive manner. The
best way I decided to start the review was to compare both
versions of the program. See my review of Deep
Paint 1. This is because I was initially confused as to
the actual improvements in Deep paint 2. It can be said that
version 2 definitely does more and has more options than version
1, but I do not believe the changes are intuitive nor documented
in a descriptive manner.
While most of the tools are the same (version 1 did not have
a Spline tool which I will explain later), cloning has been
expanded. In Deep Paint 1, one could clone using cloning brushes
or regular brushes and the cloner tool (the rubber stamp).
Any brush in Deep Paint 1 could be turned into a cloner and
all brushes could be manipulated. The same happens in Deep
Paint 2 when using the Paint tab.
Deep Paint 2 has three tabs. One can work in Clone mode,
Paint mode, or Print mode.

The Paint mode of Deep Paint 2 looks almost
exactly like the one in Deep Paint 1 when the clone tool is
selected from the tool bar. When the brush tool is selected,
in Deep Paint 2, a preview of the brush is shown across the
top of the bar. Brush presets from Deep Paint 1 can be merged
and previews of these will, also, be visible.
| DP 1 Clone Tool |
DP 2 Clone Tool used in Brush Category |
 |
 |
However, many more options have been added to the new version
of Deep Paint 2 with the Cloning Category.
 The
Cloning Category (tab) offers a number of cloning variations
through preset cloners. These cannot be modified themselves
as can brushes, but they can be used in a variety of ways
giving them unlimited settings. The
Cloning Category (tab) offers a number of cloning variations
through preset cloners. These cannot be modified themselves
as can brushes, but they can be used in a variety of ways
giving them unlimited settings.
If one went to the layer menu, accessed through the Paint
Tab, one would see that in this mode there are three layers,
initially. The top layer is an edge layer; the middle is the
one being used; and the bottom is the source. Both the top
and bottom layers can be manipulated by the two sliders under
the picture. The Outline Slider refers to how much of an edge
or outline of the image will appear in the final image. The
Original Slider refers to how opaque the source layer will
appear both while working and in the final image.
The Size Slider manipulates the size of the brush being used
while the Strength Slider modifies the strength of the stoke.
The Abstract Color to Original Image Color Slider only works
with the brush tool as does the Fuzziness Slider. Examples
are pictured below.
| 4 Sample Strokes using the
Brush Tool |
Slider Position |
 |
Full
Abstract Color |
| Full
Original Image Color |
| Fuzziness
0% |
| Fuzziness 100% |
While one can use the Clone Tool under
the Clone Tab, one cannot manipulate to the extent
that one can the Brush Tool.
However, one can go to the Paint Tab
and use the Cloner Tool in the same manner as one did
in Deep Paint 1. For those not familiar with Deep Paint 1,
see the above screen capture that shows these tools in both
versions.
I have spent time in this review describing
these two categories because I found the titles confusing,
but once I understood the differing functions of similar tools,
I saw the strengths of this version of Deep Paint and really
like it.
Before investigating the Print Tab which
is another new addition to Deep Paint, I want to give examples
of some of the Cloner presets (Paint Effects) in the Cloner
Tab as well as the brushes in the Paint Tab.
The following are just a very few examples of
the default settings for brushes and other tools in the Paint
Tab.
The following are a few of the default presets
in the Cloner Tab.
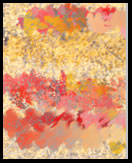
The Print Tab (category) is a new addition
to Deep Paint 2. One of the offerings is borders. This psd
file was just opened in Deep Paint 2 and a border put around
it. It was then saved in its original generic state. Thus,
borders can be used on images other than those worked on in
Deep Paint 2; but they must be printed from Deep Paint 2.
Some of the other options in this tab can be
seen from the below right screen capture. There are a number
of preset borders in Deep Paint 2. As can be seen the thickness
of all these borders can be manipulated. For the borders to
be used, the image must be printed from Deep Paint 2. I did
a trial print and was impressed with the color reproduction.
A series of new tools to Deep Paint 2 are the Spline Tools.
These tools allow the user to create Curves or Splines;
and then edit them and manipulate them. Also, one can have
brush strokes snap-to a spline as well as select other options.
| Pen Tools for Creating Splines |
Spline Selection Tools |
Right Click Options with Snap to Curve
Selected |
 |
 |
 |
I really do like this new version of Deep Paint. I think
both the new purchase price and upgrade are very reasonable
for all the program has to offer. However, I wish the documentation
could have been downloaded separately as well as could have
been presented better.
|