|
BodyPaint 3D is a painting, texturing, and mapping
software program. It is uniquely designed so that painting
can be done on a 3 dimesional object at the same time as it
is done on a UV mesh. See the tutorial I wrote for creating
image maps of Poser
figures. However, this tutorial should also give the new user
basic information for creating image maps.
I believe that it is very important for readers to know the
knowledge base of reviewers. All too often I read a review
that states a particular program is an easy one to learn,
and I find it isn't. This usually happens when an experienced
person in a particular field reviews the program. The reviewer
has the advantage of building upon his experience. But I sometimes
like to write a review from a different perspective. This
review, I believe, will complement the other reviews of which
their are a few.
I am an experienced 2D artist having used Photoshop and similar
programs for many years. While I have dabbled in 3D and do
know Poser fairly well, I do not possess a background in 3D.
But to use 3D programs, one must jump in and learn the language
of 3D. I found that after I had finished my review and written
the first tutorial, the concepts percolated in whatever brain
I have left. I understood a lot more of the program than I
thought I did and began to realize that BodyPaint 3D went
far beyond my review.
I had read some articles and reviews about this program and
decided it was one I wanted to review. I was especially interested
in how it would interact with Curious Lab's Poser and ProCreate's
(Corel's) Bryce 5. I will review it from the aspect of how
it performs as well as how easy it is to learn. I don't really
like to use the term "easy" because it is not a
criterion for judging a product. Basically I will describe
the learning curve and how well the manual helps a newcomer
to understand how to use Body Paint 3D
The minimum requirements are 64 MB of RAM, MacOS 7.6.1, PowerPC;
Windows 95/98/ME, NT 4 SP3/ 2000 and a Pentium. The Windows
version comes with PaintShop Pro 7. The price on the Maxon
web site is $595.
I am reviewing this program using a Pentium III 850 with
well over the minimum requirements for RAM.
The manual has two parts.The first part describes the program
while the second part consists of tutorials. The manual covers
a lot of material. The first part is over 400 pages while
the tutorial section is about 100 pages However, I found that
the tutorial contained in the manual itself in the chapter
entitled BodyPaint 3D Basics was an excellent way to
initially start to learn the program. As I went through sections
of the book, I used this tutorial to familiarize myself with
concepts and terms. Also, it was useful in experimenting with
some of the different tools.
 An
overly simplistic statement of the purpose of BodyPaint 3D
is the creation of texture maps. For those who don't know
or understand texture maps, I will give a brief explanation.
If I took a sculpture of a face without any painting on it,
it would appear to have shadows and highlights but no color
other than the basic color of the clay. If I wanted to paint
it, I would hold the model and apply paint. If I then could
unwrap this layer of paint and spread it out flat, I would
have a very basic texture map with coordinates of U and V.
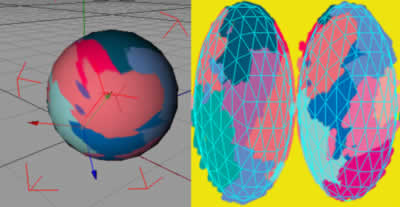
BodyPaint 3D allows for the creation of these maps using using
different texture map projection modes. In flat mode, for
example, the object can be painted and the strokes will appear
on the texture map in real-time or the texture map can be
painted and the strokes will appear on the model in real-time.
Both the model and the texture map can then be saved in various
formats as well as exported. This concept applies to other
modes as well. An
overly simplistic statement of the purpose of BodyPaint 3D
is the creation of texture maps. For those who don't know
or understand texture maps, I will give a brief explanation.
If I took a sculpture of a face without any painting on it,
it would appear to have shadows and highlights but no color
other than the basic color of the clay. If I wanted to paint
it, I would hold the model and apply paint. If I then could
unwrap this layer of paint and spread it out flat, I would
have a very basic texture map with coordinates of U and V.
BodyPaint 3D allows for the creation of these maps using using
different texture map projection modes. In flat mode, for
example, the object can be painted and the strokes will appear
on the texture map in real-time or the texture map can be
painted and the strokes will appear on the model in real-time.
Both the model and the texture map can then be saved in various
formats as well as exported. This concept applies to other
modes as well.
However, BodyPaint 3D also has other built in features. I
am always interested in whether a program has enough import
and export filters to keep it flexible. BodyPaint 3D can import
and export from and to the popular 3D programs and save maps
to all the standard 2D file formats. Body Paint 3D allows
the user to paint in up to ten different material channels
with one brush stroke. This is a part of the RayBrush Technology
which allows for the user to paint in a pre-rendered view
in real-time.
BodyPaint's tools can be customizeable. It is very easy to
change and save the size and feel of a brush. There are many
types of preset brushes - acrylic, oil, pen, chalk as well
as specialty brushes such as welding, rivets. Spacing of strokes
can also be controlled from a coarse or jittery look to a
fine, smooth look. Colors are easy to add and delete from
the default palette. Specific palettes can also be created
and saved. The whole interface is, also, customizeable. Palettes
can be docked and undocked easily. An object can be viewed
from many angles simultaneously.
At first glance, The BodyPaint 3D interface appears different
than other programs, especially if one is 2D oriented; however,
for those people familiar with Photoshop, many similarities
are present. One can work in layers, use different blending
modes, manipulate the brushes, etc. Click on the small image
of the 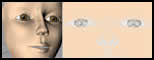 model
and map to see the entire interterface.Also,
there are many selection tools, two fill bucket tools, filters
for image manipulation that work in real-time with control
over their various aspects, etc. model
and map to see the entire interterface.Also,
there are many selection tools, two fill bucket tools, filters
for image manipulation that work in real-time with control
over their various aspects, etc.
UV editing is also a part of Body Paint and this program
comes with a UV editor with "Intelligent Automation."
When I "unwound" the skin from my Poser figure (or
I should say Body Paint did it for me), I did not have to
make any corrections to it. When I placed it on my Poser model
in Poser, it fit like a form fitting glove. However, if it
hadn't, I could have used the magnet tool to modify it.
A feature that I like a lot and could easily be lost in the
shuffle due to there being so many other powerful features
in this program is that one has the ability to work in multiple
layers when creating the map. These layers can then be merged,
if desires, or left as they are and saved as a Photoshop psd
file. When brought into Photoshop, finishing touches can be
made and then the layers merged to form the 3D object's skin.
Before I decided to review the program, I read reviews about
it on the web. Almost all that I saw stated how easy a program
it was to learn. While this is not a fault of the program,
I beg to differ with that opinion. Very possibly for an experienced
creator of 3D material, it is. But for someone who does not
specialize in 3D programs, I believe it is not. However, with
perseverence, these problems can be overcome. With some hard
work, I was able to feel comfortable with the basics of the
program and get the results I desired initially. Like any
other program that has many facets, one must build up one's
knowledge. As I stated in the beginning of this review, I
am reviewing it from the perspective of a user who does not
specialize in the creation of 3D objects. Working creatively
in 3D is an art unto itself.
 While painting the objects was straight forward, learning
how to do it well was not. I Found that many of the tools
appeared to perform the same function when, in reality, they
did not. To an experienced 3D user, this might not be a problem.
But for someone who only wants to accomplish specific tasks,
ie. create maps for Poser figures, for example, this possible
lack of knowledge could lead to confusion. Whichever tool
is chosen, the initial appearance in the perspective window
is the same. Later on, though, the results will be different.
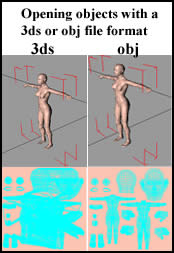
In addition, I found that the format an object is in when
it is opened makes a lot of difference as to how the map will
be formed. For example, if I exported a figure from Poser
in a 3ds (3D Studio max) format and opened it in BodyPaint
3D, the UV mesh would look like the one on the left. If I
opened one as an obj (Wavefront), it would look like the one
on the right. I tried it in both UVW and flat mode and the
resultant look was the same.
While painting the objects was straight forward, learning
how to do it well was not. I Found that many of the tools
appeared to perform the same function when, in reality, they
did not. To an experienced 3D user, this might not be a problem.
But for someone who only wants to accomplish specific tasks,
ie. create maps for Poser figures, for example, this possible
lack of knowledge could lead to confusion. Whichever tool
is chosen, the initial appearance in the perspective window
is the same. Later on, though, the results will be different.
In addition, I found that the format an object is in when
it is opened makes a lot of difference as to how the map will
be formed. For example, if I exported a figure from Poser
in a 3ds (3D Studio max) format and opened it in BodyPaint
3D, the UV mesh would look like the one on the left. If I
opened one as an obj (Wavefront), it would look like the one
on the right. I tried it in both UVW and flat mode and the
resultant look was the same.
While I created my map for the Poser tutorial I was writng
using only the color channel, one can also create bump or
relief maps, for example. However, one can control many other
facets of an image through the Material Editor. Some of these
material variables are, diffusion, luminescence, transparency,
specular color, etc. The strengths of these can also be adjusted.
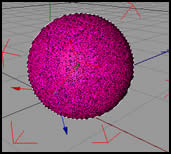
The example underneath is a sphere I created in a 3D program.
It shows how the object will look when using both the bump
and color channel. Notice, in the illustration on the far
right, how bump and color form their own background layers.
|
Finished Sphere
|
Bump Map
|
Layer's Palette
|
 |
 |
 |
For more information on features of BodyPaint 3D, go to the
Maxon web
site. While on the site, look at the parent product Cinema
4 DXL and other Cinema 4 versions.
My analysis of the program is that it is undoubtably powerful
and will create excellent maps. In addition, it has so many
features similar to 2D imaged editing programs, that the user
will feel right at home. However, I believe, that to use this
program easily, one needs to have spent quality time in 3D
programs building models. Even though I have only had a smattering
of knowledge using 3D programs such as Poser and Bryce and
dipping a very little into 3D Studio Max, I was able to create
my first image map and load it into Poser with perfect results.
I know that I have barely scratched the surface, but I was
able to accomplish what I intended. As stated in the beginning,
for those users of Poser or beginners using this program,
I have written a detailed tutorial on creating a new skin
for a Poser 4 nude
figure.
|