Color calibration has been a much discussed and "cussed"
topic for many years now. Sometimes when I read articles on
color calibration that are meant for the "general public
interested in graphics", I cringe because many writers
have a tendency to make the situation more complicated than
it is. Now, I am not saying that in a service bureau environment
or at a graphic arts company, for example, detailed measures
should not be taken to control color. These type of companies
need to match and control color exactly or clients might go
elsewhere even though I have seen some awful color matching
materials leave some companies and the clients not complain.
What I am saying is that home users can control color relatively
simply without resorting to creating profiles for printing
or calibrating their system with expensive software or hardware.
To the uninitiated who do not understand color and how it
works, using some of the aforementioned equipment can lead
to more problems and poorer color coordination than they had
initially. A common mistake is for people to use more than
one color management software program. This only confuses
the system.
When I first wrote my articles on various aspects of color
and color management, color calibration was much more of a
problem to the home user than it is today. See my former two
articles on color - Basic
Color Concepts and Color
Calibration. In this article I will discuss the current
(2001) state of affairs.
I use Adobe Photoshop as my basic program. While I use others,
I normally print from Adobe Photoshop versions 5.5 or 6. With
version 6, I didn't have to make any color modifications at
all. I did not use their gamma loader for I found it unnecessary.
For the work that I do, I find that I do not need to embed
profiles. I turn these aspects off and use a basic generic
profile.
Recently, I installed a new monitor for a friend and also
installed Adobe Elements (a product I recommend highly
for novices and even experienced users who do not need or
want to spend the money on Photoshop). My friend has a Pentium
III with a built in a video card on the motherboard and Windows
ME. The monitor we purchased was a 17 inch NEC. Once I attached
it, the color was very good. I did not have to adjust it at
all. In addition, she purchased an Epson perfection 1640SU
scanner and had an HP ink jet printer already. I am describing
these peripherals because they are not expensive additions
and I had no idea how a scanned image would look both on the
monitor and once printed. All I can say is I was pleasantly
surprised. Now, one can use most products basically "right
out of the box."
In my article, Basic
Color Concepts, I described complementary colors.
For a fuller understanding, refer to that article. The following
movie will demonstrate how these colors work.
When one works using CMYK (Cyan, Magenta, Yellow,
BlacK), the resultant colors are different than those
same colors would be if created using RGB (Red, Green,
Blue). I am not going to describe why. However I will
give an example that I created in Photoshop. When a program
converts a file from one space to another, this fact is taken
into consideration during the software conversion.
To
understand a little of the differences, when one creates a
color using RGB, one can say the color is fully saturated
when R=255, for example. When one creates a color using CMYK,
one speaks in terms of percentages. Red is created when Yellow=100%
and Magenta=100%. The average person should not need to know
or understand this. However, it is useful to know that when
an RGB color is fully saturated, the CMYK equivalent does
not show 100% of both colors that are needed to create it.
Also, the reds are slightly different.
Further if one looks at the illustration on the left, one
can see that if red is created using RGB, the CMYK equivalent
is not what one would expect. And if the color is created
using CMYK, the same is true. Thus, color calibration is complicated.
But, if one is not having to match colors on a daily basis
for perspective clients, one can simplify color management
and not get bogged down in the process.
I will give some simple examples of how to know if your monitor
is showing color in a relatively true manner. I use
the term, relatively, because even if one has identical
systems, a monitor's color will vary slightly. We have two
monitors of the same make that we purchased within a two month
period. Neither of the colors are exactly the same. But, they
were similar enough not to warrant problems and to the native
eye both looked to be a neutral gray. Only when compared was
the difference apparent.
However, the other day, I noticed that my husband's monitor
suddenly had a reddish/magenta-ish cast to it. What happened
could be attributed to the monitor color guns, color management
software, video card, video card software, etc. At present,
all I wanted to do was fix the problem. Since I could correct
it over all through either the monitor color correction menu
or the video color correction menu, I tried both. On this
particular monitor, the monitor correction software was not
particularly easy to control. The changes were too crude and
I could not adjust them finely. So I looked to the video card
color correction software. Below are outlined the steps I
used for my particular video card.
The first step I took was to make my Window's desktop a neutral
gray. This will help show me if my colors are skewed. To do
this:
Right click on the desk top
Select properties
Choose appearances from the menu
Choose desktop from the left menu
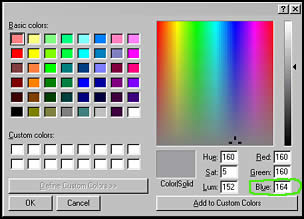
Choose one of the gray swatches on the right. Note that
when the RGB values appear, they are not exactly a uniform
neutral gray, being R=160, G=160, and B=164. You can leave
those values or make all uniform.
Keep the color Scheme empty or, if appropriate,
select none. See the box circled in red.
Once your monitor's desktop is set to a (supposedly) neutral
gray using the steps outlined above, then it is time to
color correct it if there appears to be s problem. It is
not always easy to know how to judge a neutral gray particularly
since ambient or room lighting will affect the screen's
color. But normally, the effect will not be a lot. The best
way is to have an external neutral gray. This is not too
hard to get. Some graphic programs and scanners come with
calibration cards. These cards show various swatches as
well as grayscale steps (black to white). A middle gray
swatch is the one to be used as a point of reference for
neutrality only. One is not trying to match it in terms
of lightness or darkness. Also, an 18% gray card can be
purchased at a Camera Store. Whatever you have that you
know is a neutral gray, hold it near to the monitor in the
same path as the ambient light. The color cannot be exact
since monitor light and the light reflected from the card
are different, but one only wants to make sure the tone
of the gray on the monitor is neutral. One is not trying
to get a match.
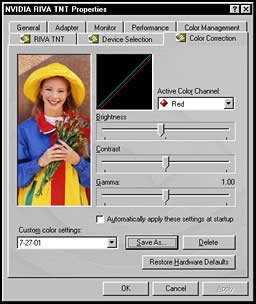
Normally, with modern monitors and video cards, the gray
will look satisfactory. If it does not, there are still
two easy avenues to pursue. Most new monitors and video
cards come with the ability to change the color balance.
Below is an example from a Diamond Viper 770 card. I accessed
it through right clicking on the desktop to bring up a menu.
Then clicking on properties/settings/advanced/color correction.
Often using any of the color correction screens
take a lot of trial and error even if one is aware of what
all the labels mean. But, normally one can restore to the
hardware defaults. If there is not a restore button, write
down any settings beforehand so they can be used as a point
of reference.
 To
understand a little of the differences, when one creates a
color using RGB, one can say the color is fully saturated
when R=255, for example. When one creates a color using CMYK,
one speaks in terms of percentages. Red is created when Yellow=100%
and Magenta=100%. The average person should not need to know
or understand this. However, it is useful to know that when
an RGB color is fully saturated, the CMYK equivalent does
not show 100% of both colors that are needed to create it.
Also, the reds are slightly different.
To
understand a little of the differences, when one creates a
color using RGB, one can say the color is fully saturated
when R=255, for example. When one creates a color using CMYK,
one speaks in terms of percentages. Red is created when Yellow=100%
and Magenta=100%. The average person should not need to know
or understand this. However, it is useful to know that when
an RGB color is fully saturated, the CMYK equivalent does
not show 100% of both colors that are needed to create it.
Also, the reds are slightly different.